



Google Flow is Google's AI video studio. You describe a scene in plain words, and Flow turns it into short video clips with sound, music and dialogue, then lets you join the clips into a finished video.
It's easy to start and just as easy to waste credits on clips you can't use. So instead of a feature tour, this tutorial follows one real project from a blank page to a finished video: a 20-second ad for a candle brand, made with Flow's AI agent.
You'll see what I typed, what came back, what went wrong and what each step cost. The whole ad used 232 credits.
In this tutorial, you will learn:
- What Is Google Flow?
- Is Google Flow Free? Plans and Credits
- How to Use Google Flow: Step-by-Step
- Which Google Flow Model Should You Use?
- More Things You Can Do in Google Flow
- Google Flow Prompt Tips
- Common Beginner Mistakes (and How to Fix Them)
What Is Google Flow?
Google Flow is an AI filmmaking tool from Google. It runs in the browser at flow.google.com and in a mobile app for Android and iPhone.
The point of Flow is to make video without a camera, actors or editing software. You can use it to:
- Generate video clips from a text prompt, with sound effects, music and spoken dialogue
- Generate and edit images, then turn them into video
- Brief an AI agent that plans the shots and writes a storyboard for you
- Save characters with their own voice and reuse them in new scenes
- Edit a clip by describing the change, or edit a video you upload
- Trim and arrange clips on a timeline and download the result
Flow doesn't have its own model. It's the studio where Google's video and image models work together: Gemini Omni Flash and the Veo 3.1 family for video, and Nano Banana for images.

To use it, you need a Google account, you must be 18 or older, and you must live in one of the 152 countries where Flow is available. It works best in Chrome on a computer.
Is Google Flow Free? Plans and Credits
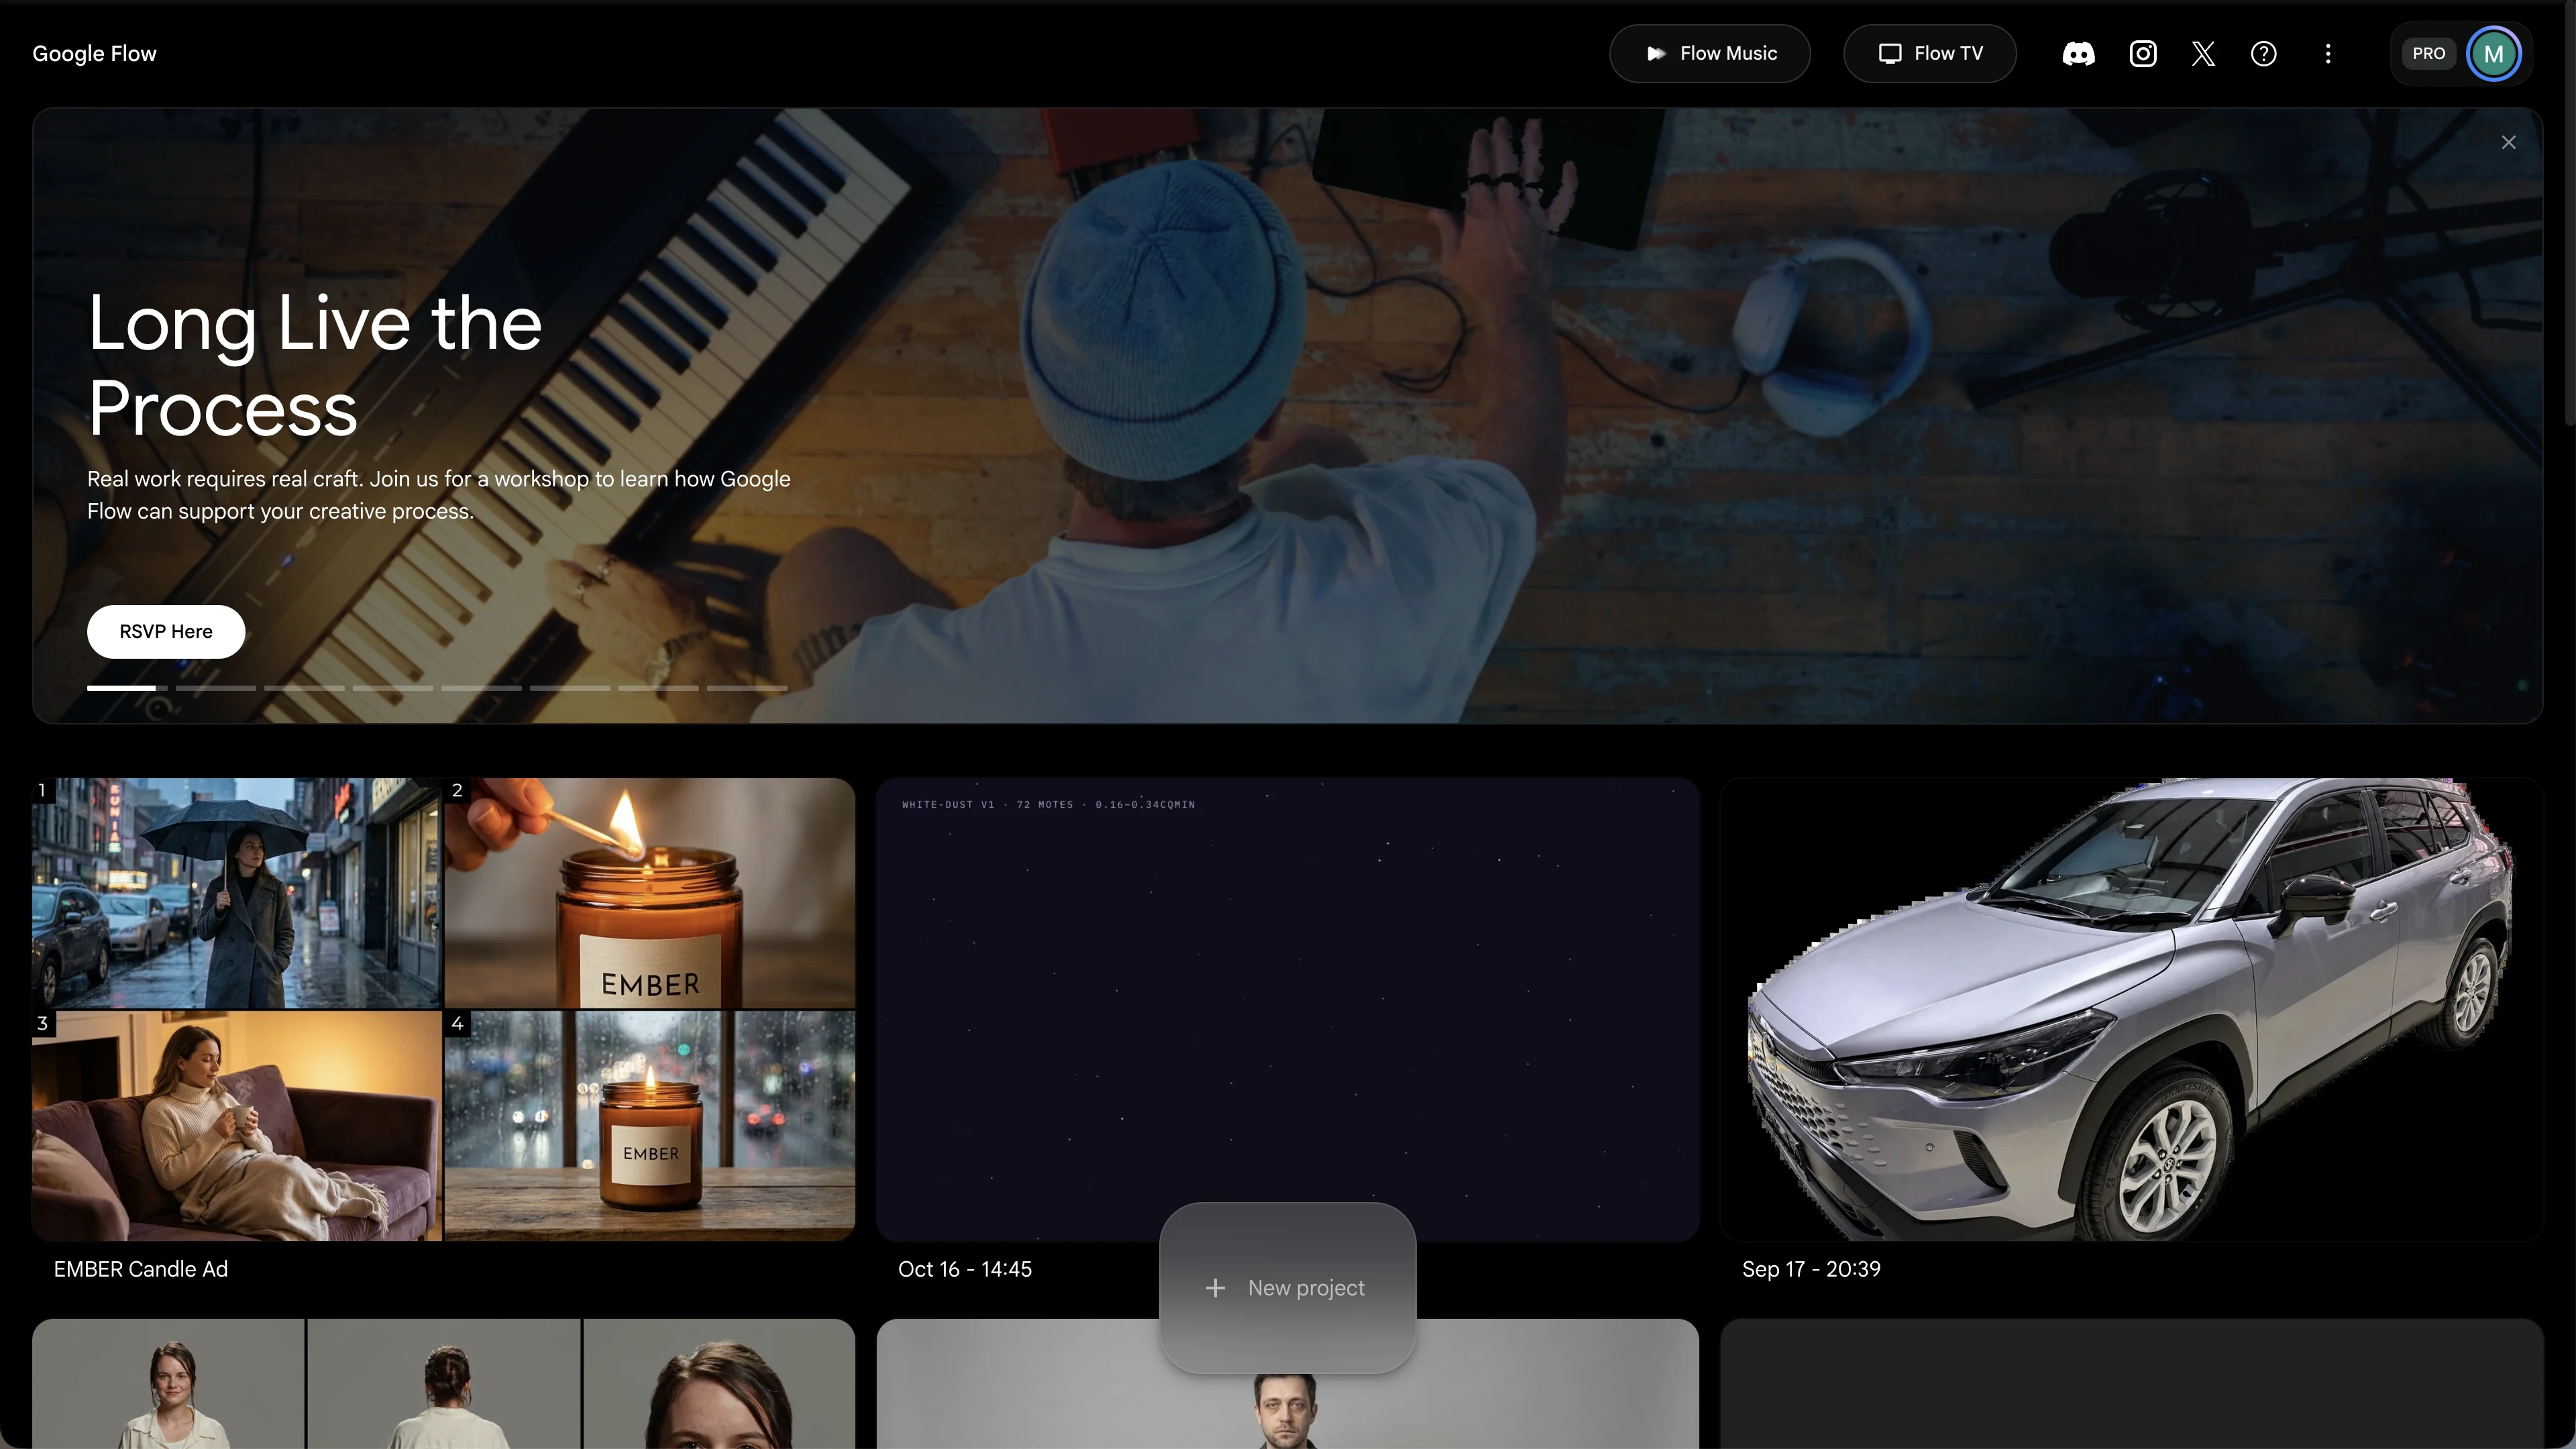
Yes, you can use Google Flow for free. Everyone gets 50 free credits a day, with or without a subscription. Every image and video you generate costs credits, and the cost depends on the model and the length of the clip.
Here's how the free credits work, according to Google's Flow help page on credits:
- Unused daily credits don't roll over to the next day.
- The daily count restarts with your first generation of the day.
- At busy times (roughly 2 PM to 5 PM UTC), people without a subscription may not be able to generate videos. Images and the agent still work.
If you need more, a Google AI subscription adds monthly credits on top of the daily 50:
| Plan | US price | Flow credits | Good for |
|---|---|---|---|
| Free | $0 | 50 a day | Learning Flow and testing a few clips |
| Google AI Plus | $4.99 a month | 200 a month + 50 a day | Occasional short videos |
| Google AI Pro | $19.99 a month | 1,000 a month + 50 a day | Regular use, such as a few short ads a month |
| Google AI Ultra | $99.99 or $199.99 a month | 10,000 or 25,000 a month + 50 a day | Heavy use, 4K downloads, cheaper Veo clips |
Monthly credits don't roll over either. Prices can change, so check Google's subscriptions page before you buy.
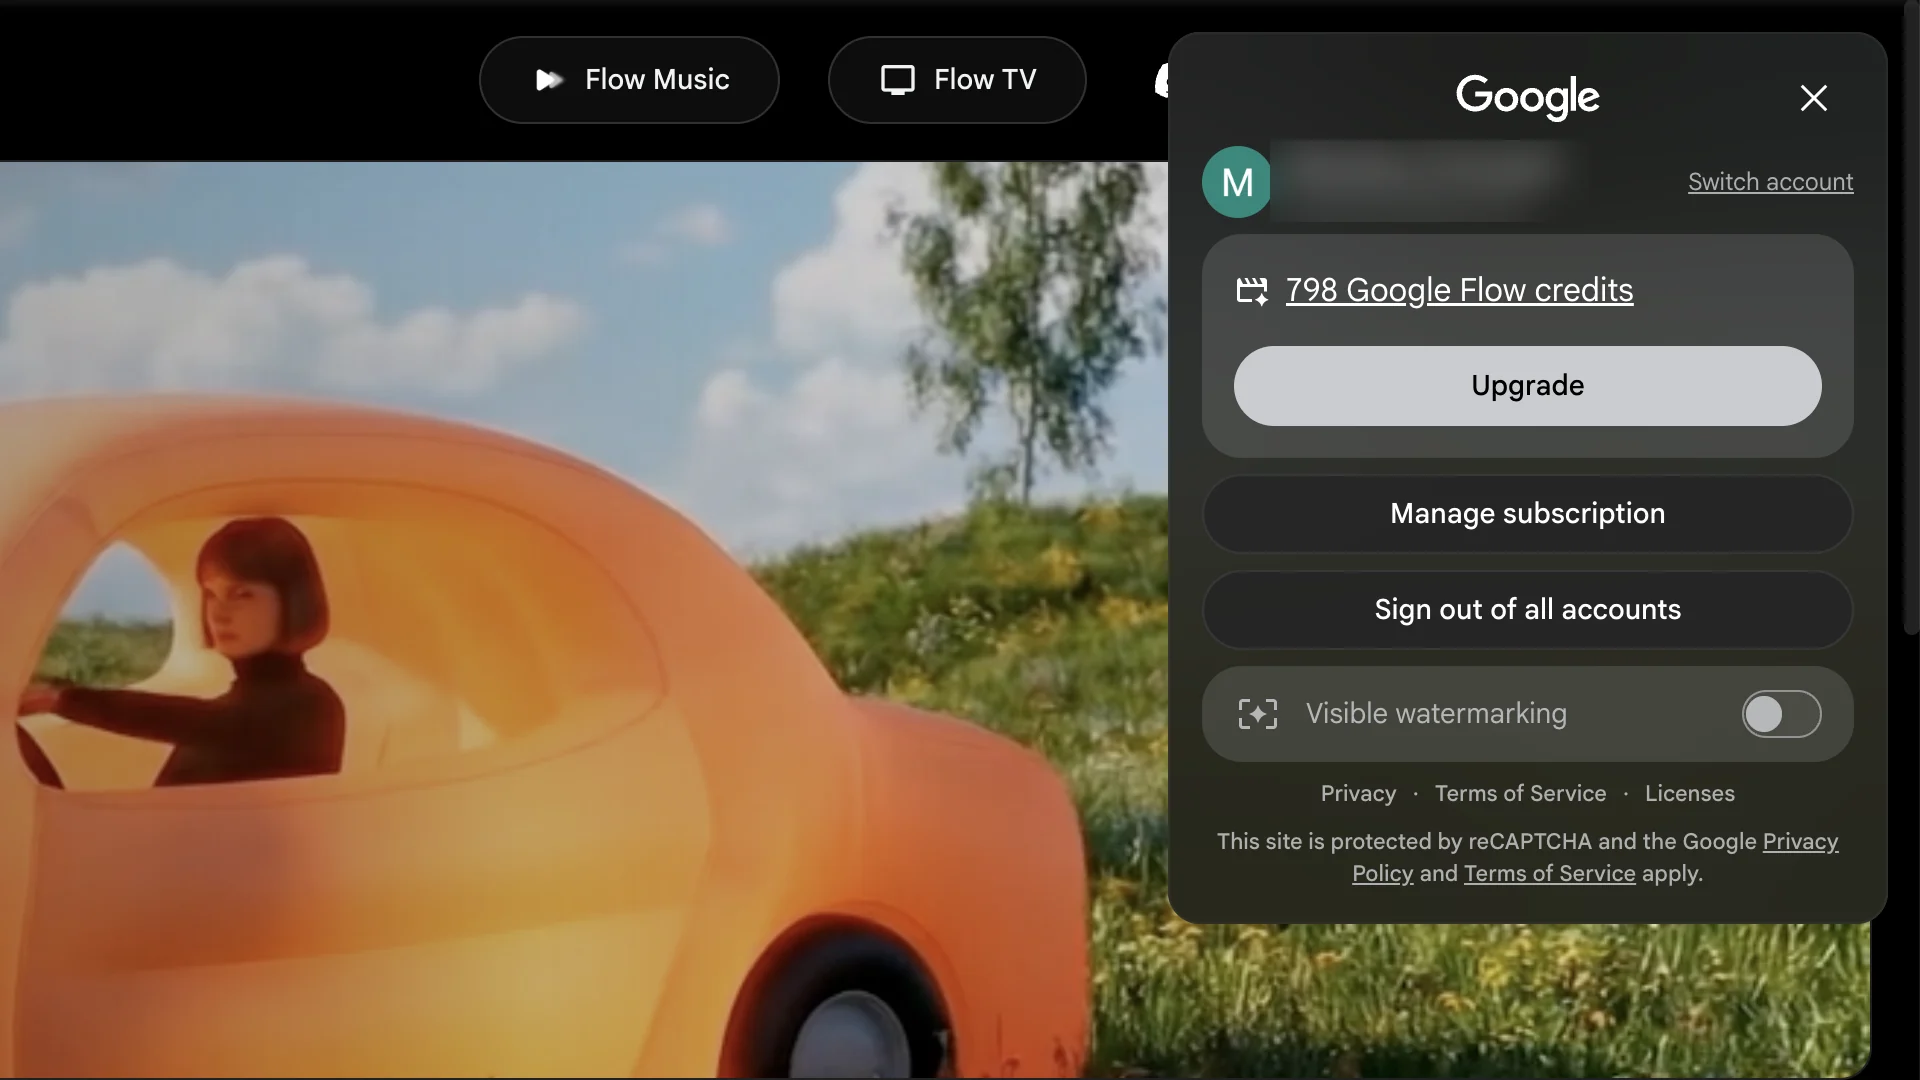
You can see your balance at any time by clicking your profile picture. The same menu has the Visible watermarking switch.
What Each Generation Costs
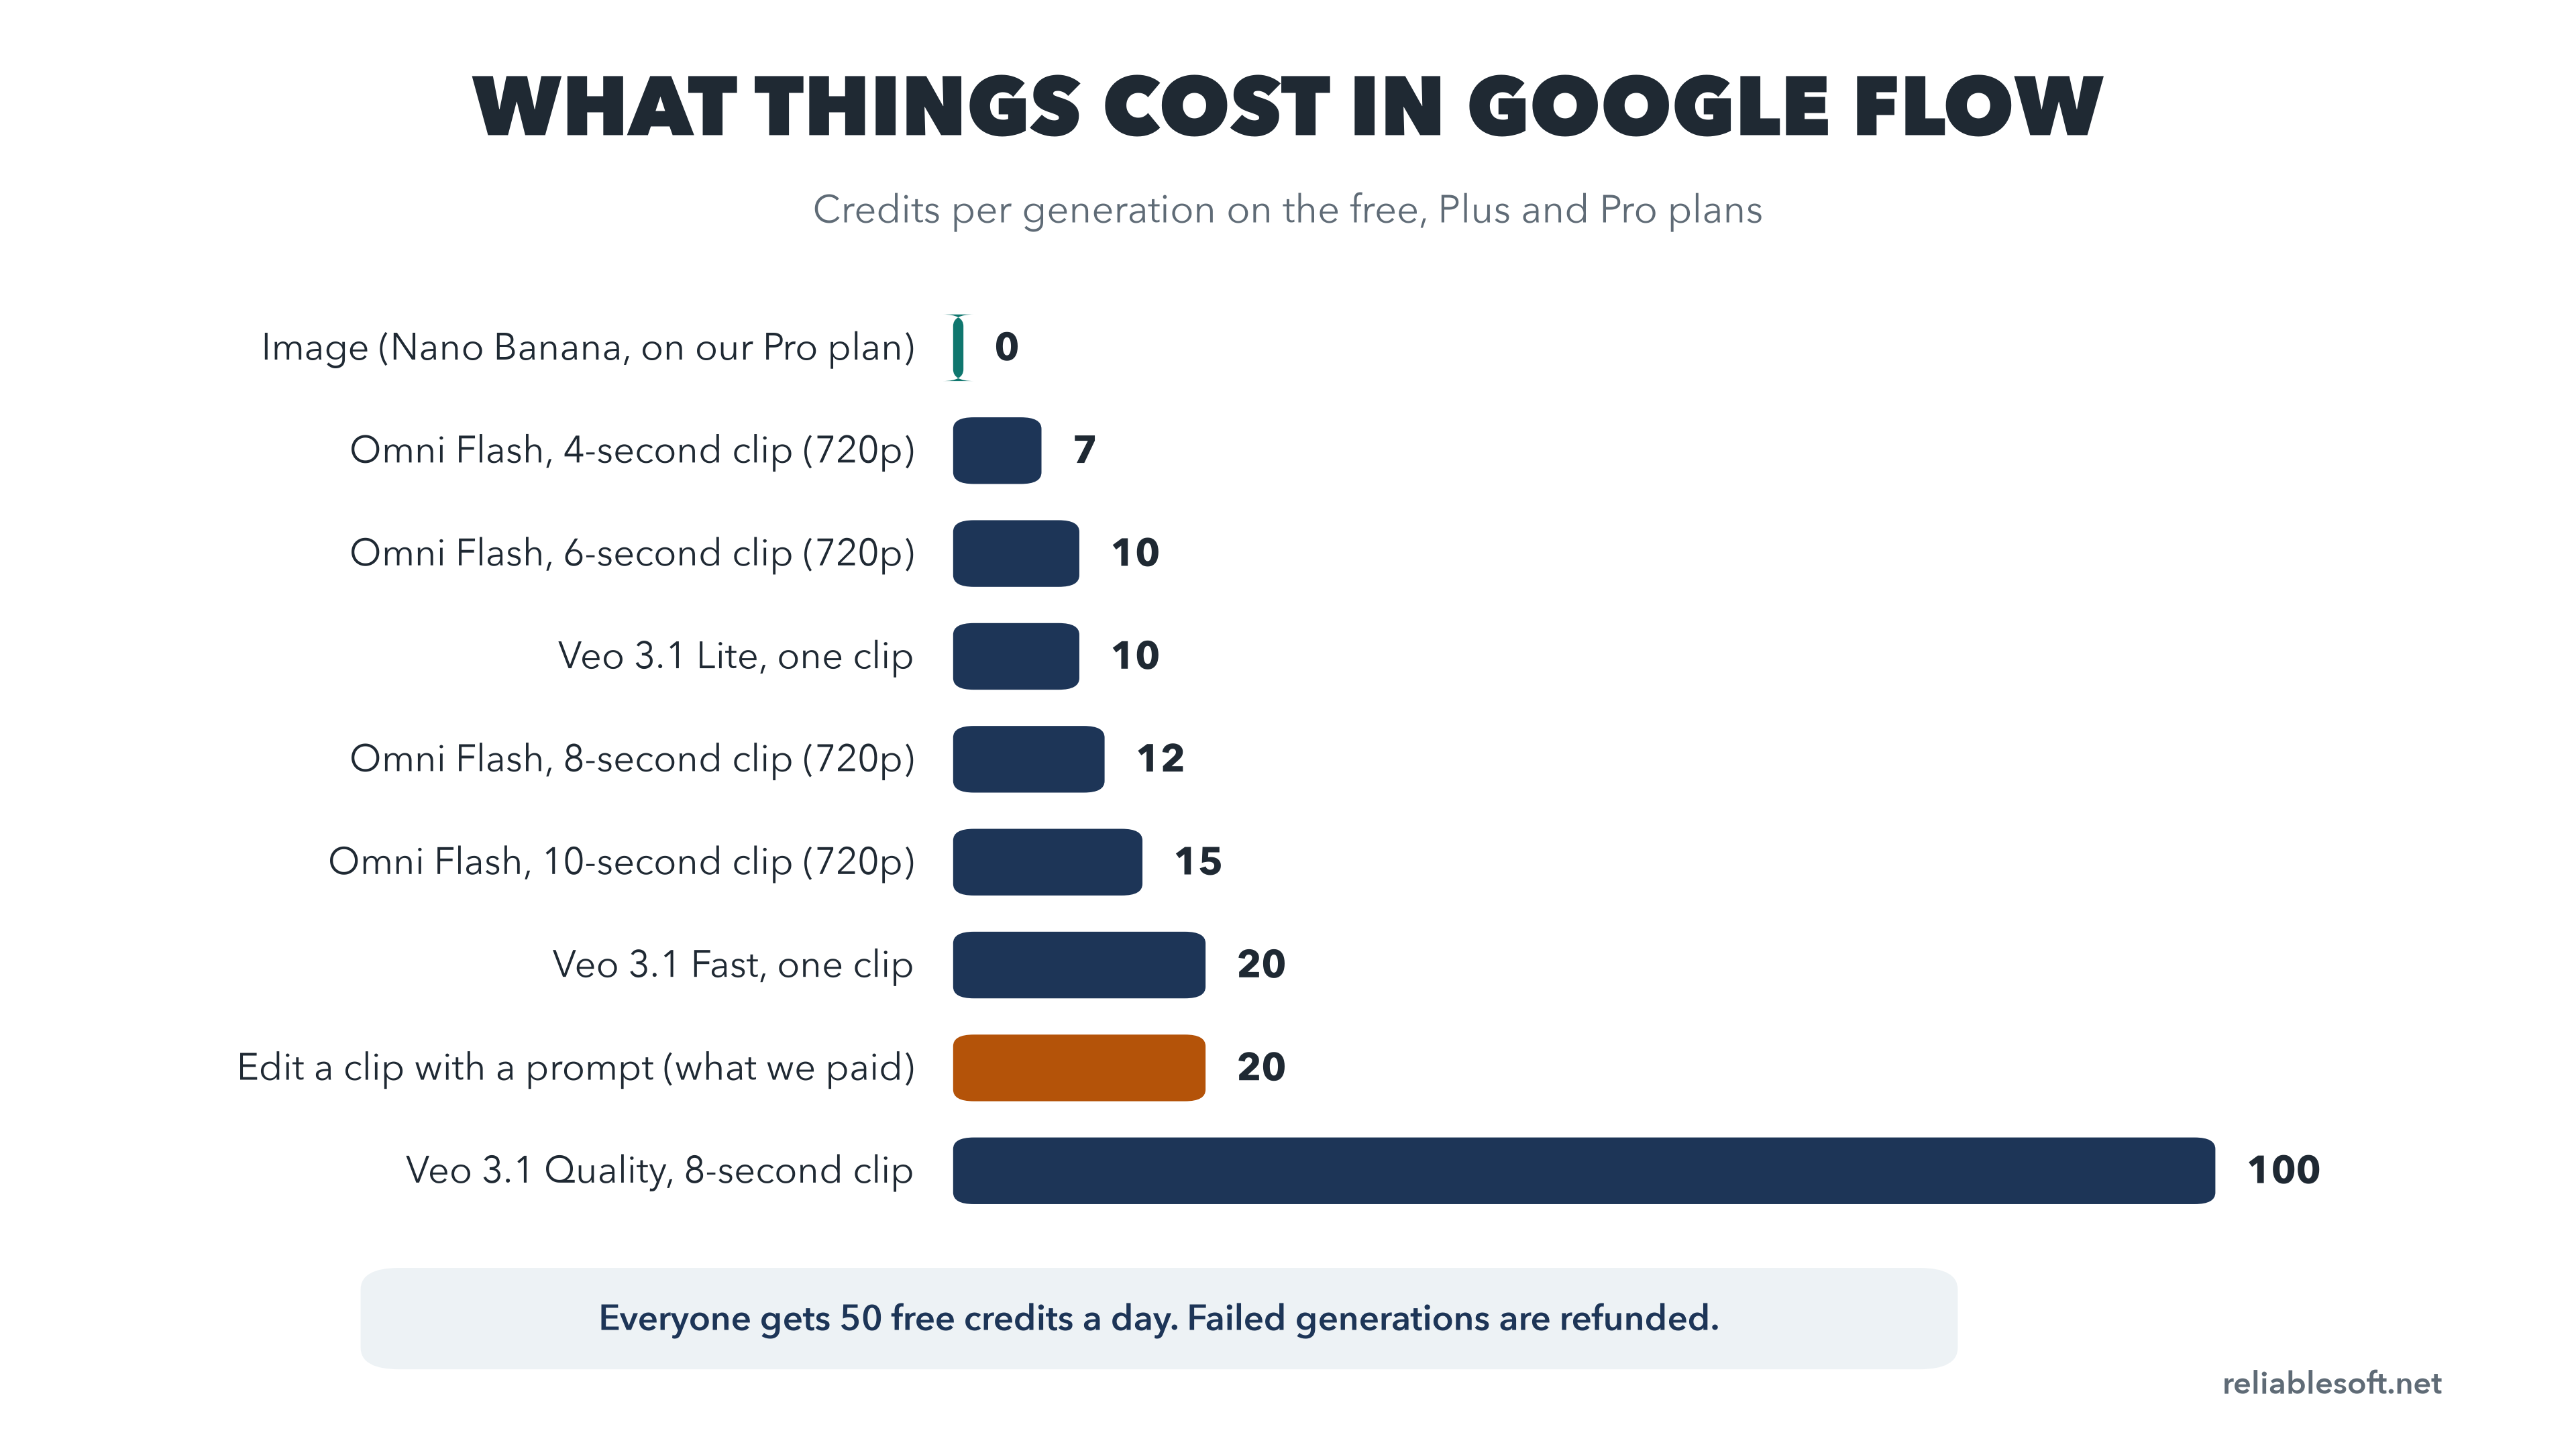
This is what each model costs per clip on the free, Plus and Pro plans:
A few things cost nothing:
- Talking to the agent. Planning, questions and text storyboards are free (there is a daily limit).
- Images. On our Pro plan, Nano Banana images showed a cost of 0 credits.
- Failed generations. If a clip fails, Flow refunds the credits.
- 1080p downloads on a paid plan. 4K is for Ultra only and costs 50 credits.
What do 50 free credits buy? Five 6-second clips with Gemini Omni Flash at 720p, or two clips with Veo 3.1 Fast and one with Veo 3.1 Lite. A single Veo 3.1 Quality clip (100 credits) costs more than one day of free credits.
Which plan should a beginner choose? Start with the free credits and learn the workflow first. If you plan to make videos every week, Google AI Pro gives you 1,000 credits a month, enough for several projects like the one in this tutorial.
How to Use Google Flow: Step-by-Step
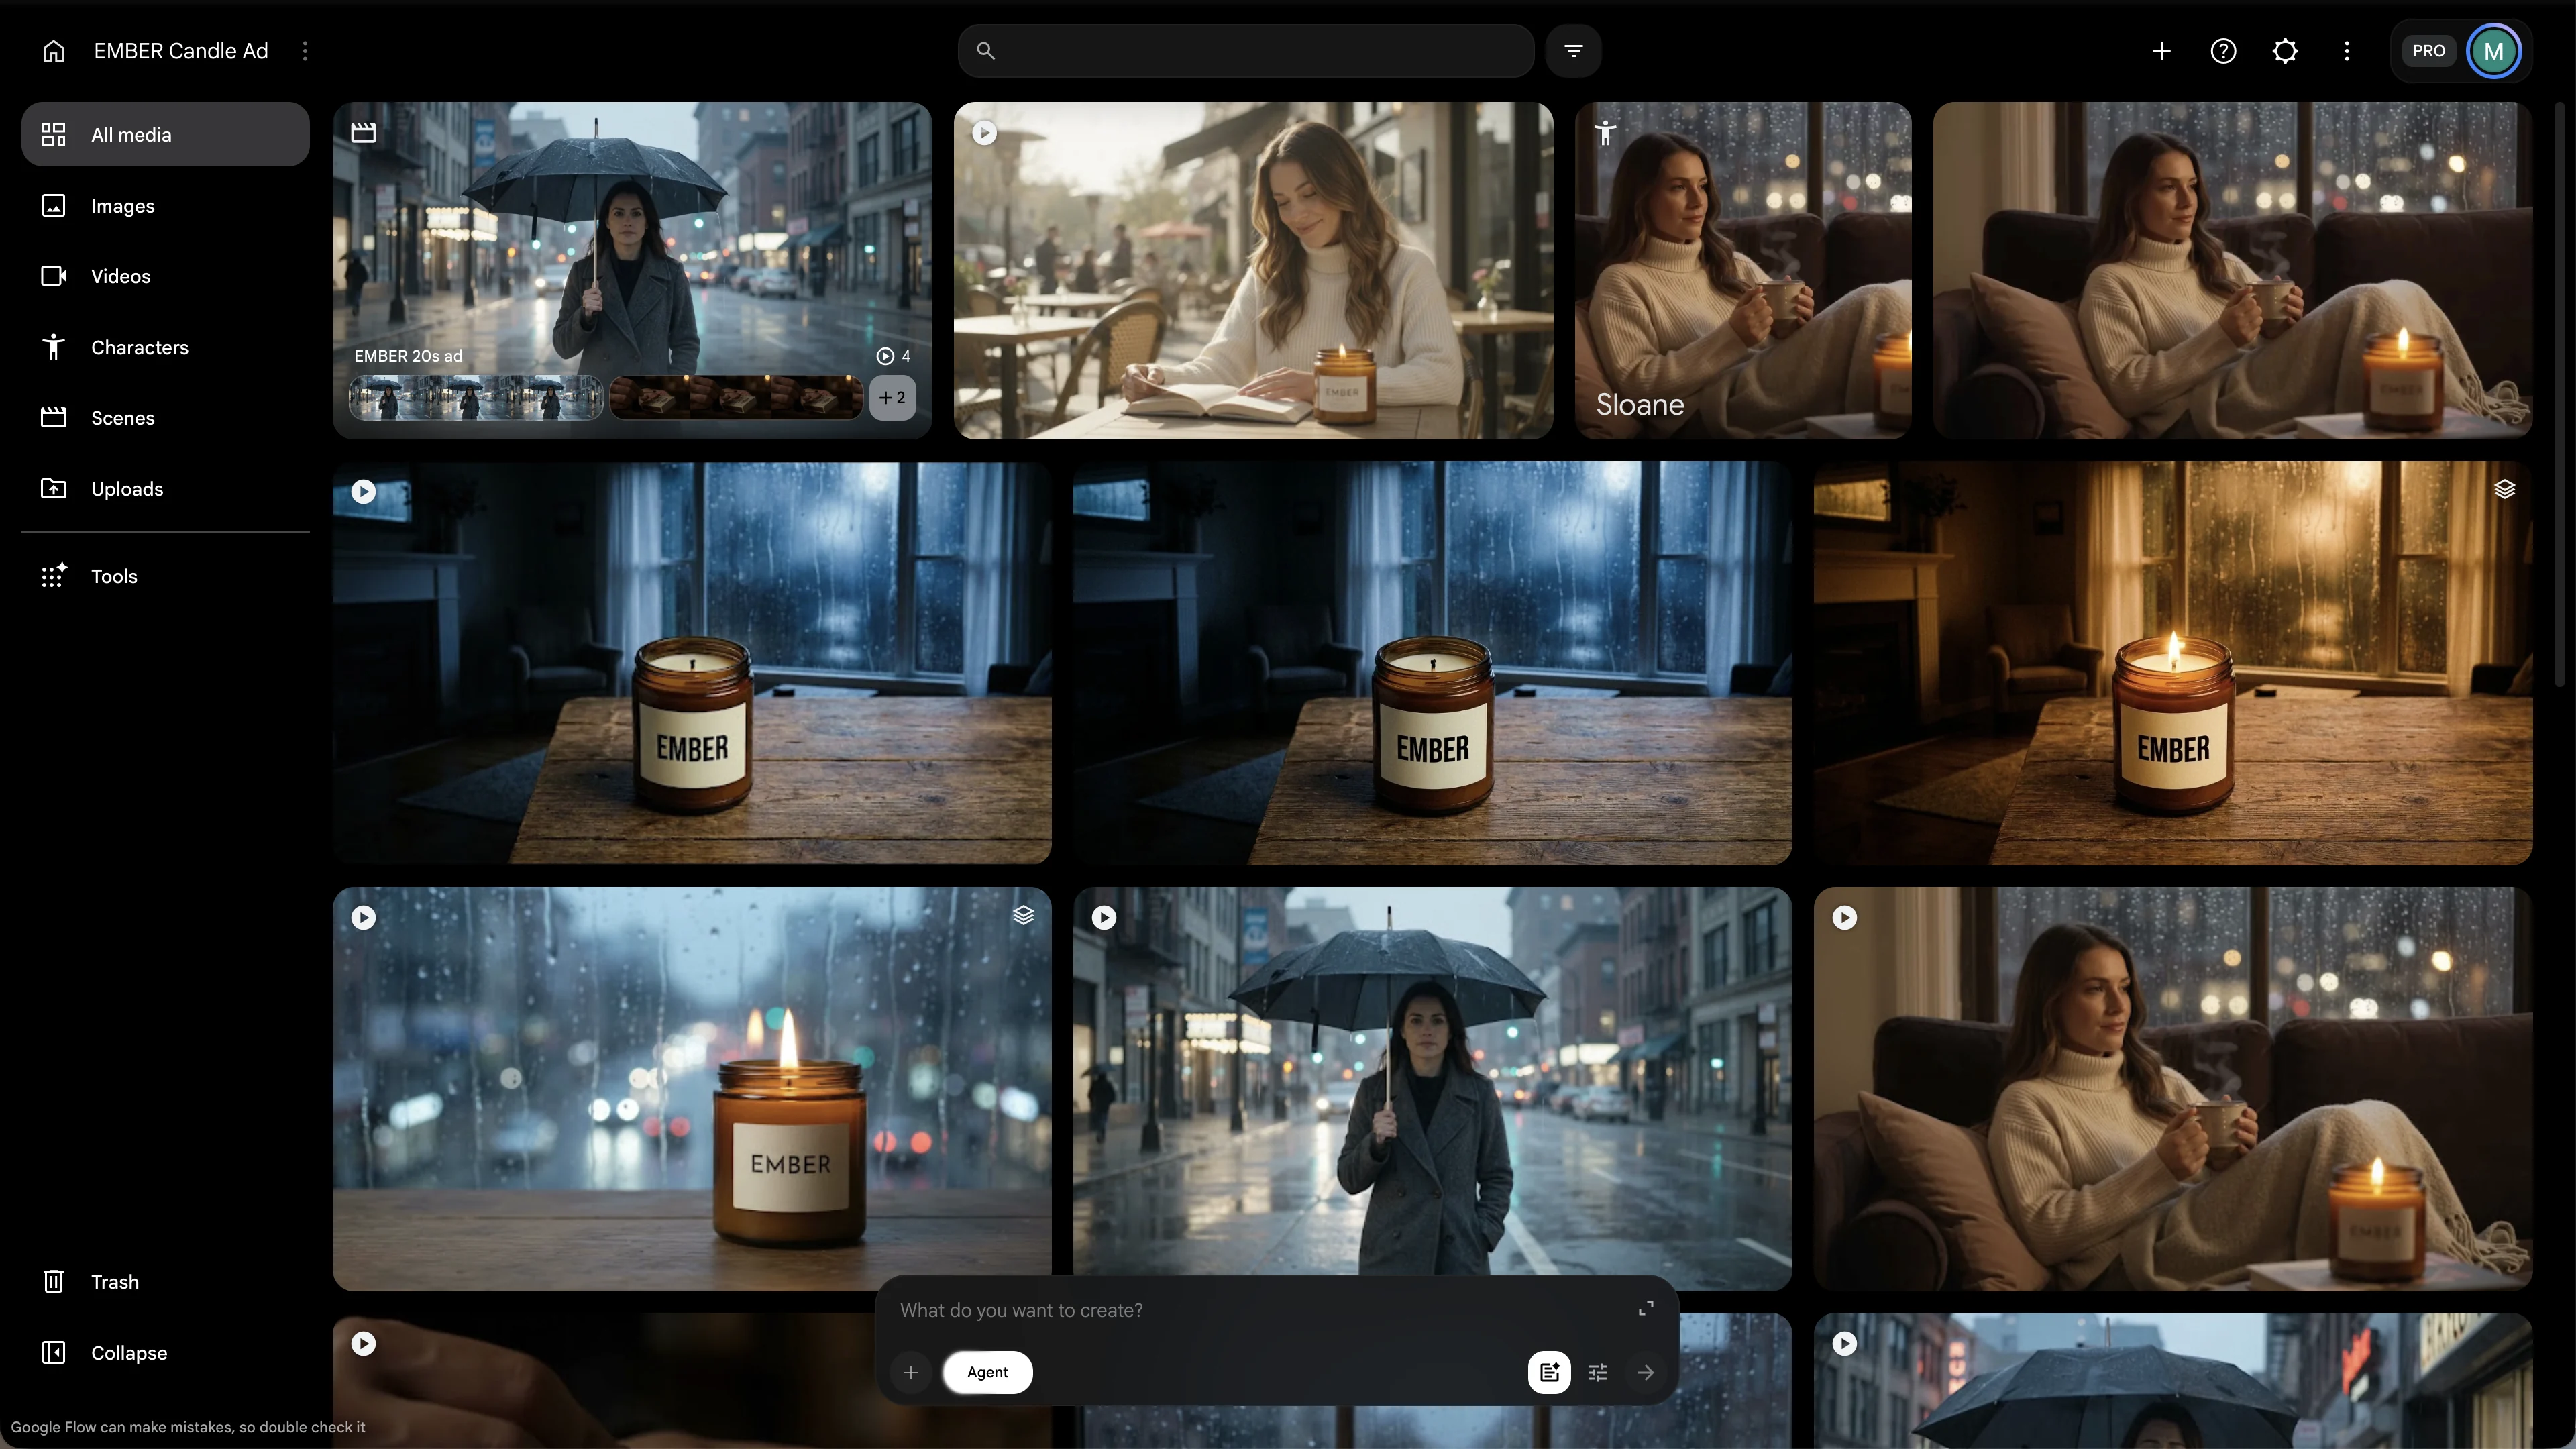
To show how Flow works in practice, I made a 20-second video ad for EMBER, a made-up brand of soy candles. The story: on a rainy evening, a woman gets home, lights an EMBER candle and finally relaxes.
Here are the steps, in the order that wastes the fewest credits.
Step 1: Sign In and Create a Project
Go to flow.google.com, click Create with Google Flow and sign in with your Google account.
On the home page, click New project. Flow names it with the date and time, so click the name at the top left and give it a real name. I called mine "EMBER Candle Ad".
Everything you make in this project (images, clips, characters and scenes) stays inside it.
Step 2: Get to Know the Workspace
A project has three main areas:
- The left menu: All media, Images, Videos, Characters, Scenes, Uploads and Tools. The Images, Videos and Uploads sections appear once you have something in them.
- The grid in the middle: everything you've generated, newest first.
- The prompt box at the bottom: "What do you want to create?"
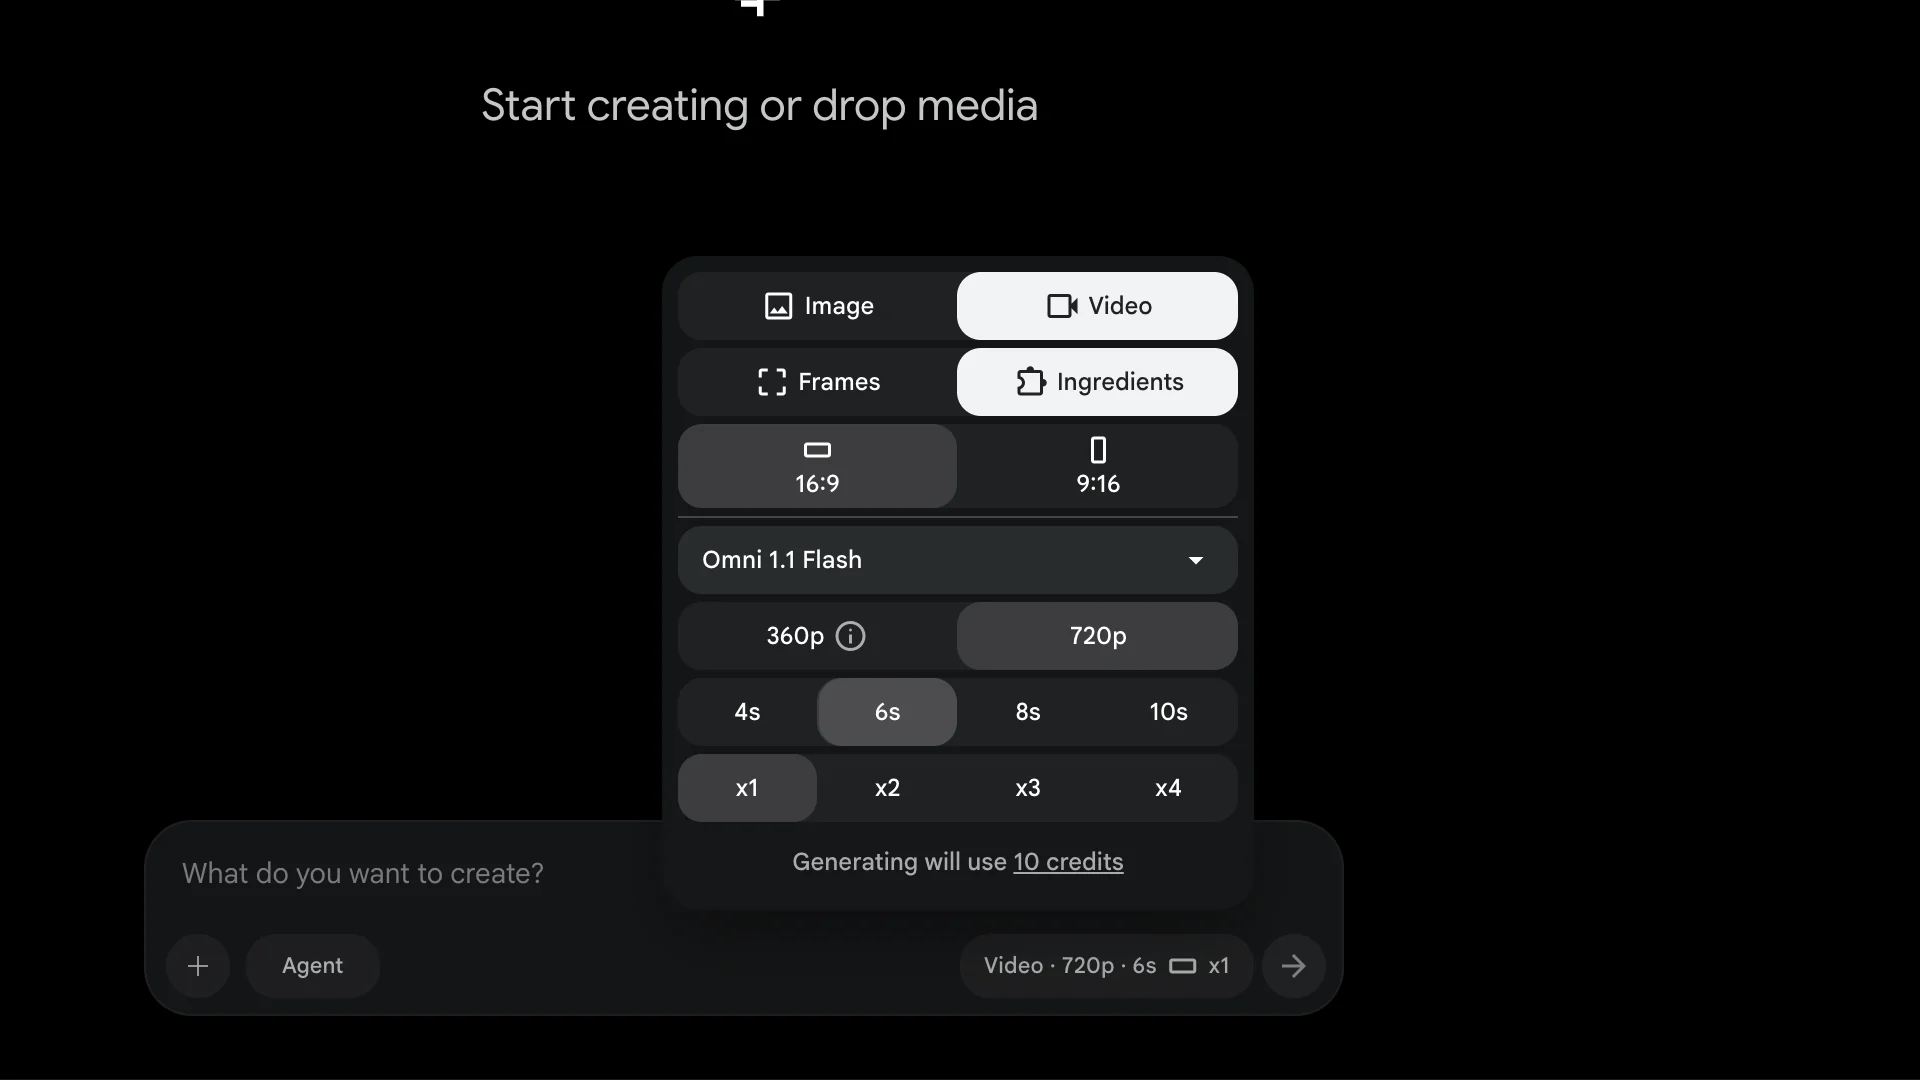
The button on the right side of the prompt box opens the generation settings. This is where you choose:
- Image or Video
- Frames or Ingredients (for video): Frames uses a start and end image, Ingredients uses reference images, characters or clips
- Aspect ratio: 16:9 (landscape) or 9:16 (vertical for Shorts, Reels and TikTok)
- Model, resolution and length
- Outputs: how many versions to make, from x1 to x4
At the bottom, Flow shows the cost before you generate, for example "Generating will use 10 credits". Check this line every time. Four outputs cost four times as much.
Step 3: Turn On the Agent and Set Your Rules
You can use Flow in two ways:
- Manual mode: you write each prompt and generate one image or clip at a time.
- Agent mode: you describe what you want, and Flow's AI agent asks questions, plans the shots, writes a storyboard and generates the clips for you.
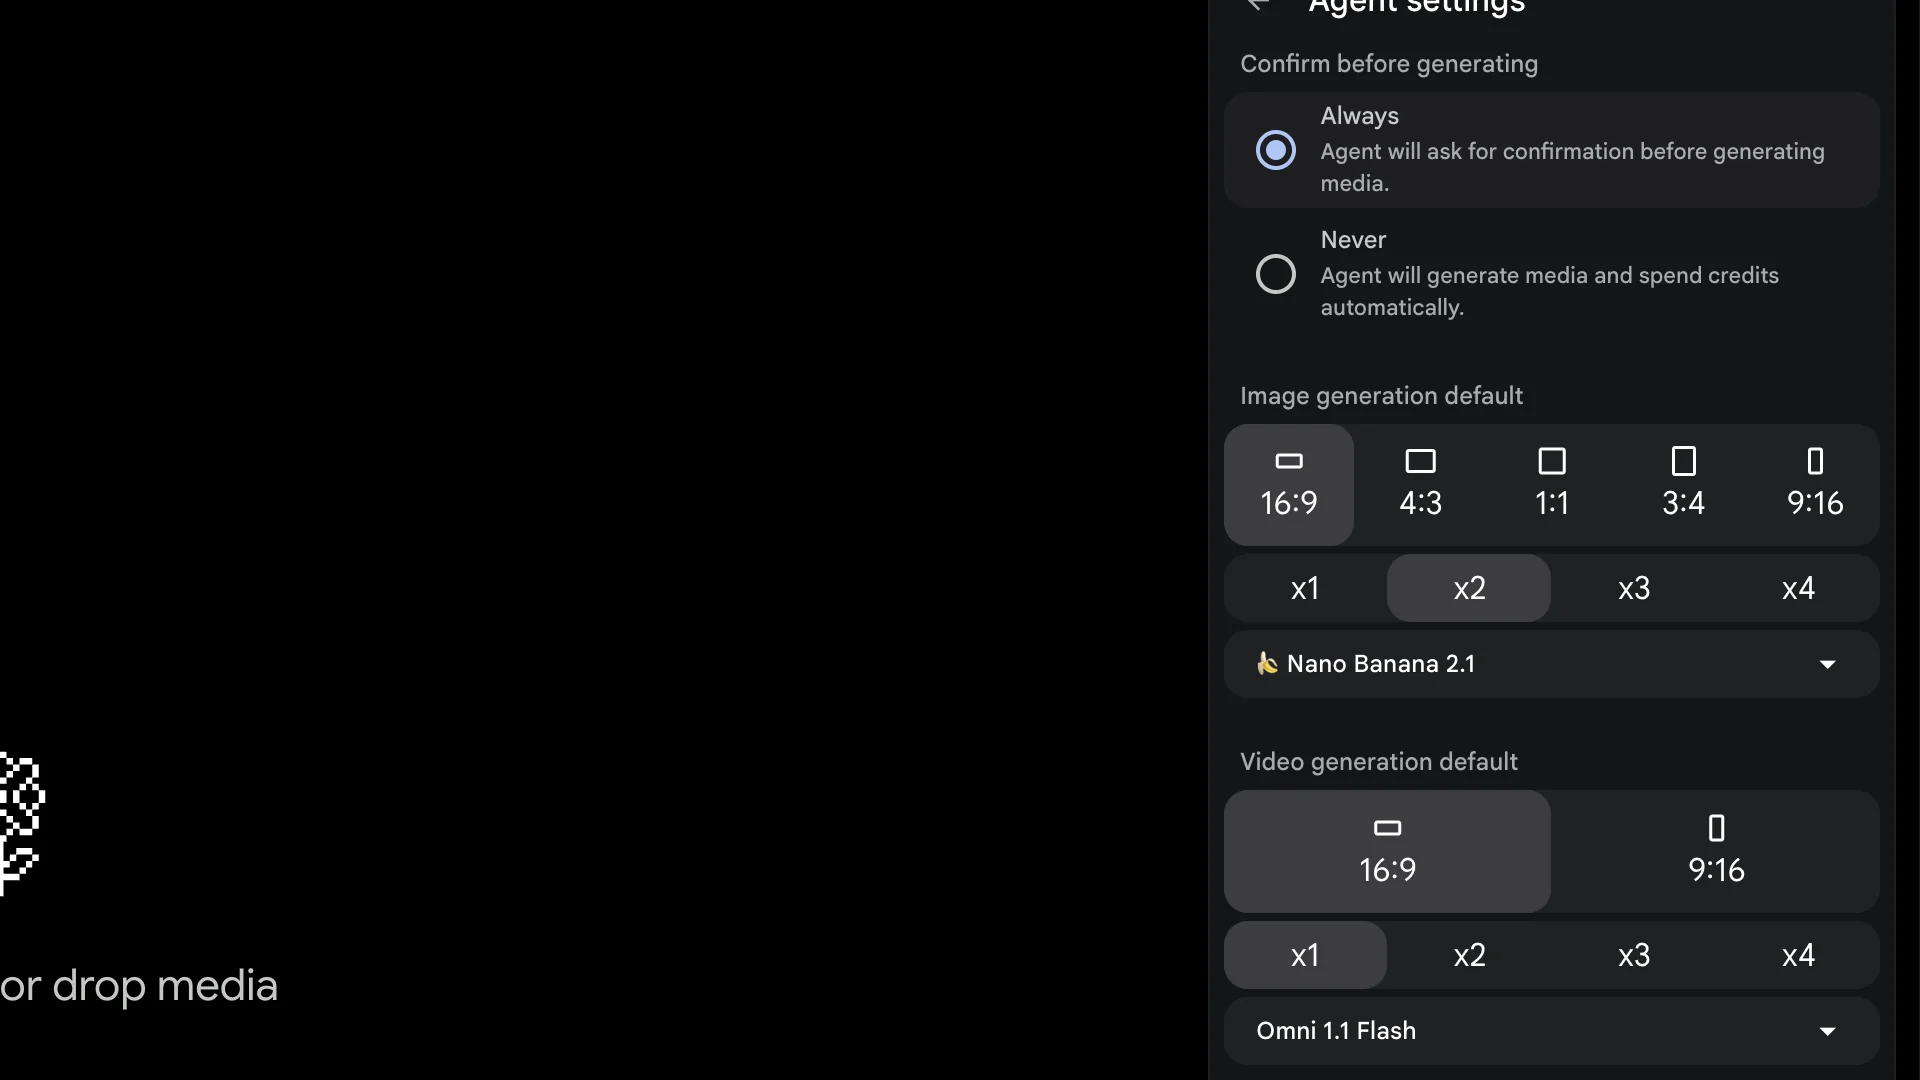
For a first project, the agent is the easier way. Click Agent in the prompt box to turn it on. Two new icons appear next to it.
The first is Agent settings. Keep "Confirm before generating" on Always, so the agent asks before it spends credits. Here you can also pick the default image and video models. I changed the image model to Nano Banana Pro.
The second is Agent instructions. These are rules the agent follows in every request, like a brand guide. I added one called "EMBER brand rules": what the product looks like, the label text, the mood, the style, and no captions or voiceover unless I ask.
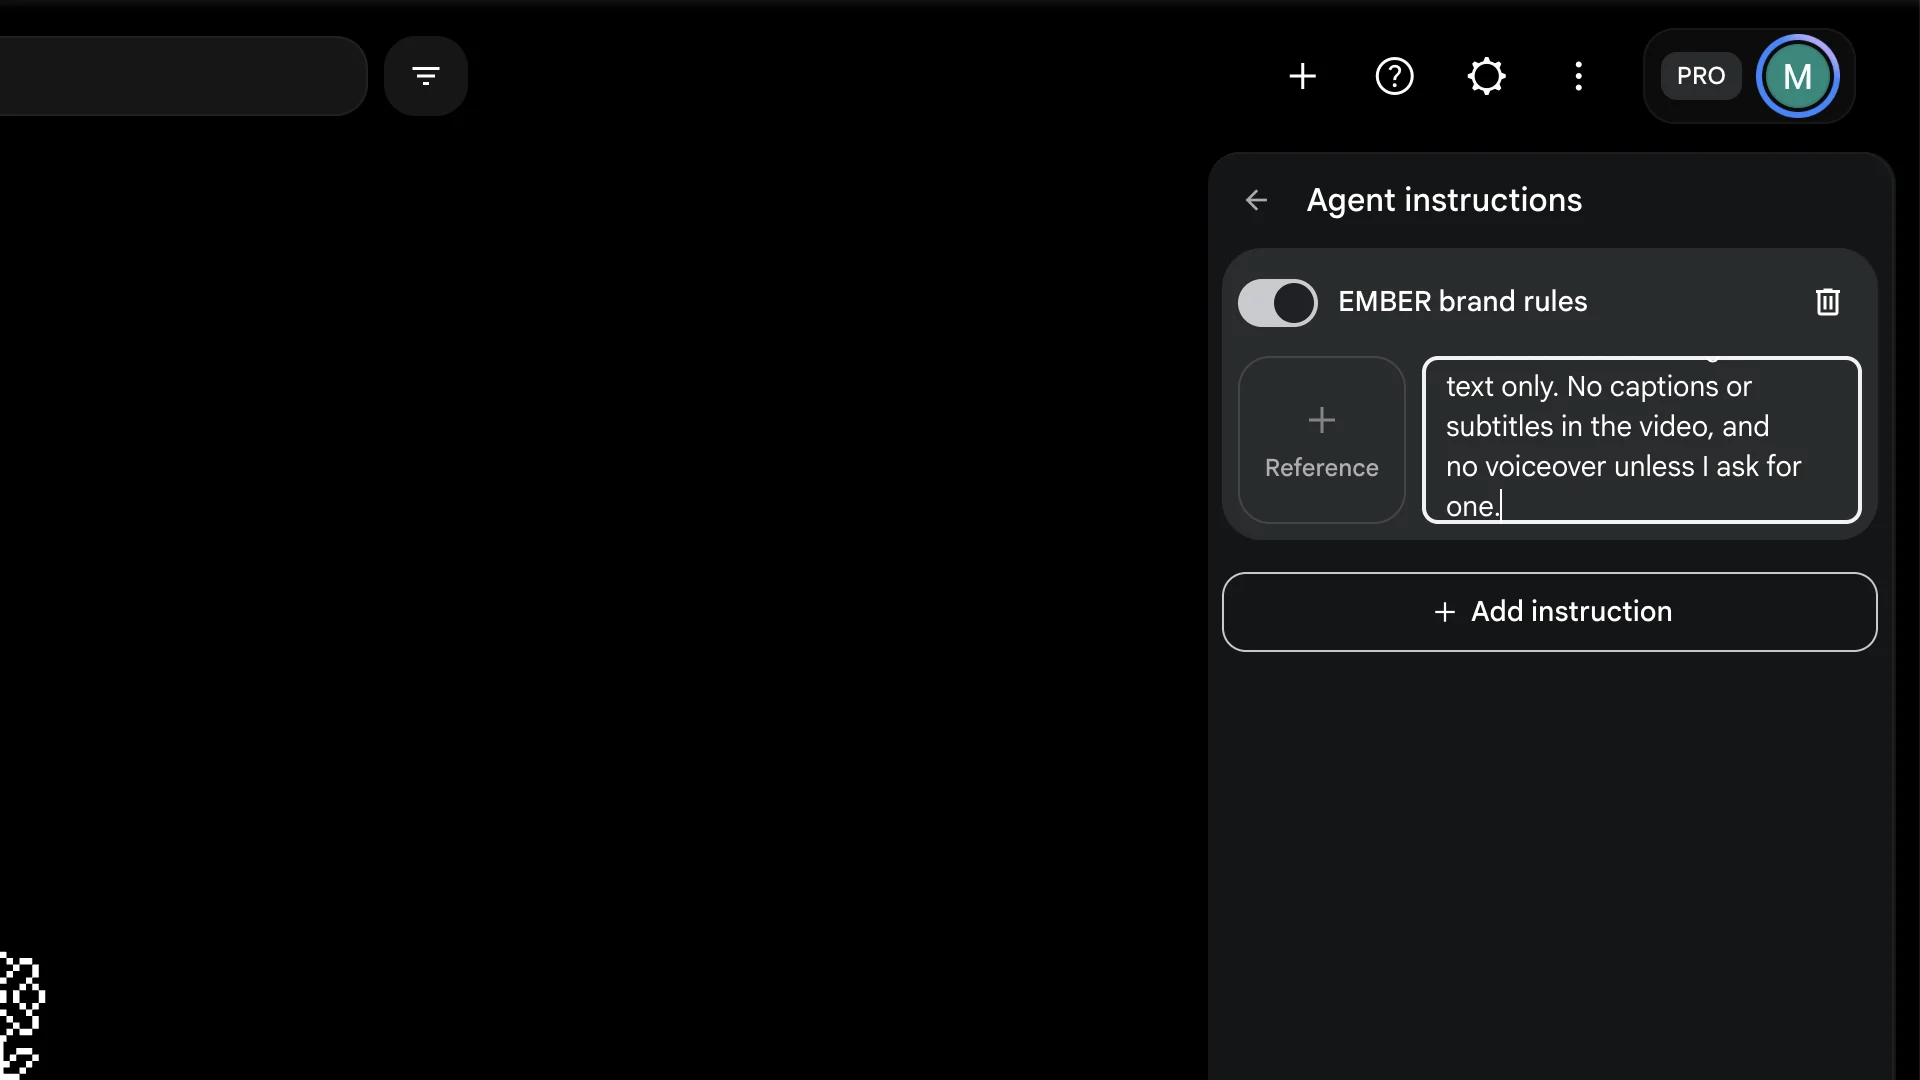
One catch: agent instructions only apply when the agent is on. In manual mode, Flow ignores them (you'll see what that means in step 8).
Step 4: Brief the Agent and Check the Storyboard
Write the brief the way you'd brief a film crew. Include:
- What you're making and how long it is (a 20-second ad)
- The product or subject
- The story in one or two sentences
- The shots you want, numbered
- The sound, and any spoken lines in quotes
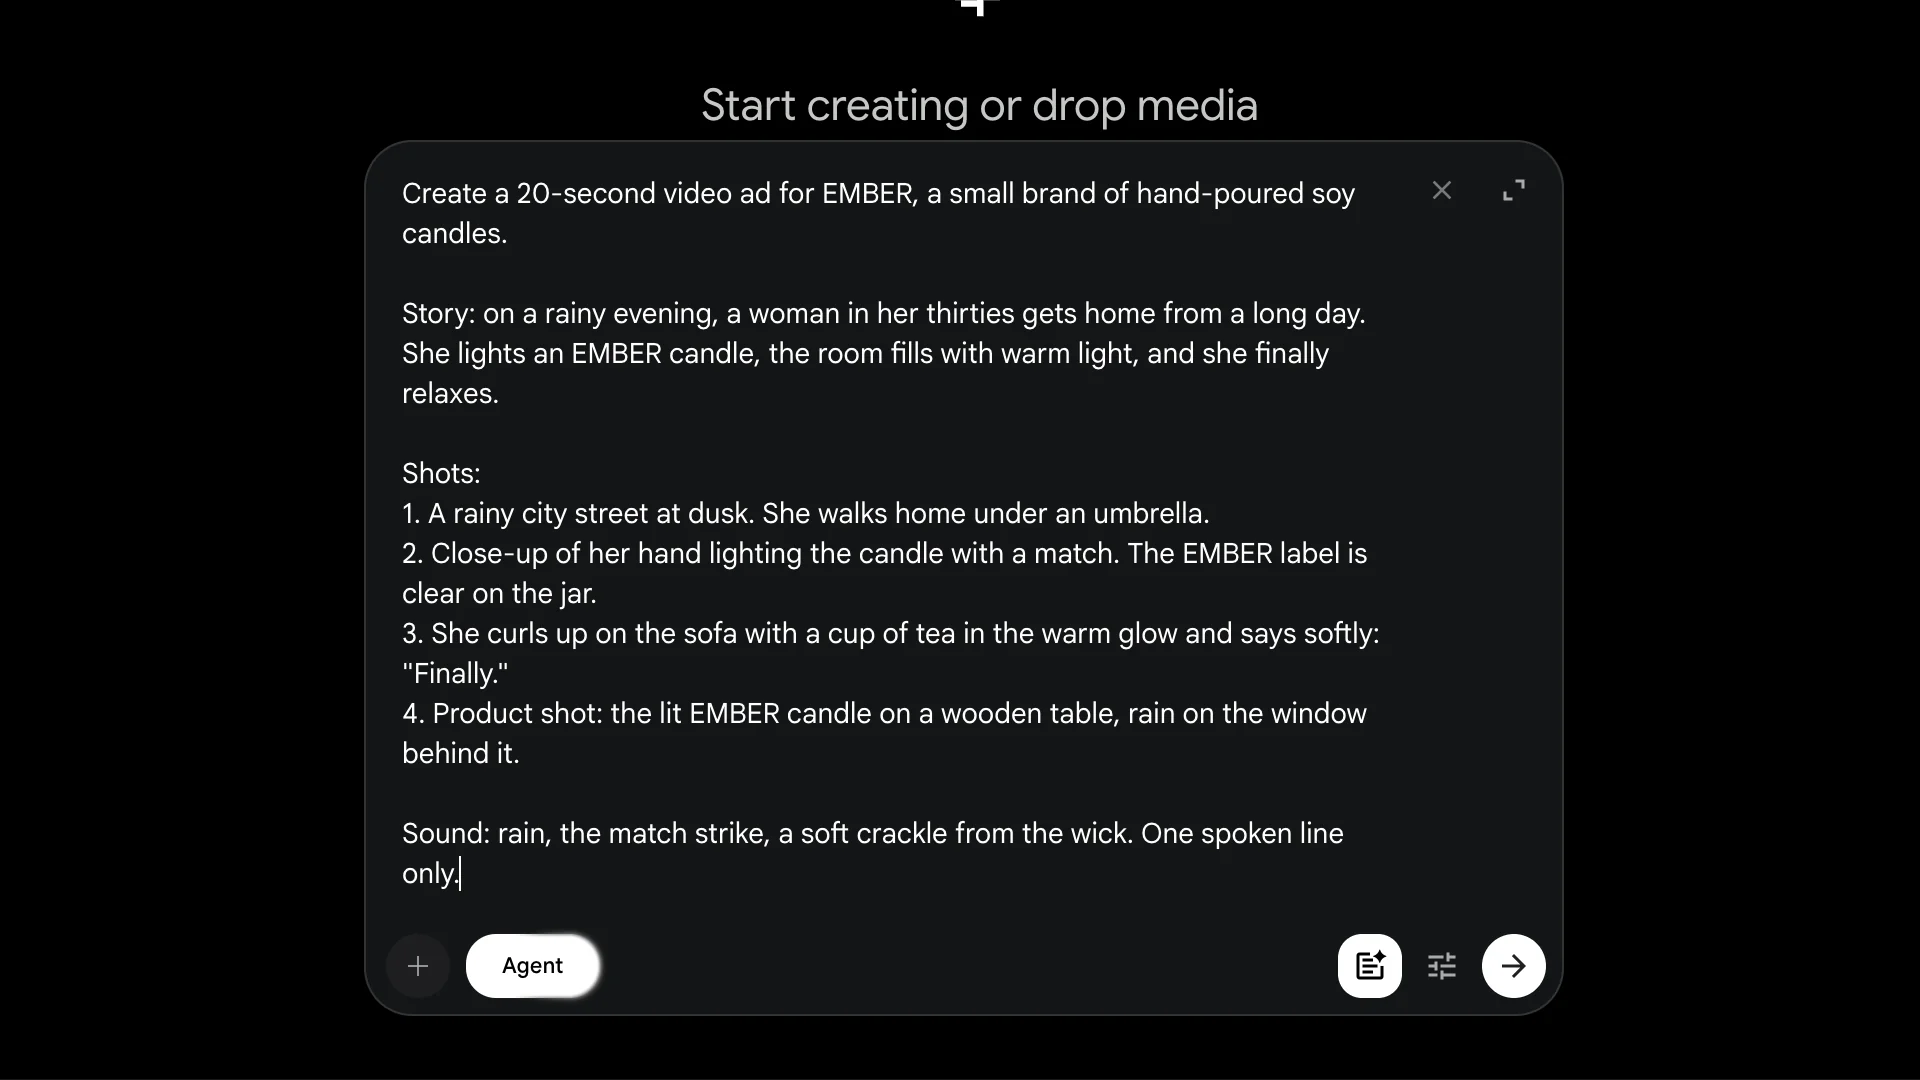
My brief was complete, so the agent didn't ask any questions. About 40 seconds later, it replied with a text storyboard: a character (it named her Sloane and described her clothes), two locations, the candle as a prop, and four frames with the action, camera and lighting for each.
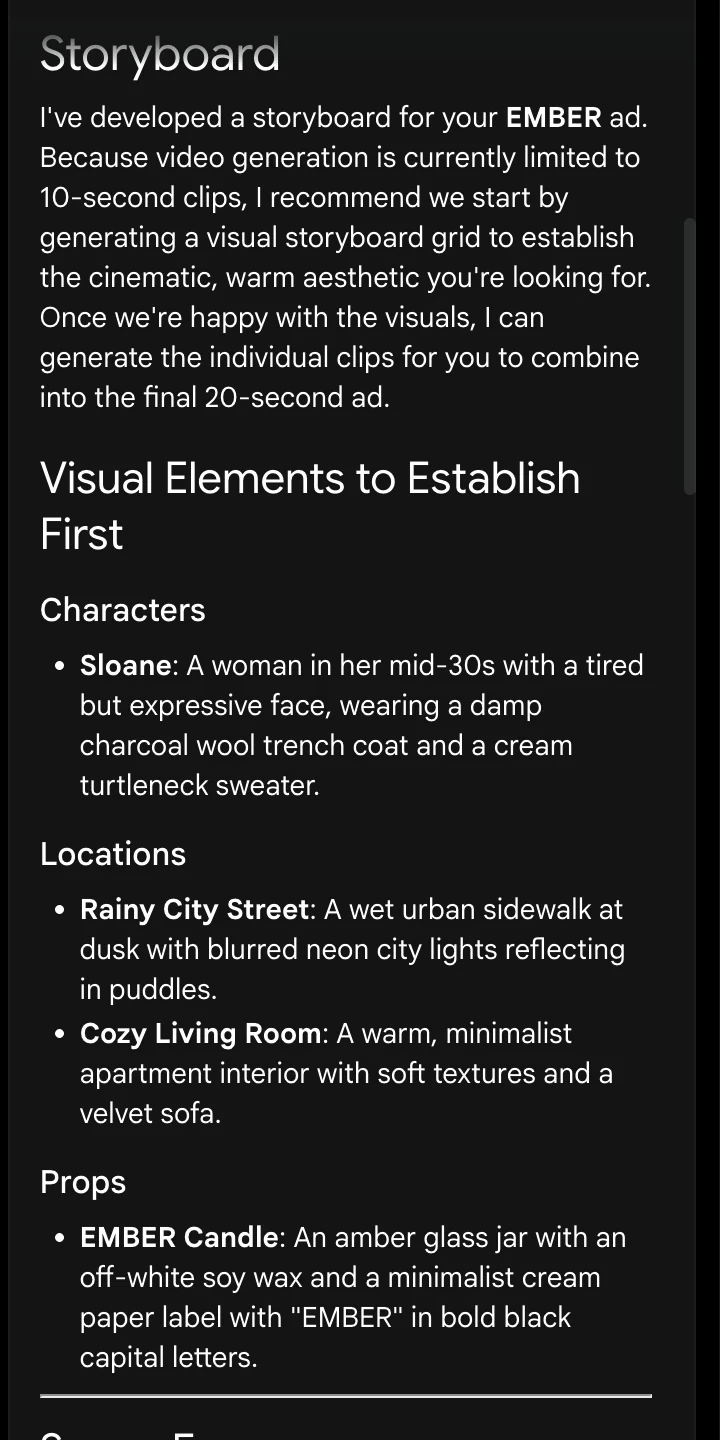
This is the cheapest moment to fix things. Changing the text storyboard costs nothing, while changing a finished clip costs credits. Read it carefully and ask for changes now.
The agent then offered a visual storyboard: one image with the four frames in a 2x2 grid. Because my default was two outputs, it made two grids. Both cost 0 credits.
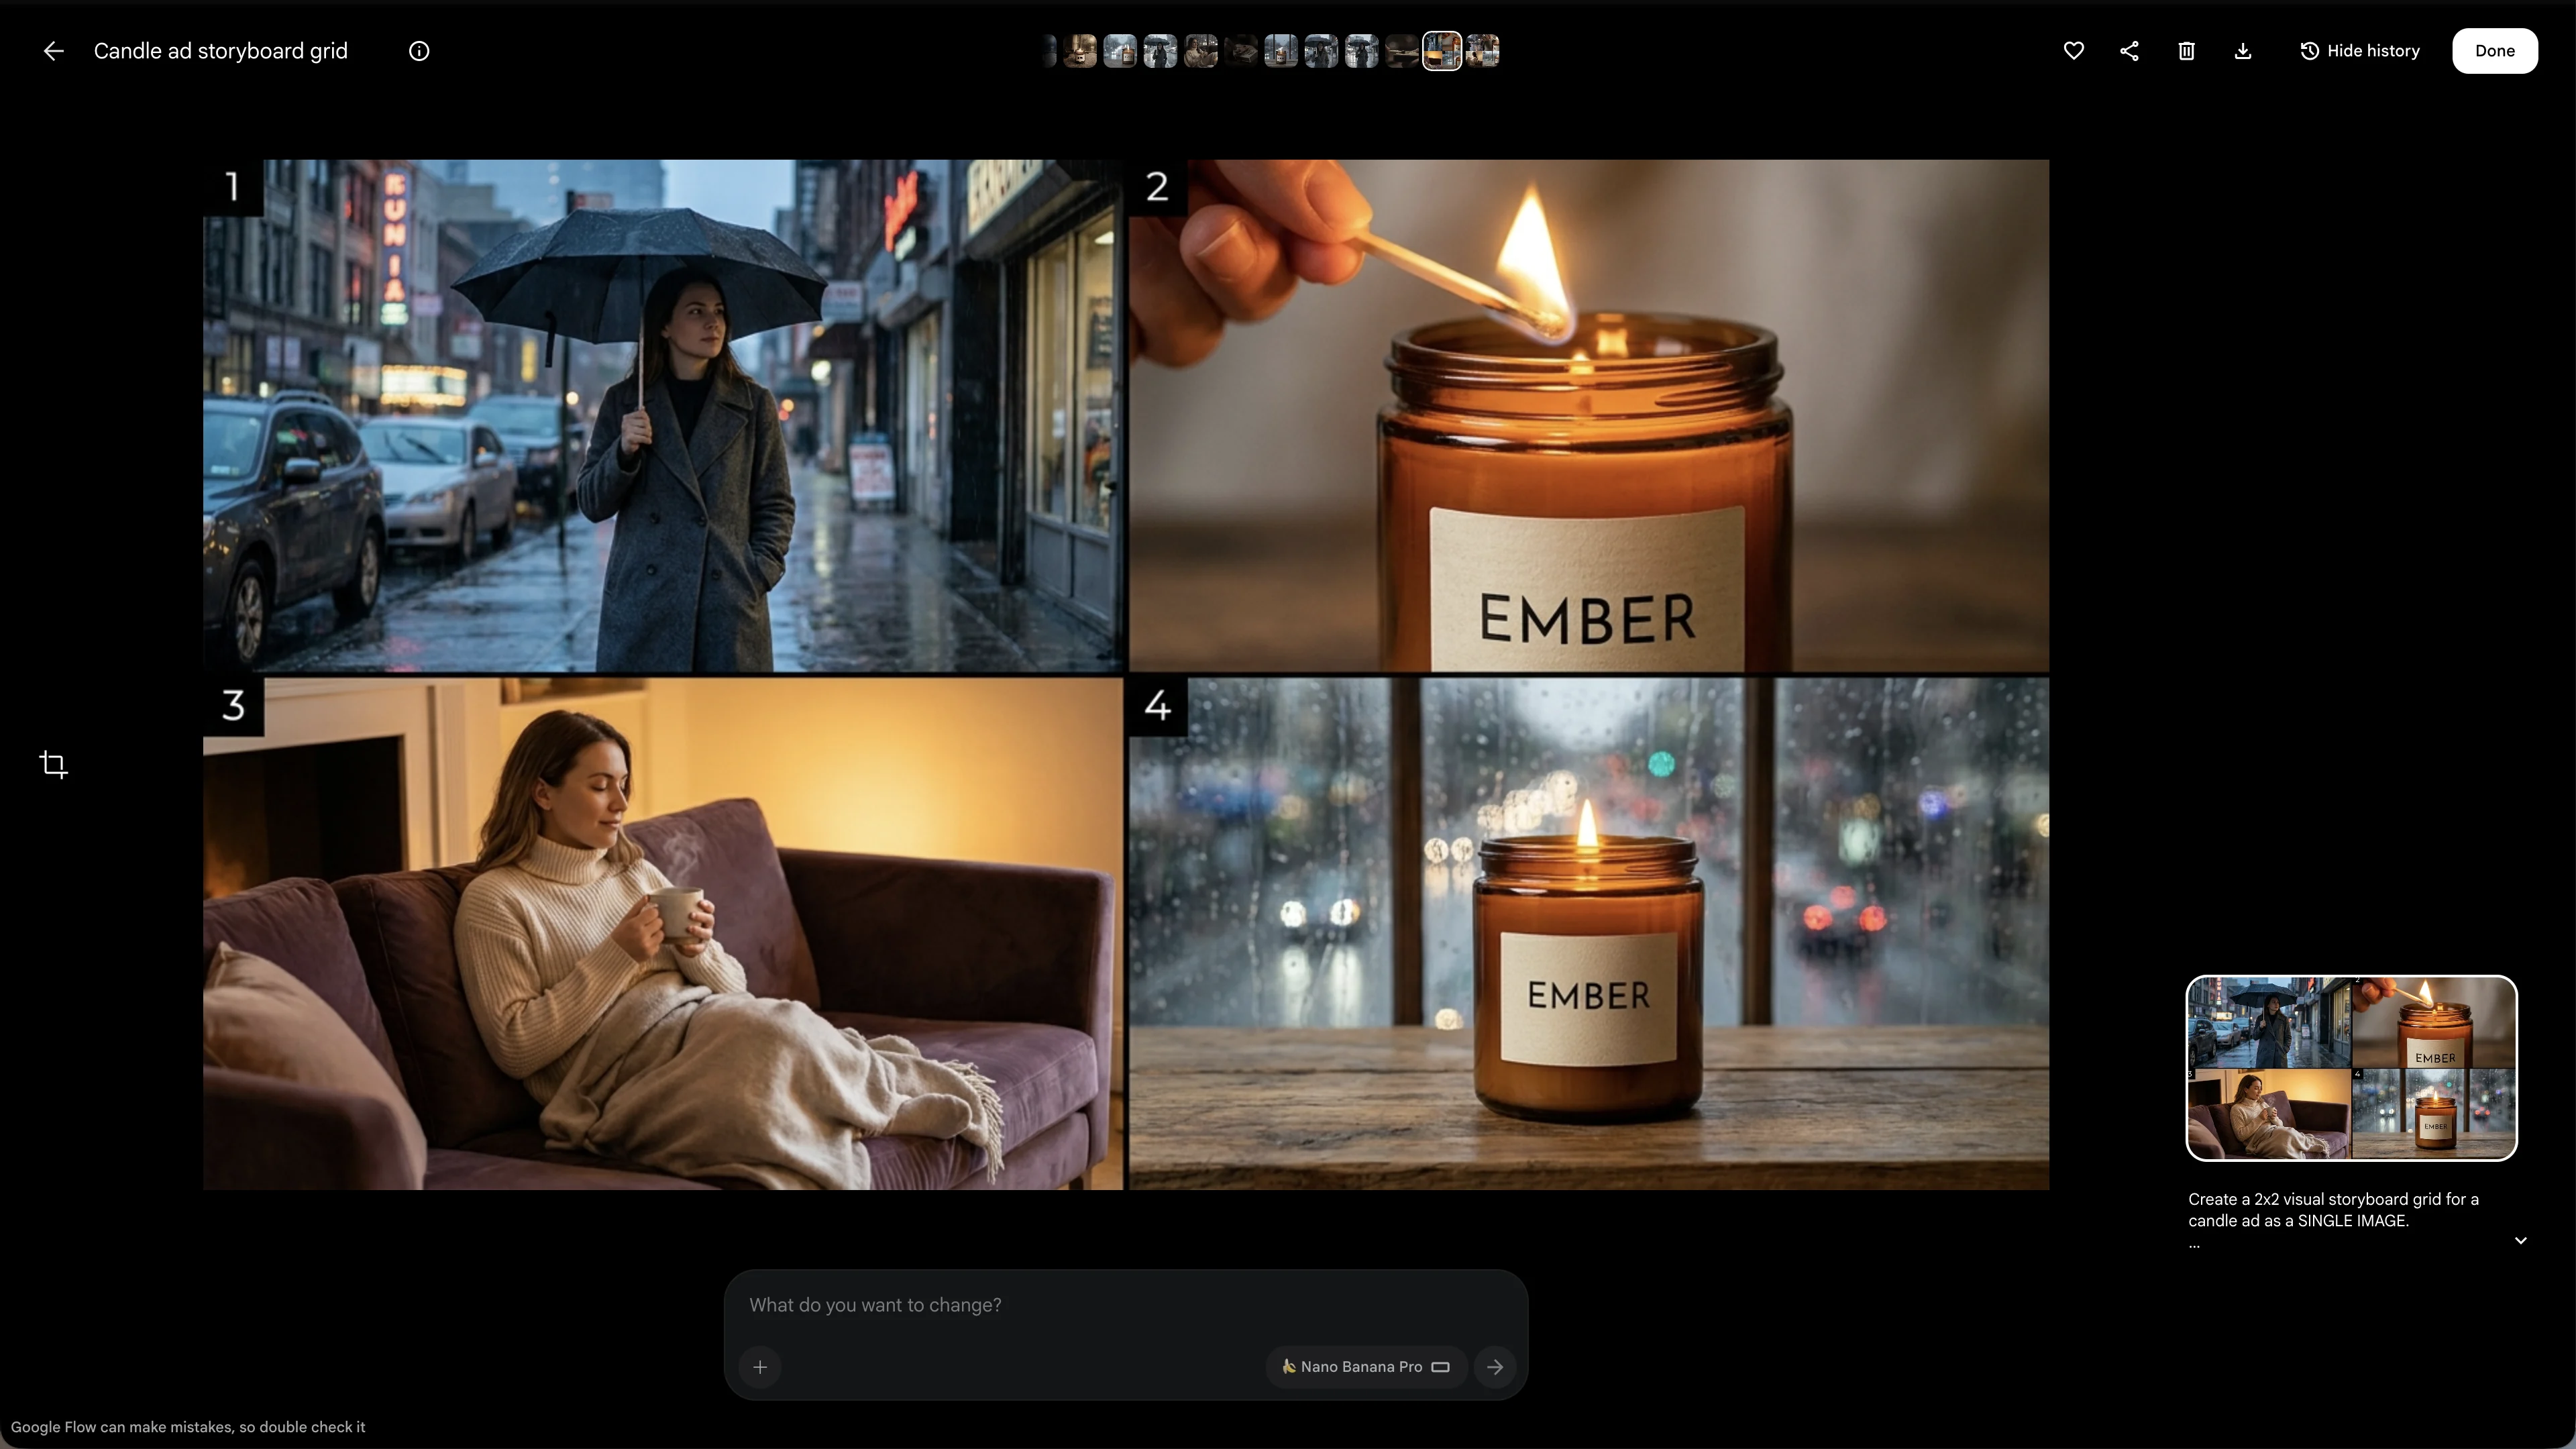
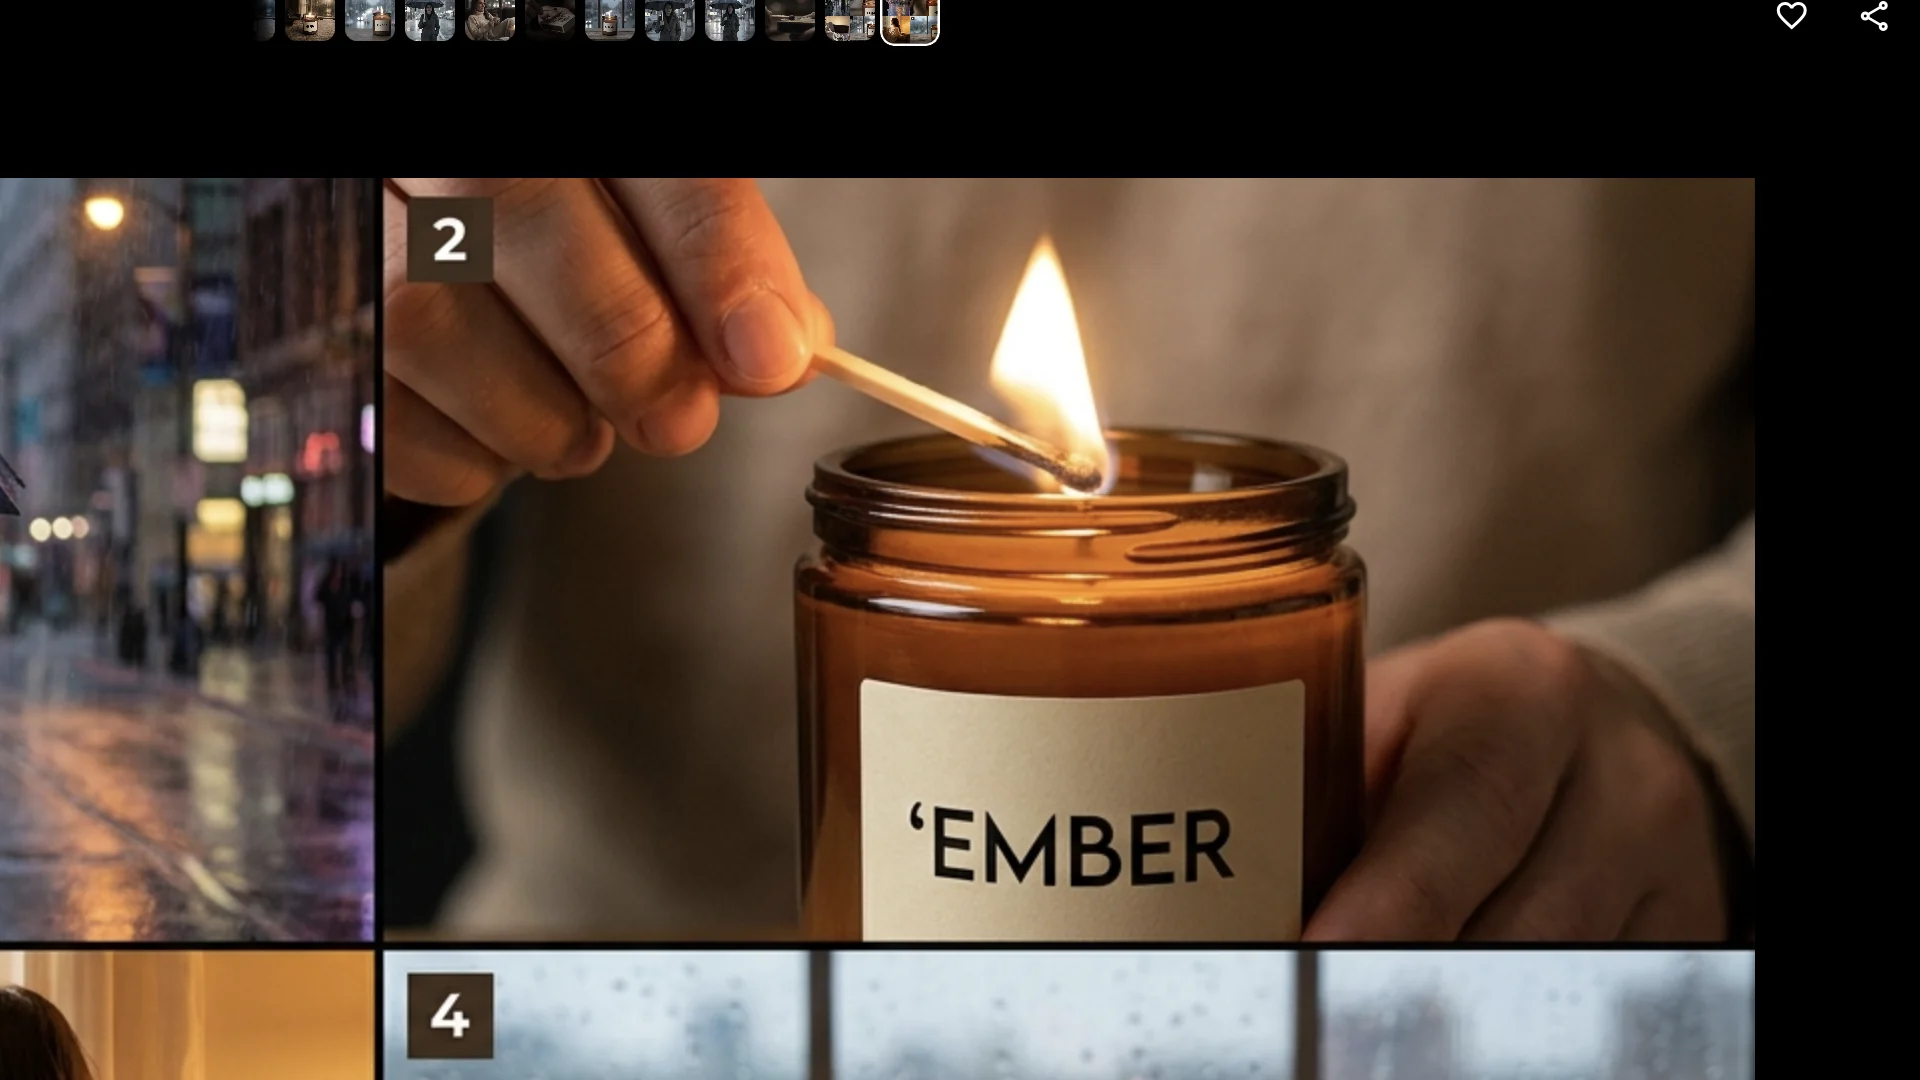
Look closely at each grid before you approve one. On the second grid, the label read "'EMBER" with a stray mark on two of the frames. Whatever is wrong in the storyboard ends up in the video, so I picked the first grid.
Step 5: Generate Your Video Clips
When the storyboard looks right, ask the agent to make the clips. I wrote: "I like the first grid. Please generate the video clips for all four frames."
Before it spends anything, the agent shows an approval card with the number of clips and the total cost. Mine said four clips, 60 credits (four 10-second Gemini Omni Flash clips). You can approve, always approve or reject.
The clips were ready in about a minute. They looked great, but there was a problem: each clip had several shots inside it. The sofa clip opened on the street, cut to the match and only then showed the sofa.
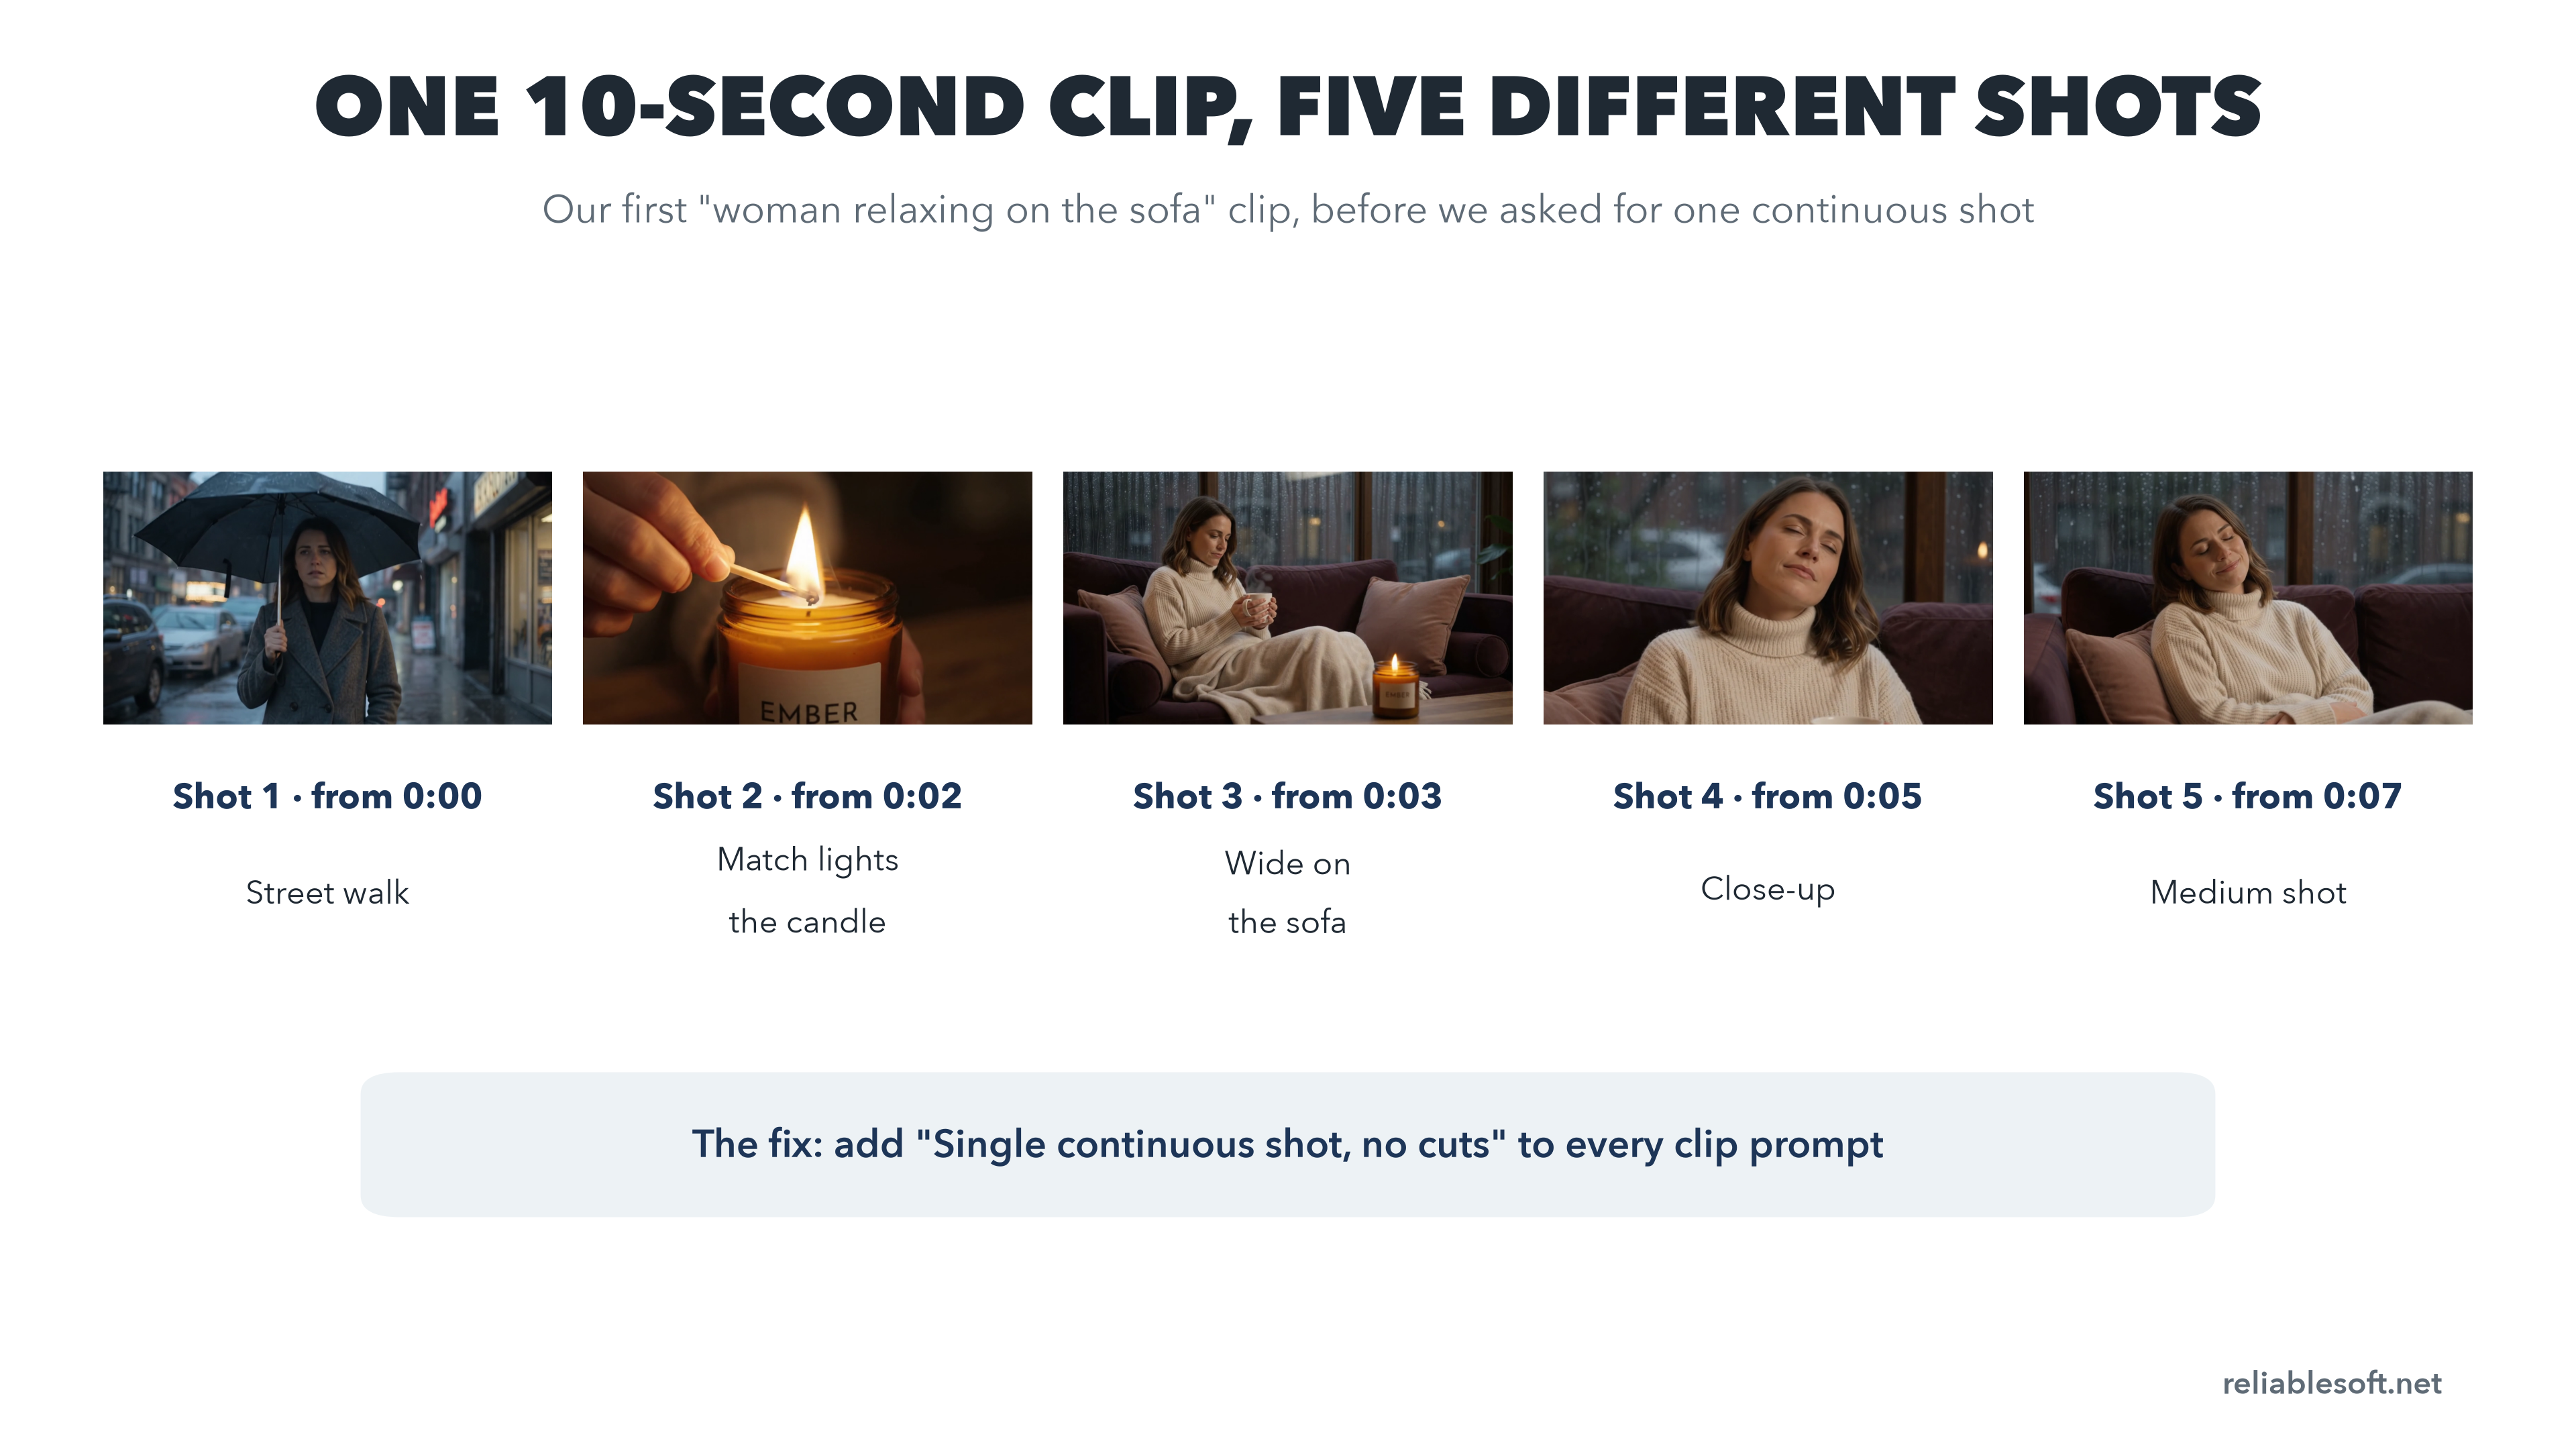
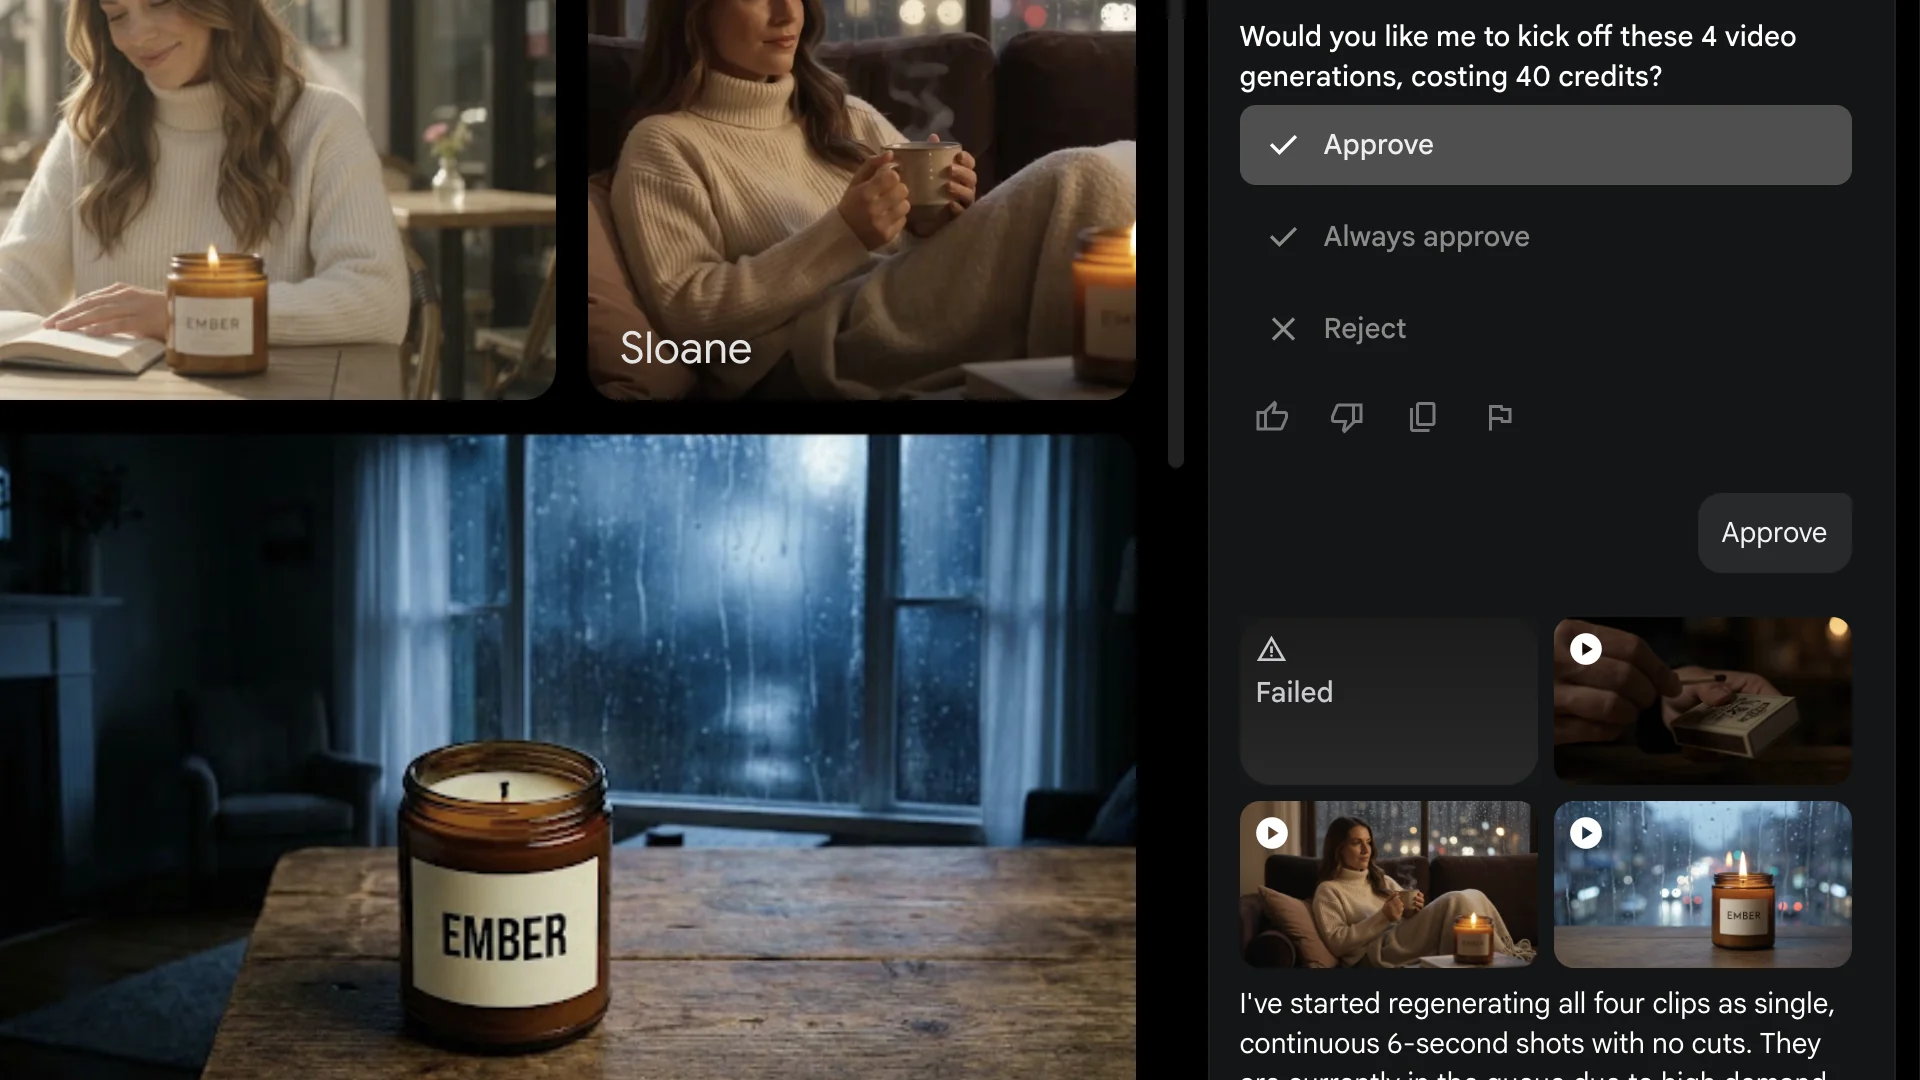
The cause was that each clip got the whole storyboard as its reference, so the model told the whole story in every clip. The fix was one sentence. I asked the agent to regenerate all four clips as "a single continuous shot with no cuts, showing only its own frame", at 6 seconds each. That second round cost 40 credits.
One of the four came back as Failed, with a message that the prompt might break the rules about generating prominent people (the woman was made up). Flow refunds failed generations, so I clicked retry, and it worked the second time.
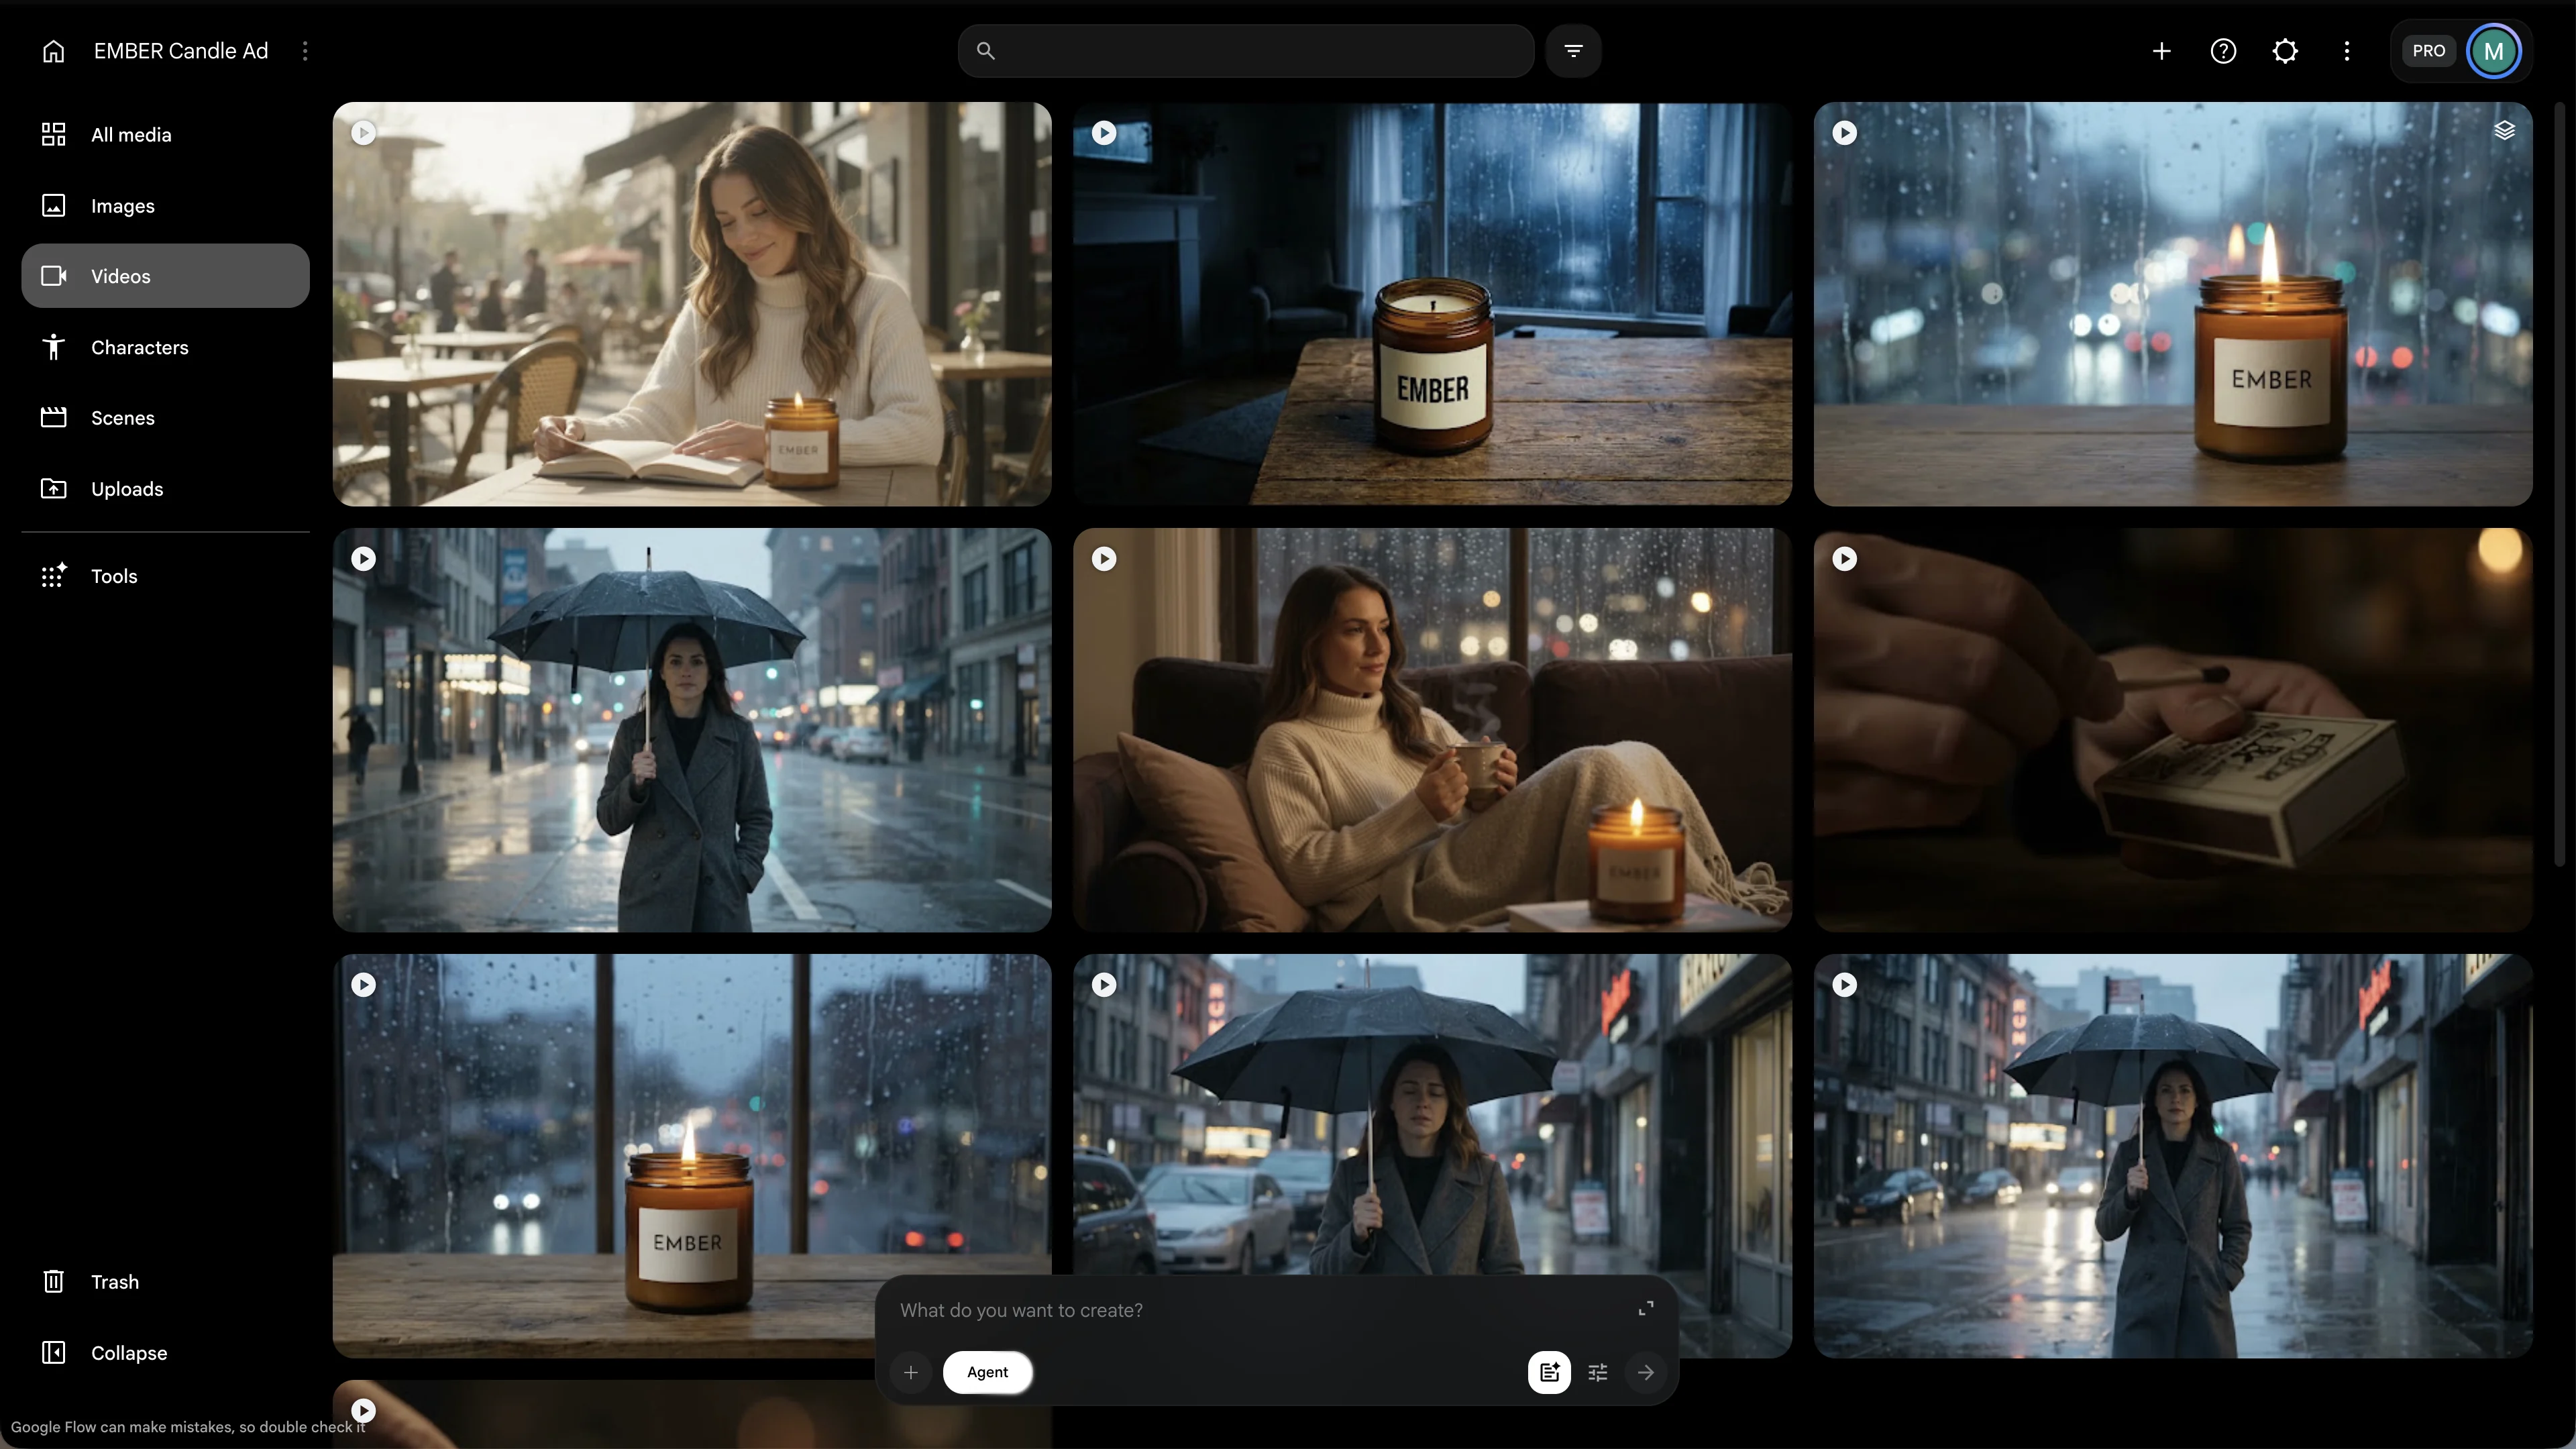
Your clips appear in the Videos section. Hover over a clip to preview it.
Watch every clip to the end. Even after the fix, the sofa clip still had one cut at about 2 seconds. Instead of paying to regenerate it, I trimmed it in step 9.
Step 6: Fix a Clip With a Prompt
You don't have to regenerate a whole clip to change one thing. Open the clip, type the change in the box under the player ("Describe how to edit this video") and send it.
In the product shot, I saw what looked like a second flame behind the jar. I asked Flow to remove it and slowly push the camera in toward the candle.
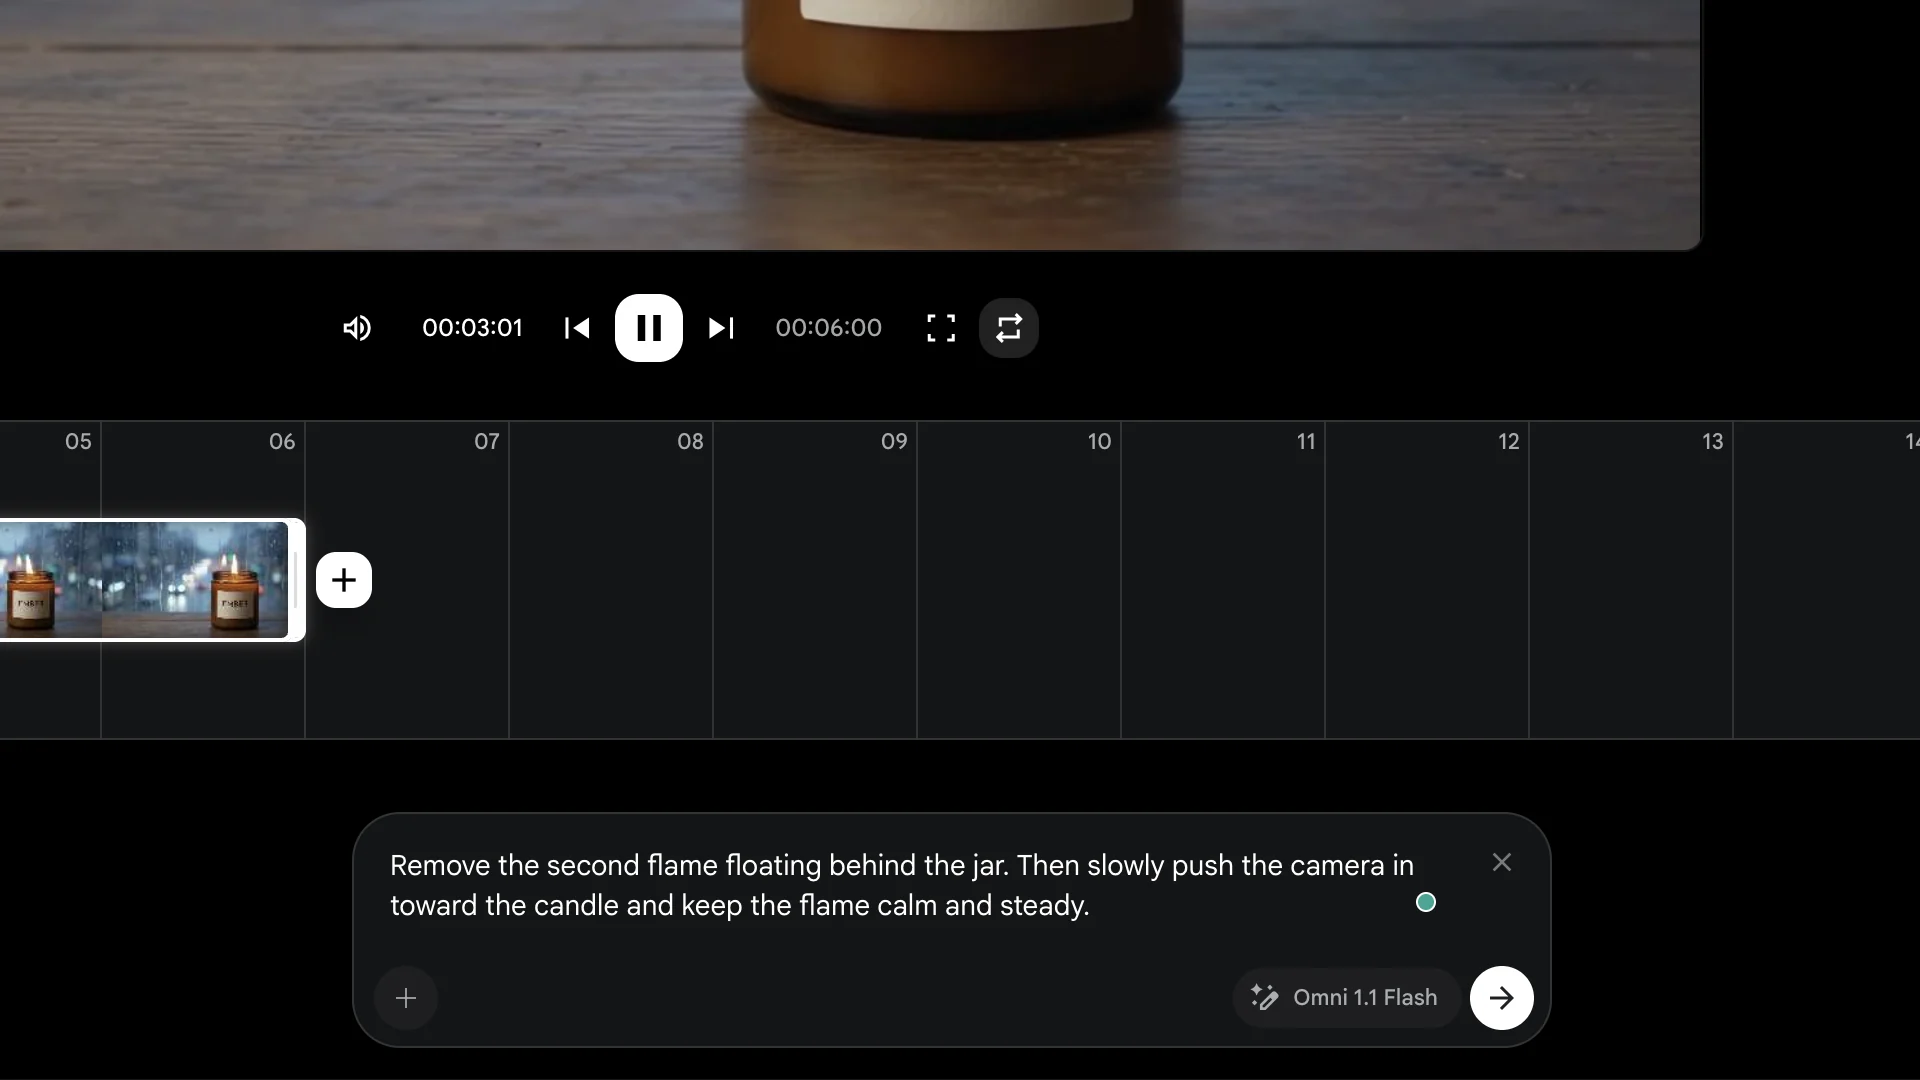
The edit took about 2 minutes and cost 20 credits. The new version is added to the clip's history on the right, so you can always go back to the original.
The result was mixed, which is normal. The push-in happened only in the last second, and the "second flame" stayed. Up close, it was the flame's reflection in the window, so the original was right after all.
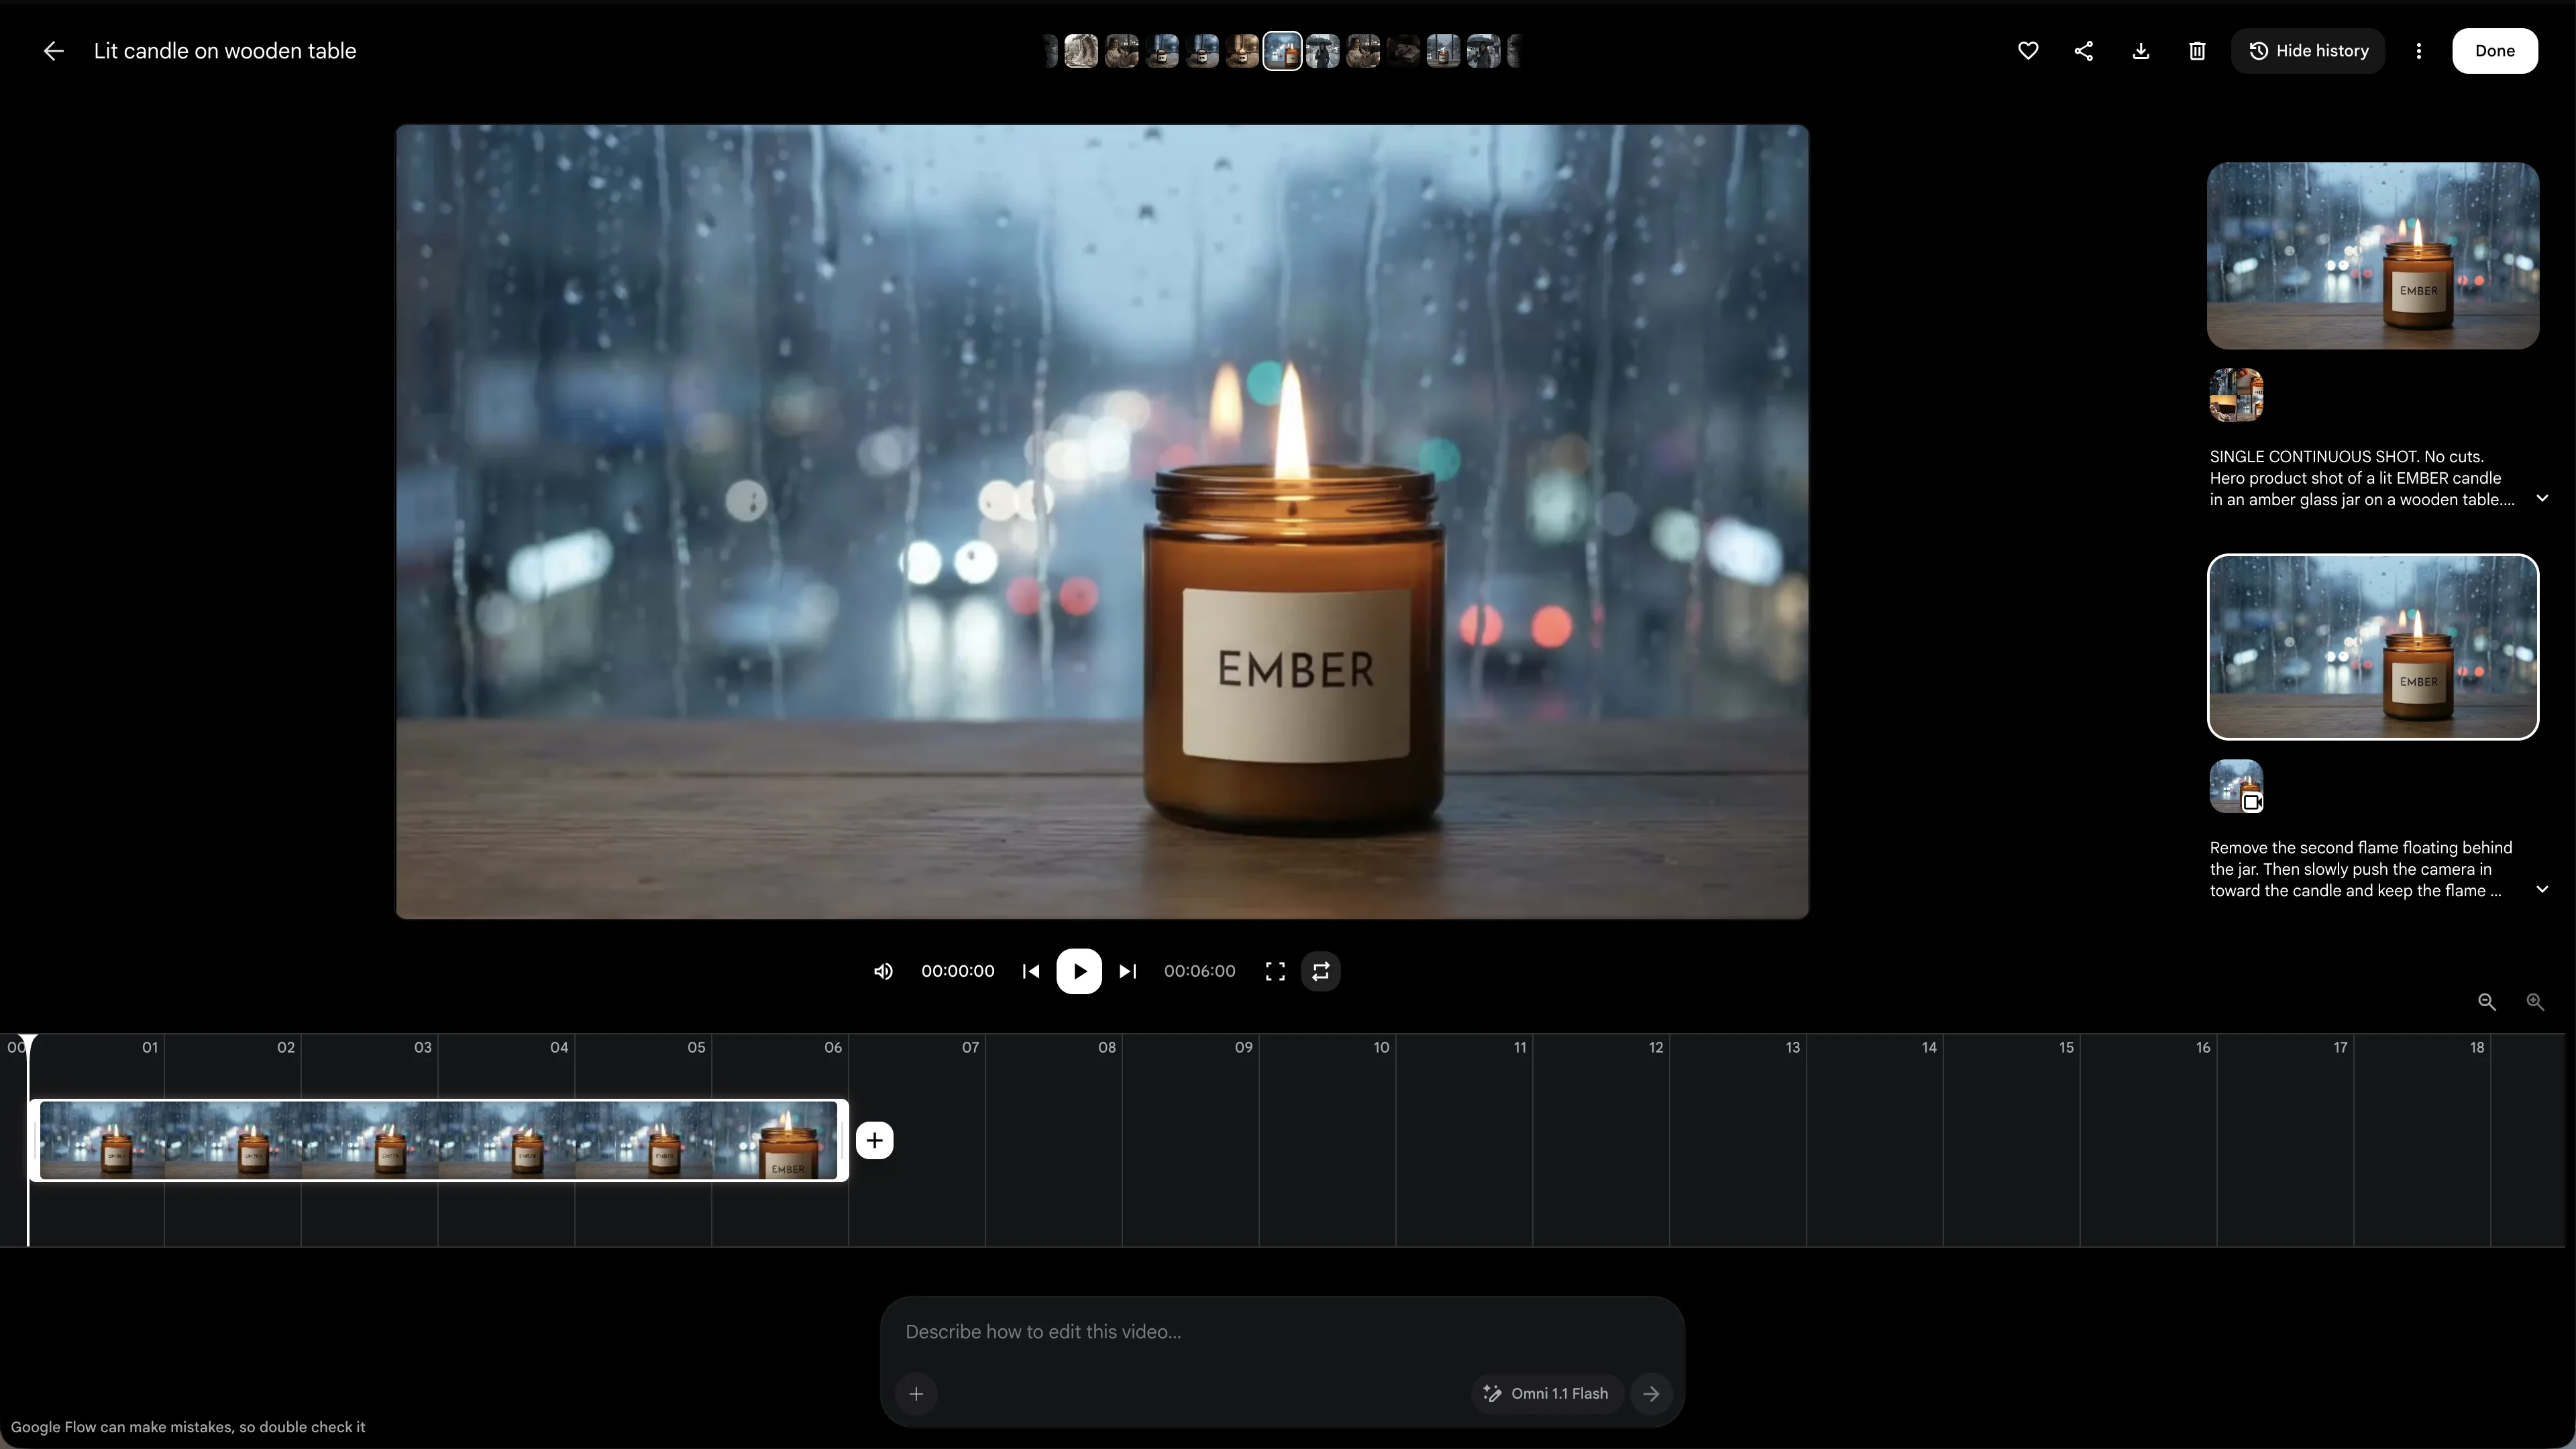
Keep edit prompts short and specific: one or two changes per edit, and say what should stay the same.
Step 7: Keep a Character Consistent
The hardest thing in AI video is making the same person look the same in a new scene. Flow solves this with Characters.
First, save a clear image of your character. Open a clip where the face is visible and click Save frame at the top right of the player. Flow saves that frame as an image.
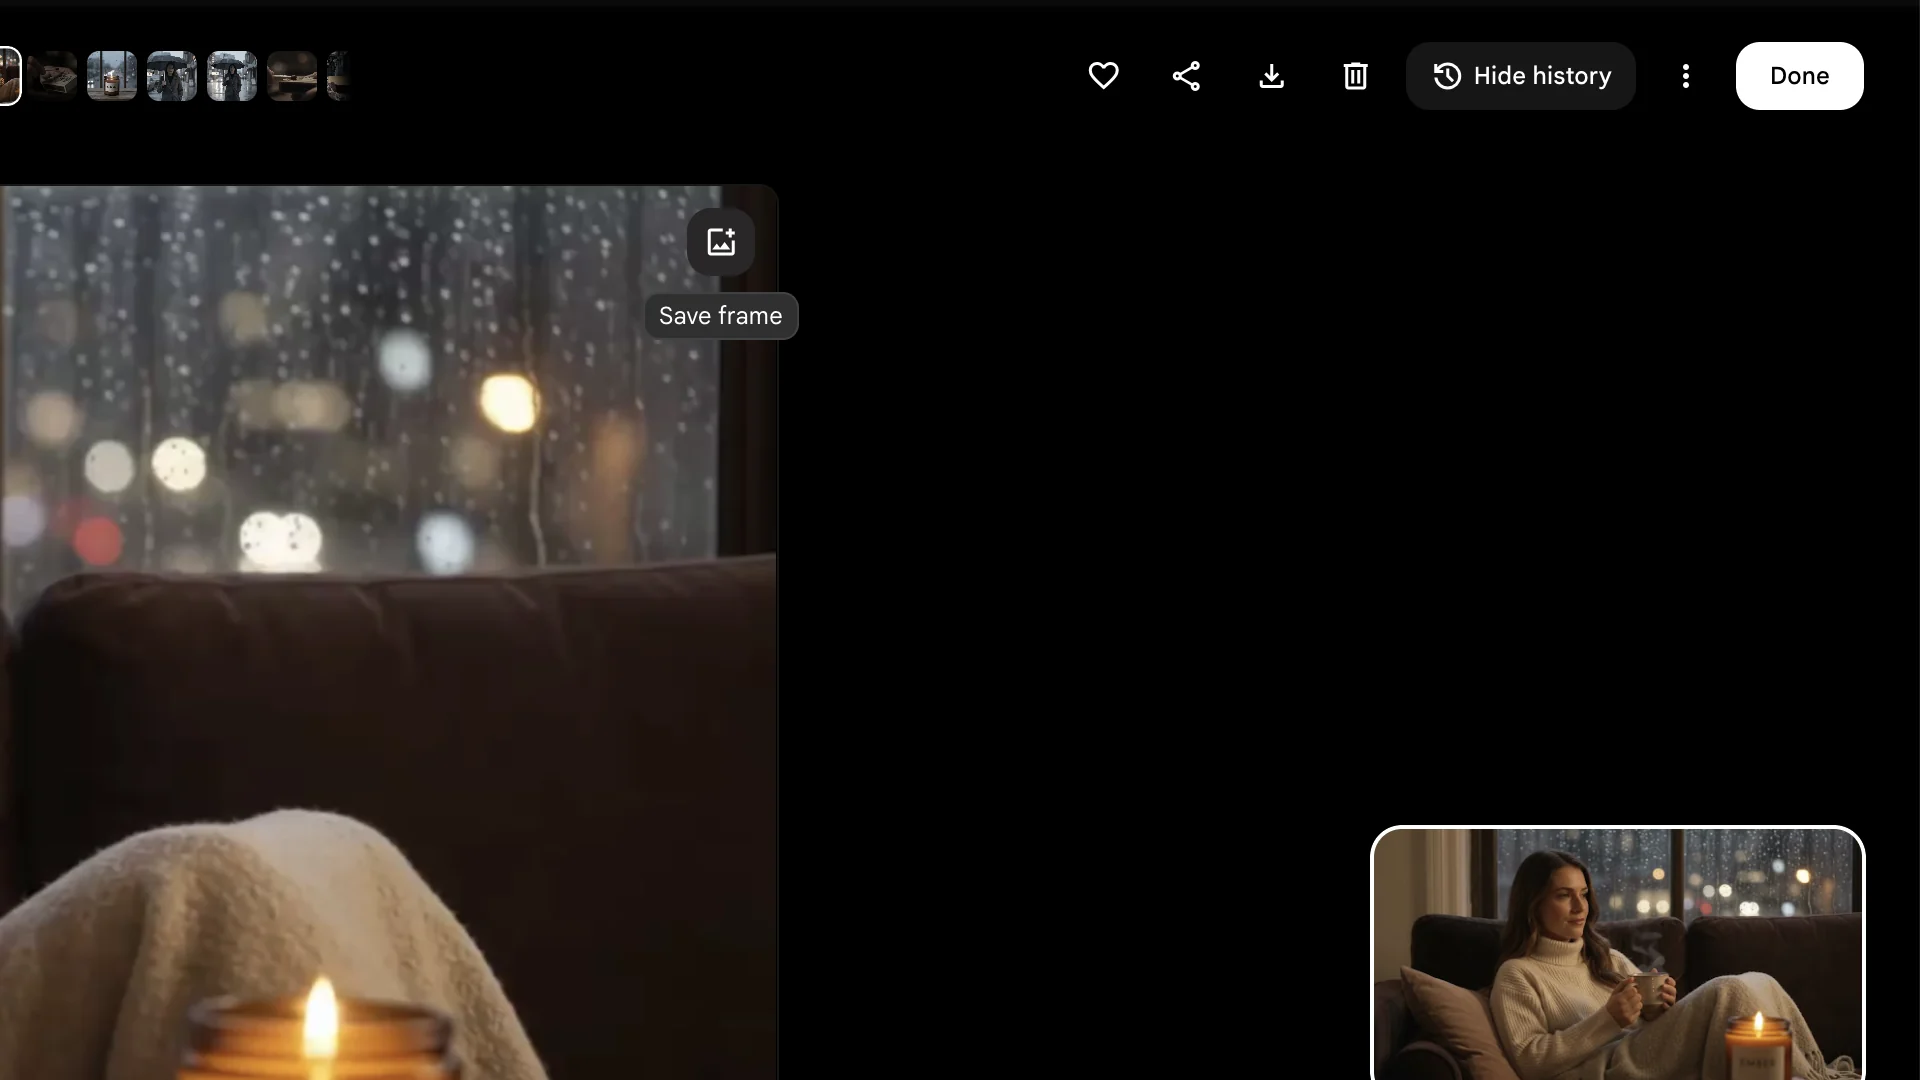
Then go to Characters, click New character, choose Add from project and pick the saved frame.
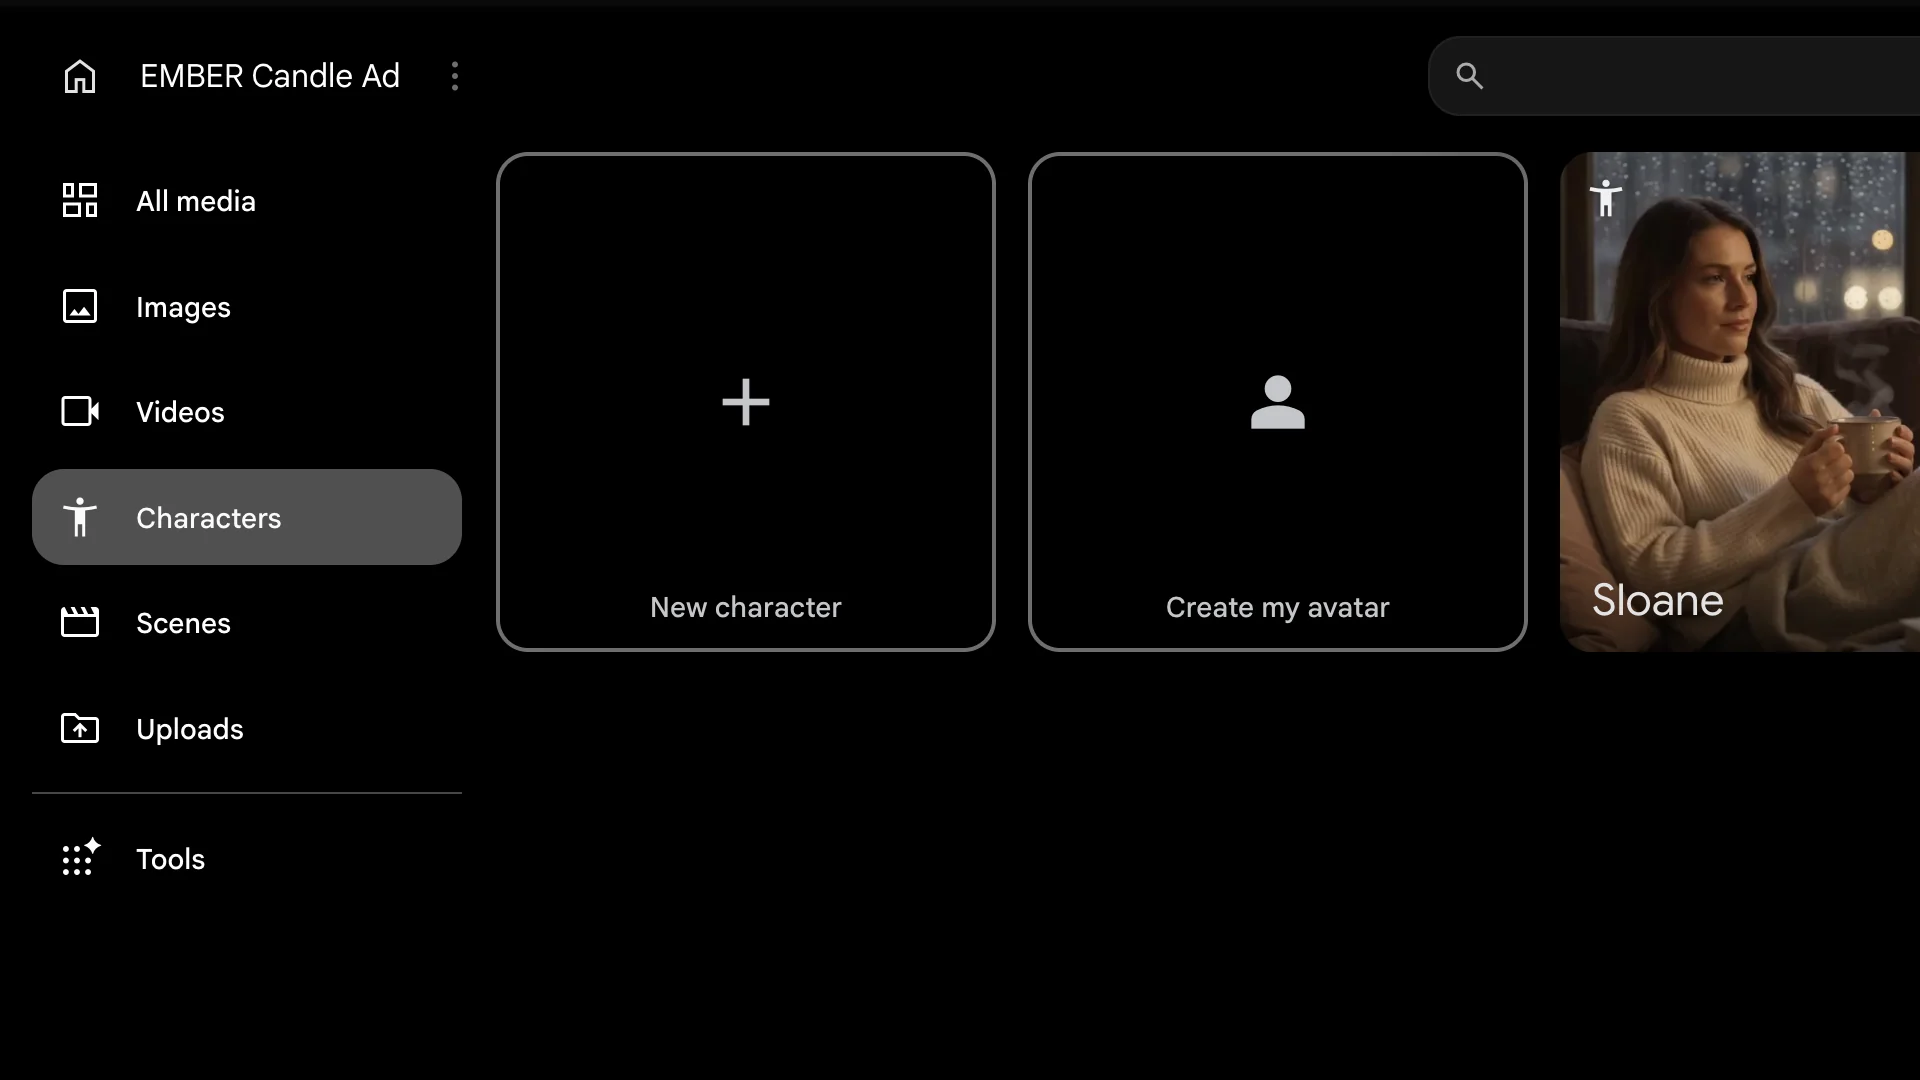
In the character editor, you can:
- Give the character a name (I used Sloane)
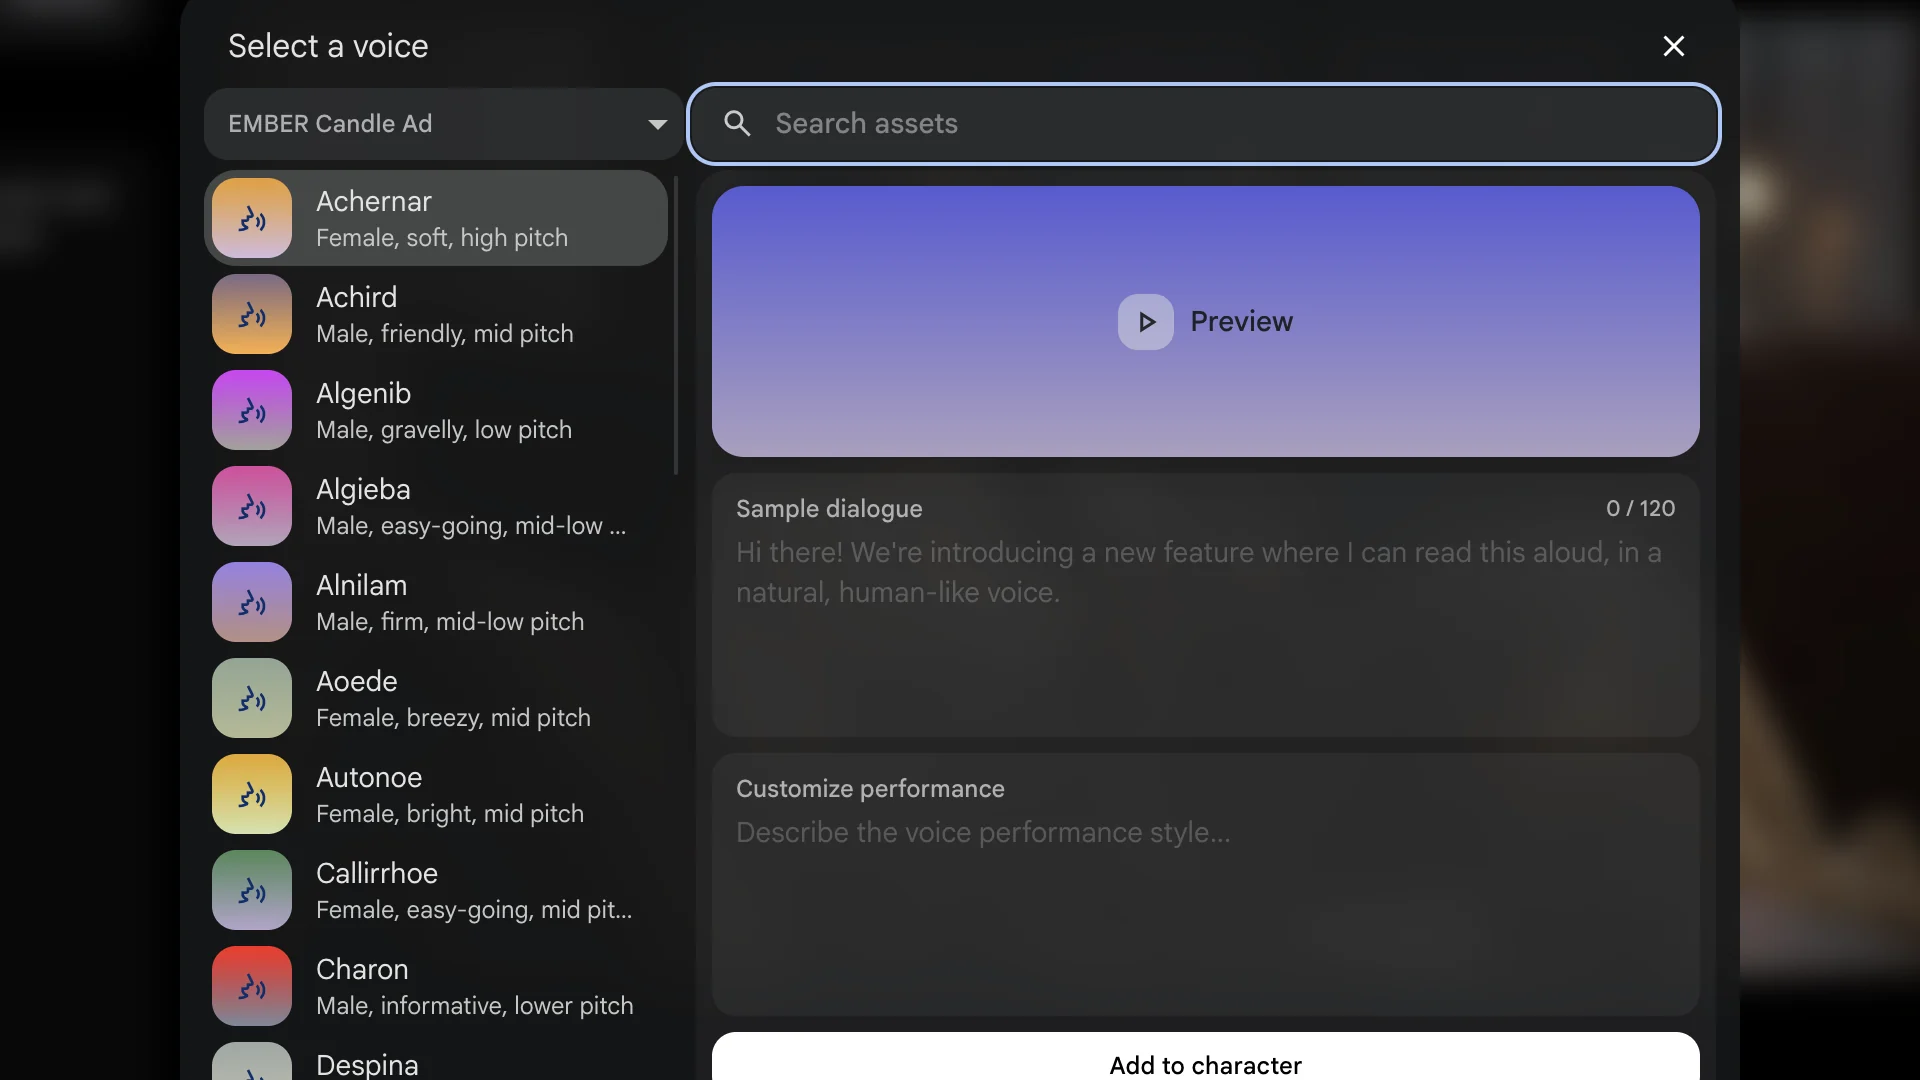
- Pick a voice
- Add character info, a short description the agent can use
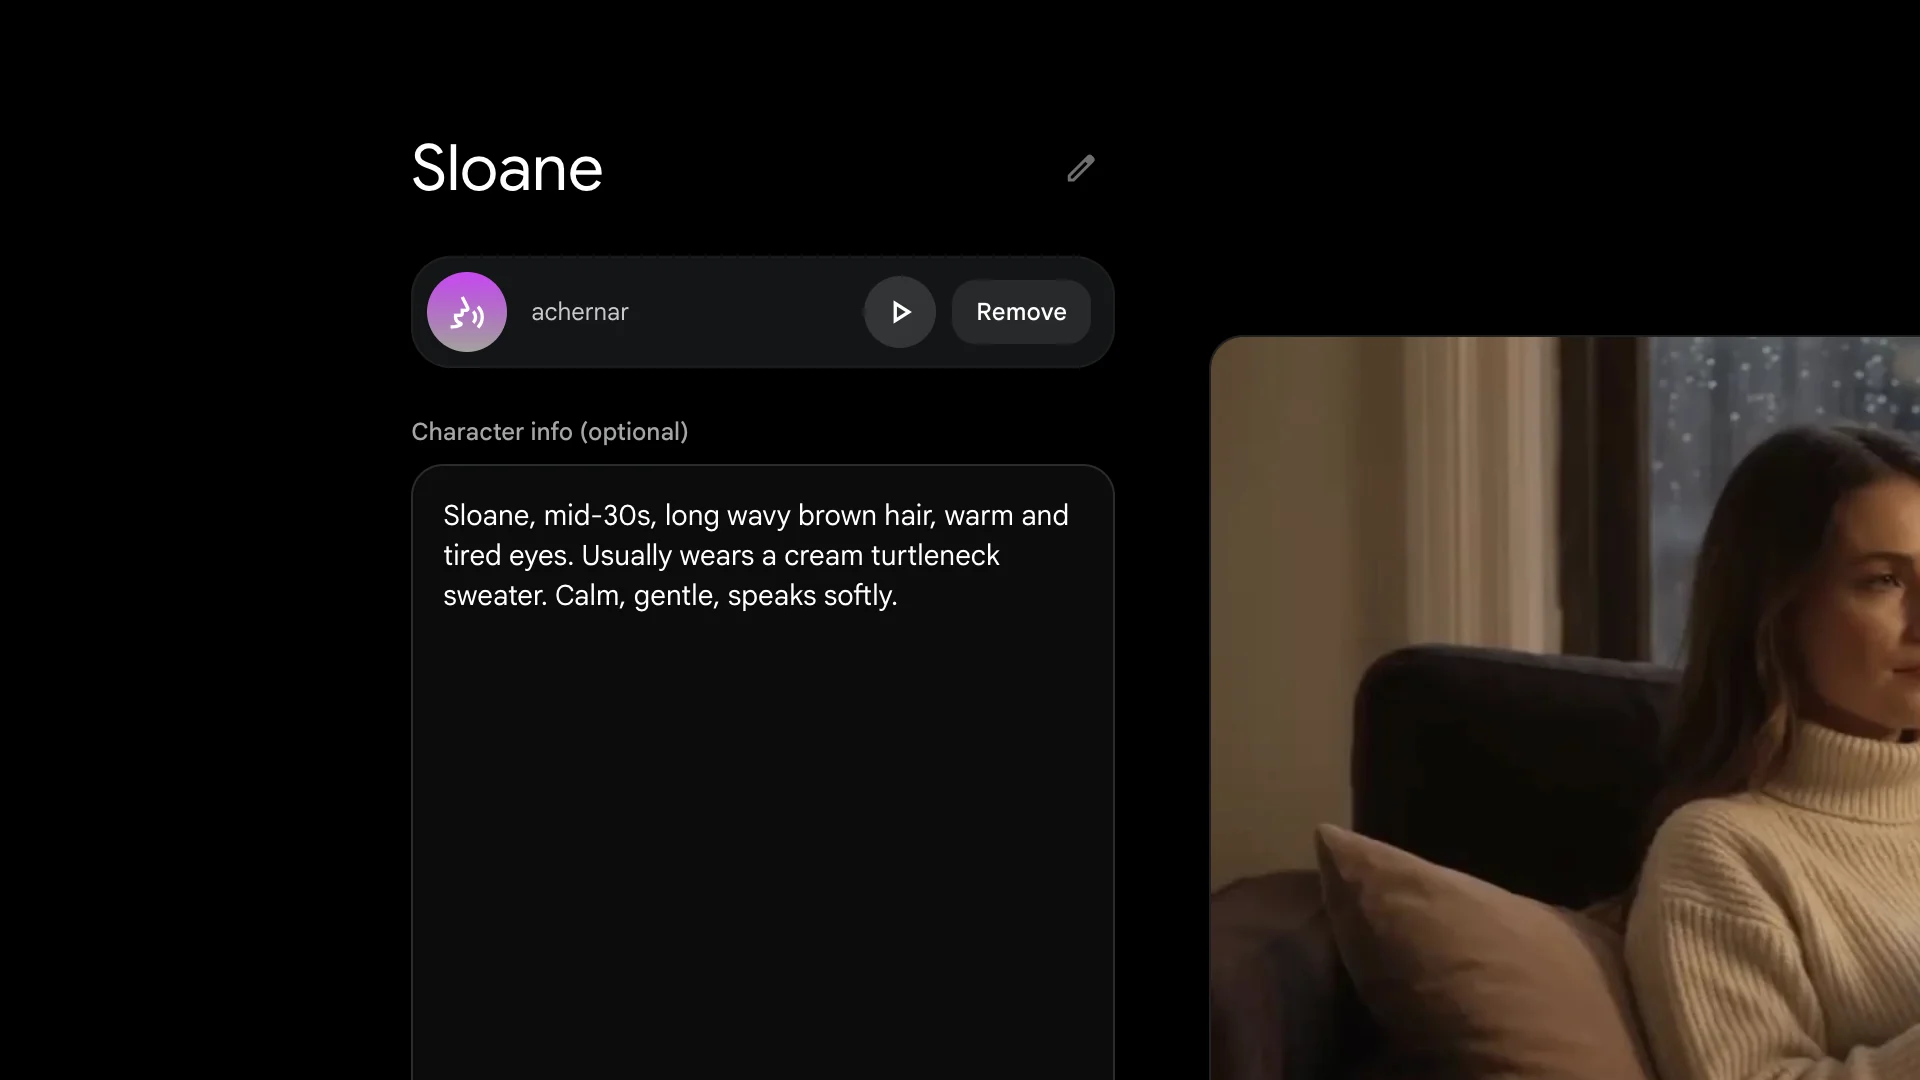
Flow has a list of voices, each with a short description such as "Female, soft, high pitch". You can preview each one and type a sample line to hear it.
To use the character, type @ in the prompt box and pick it from the list. It's added to your prompt as a chip.
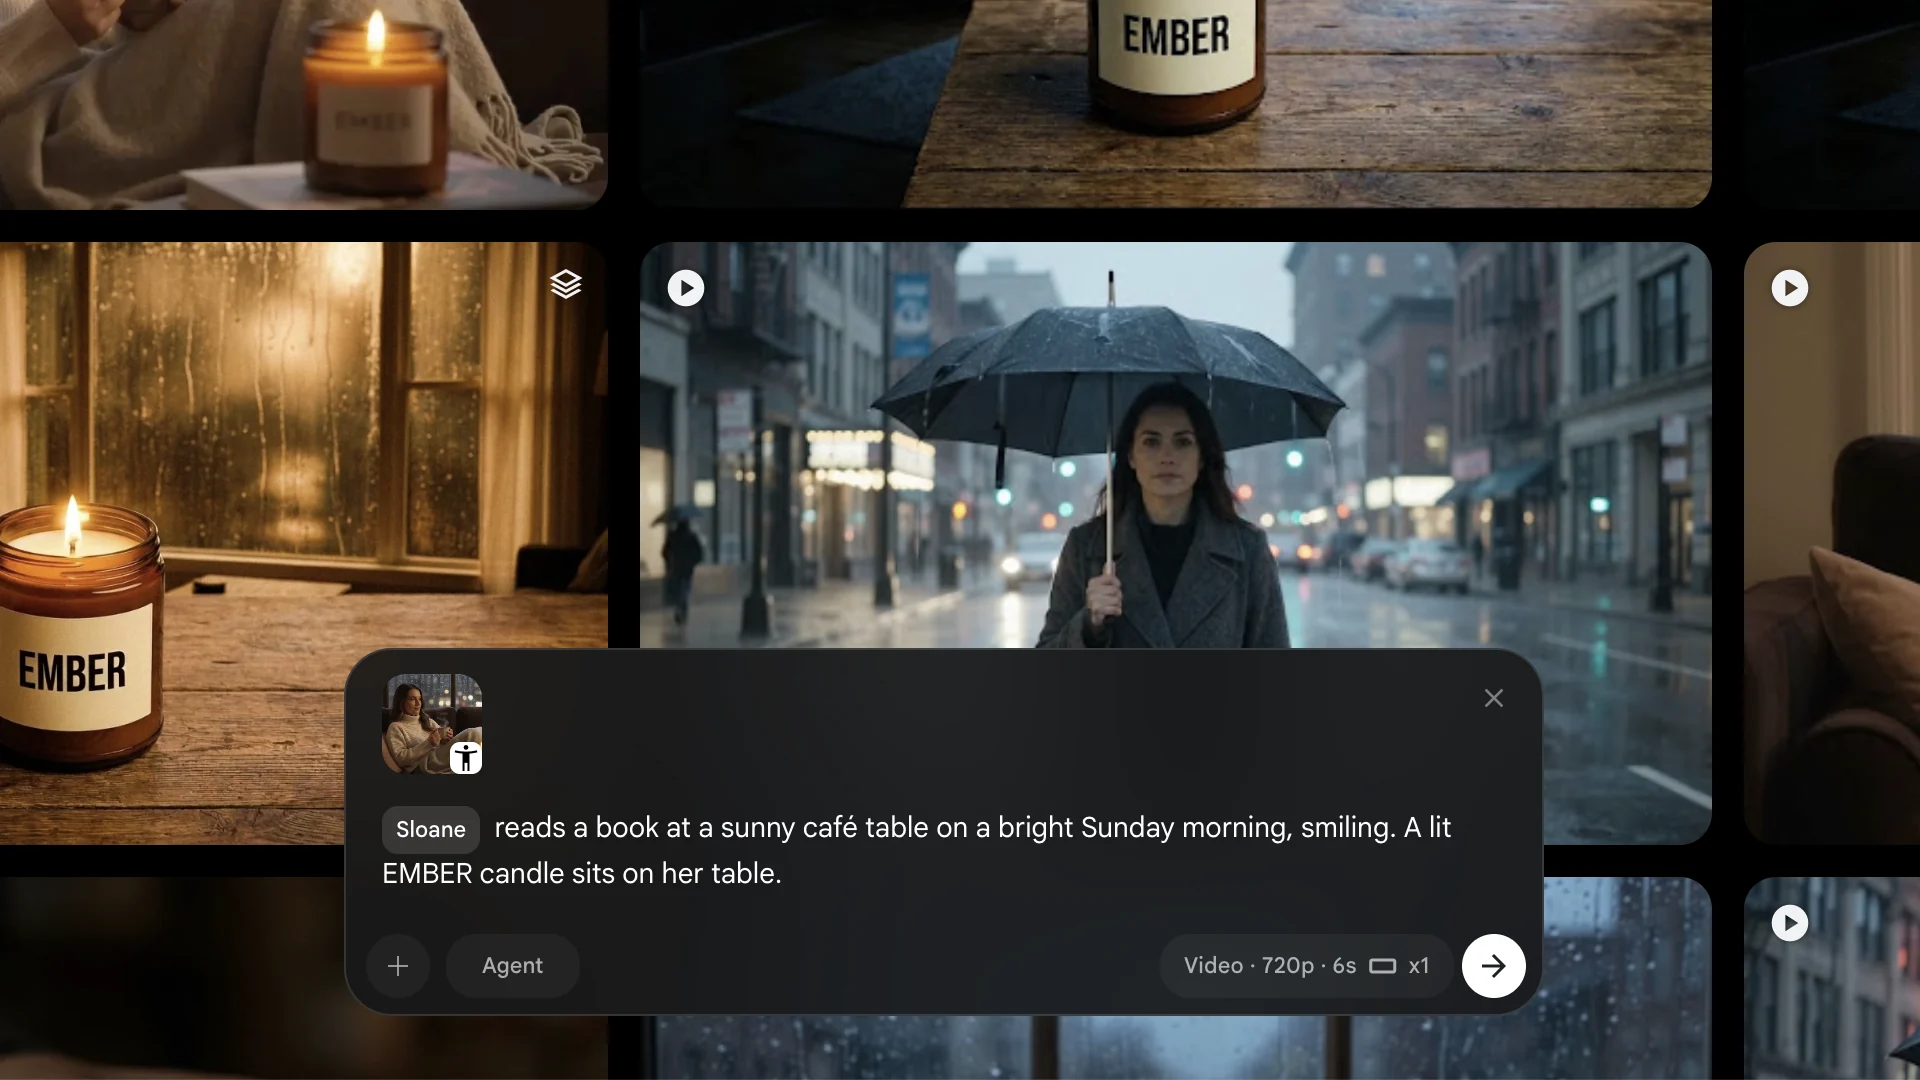
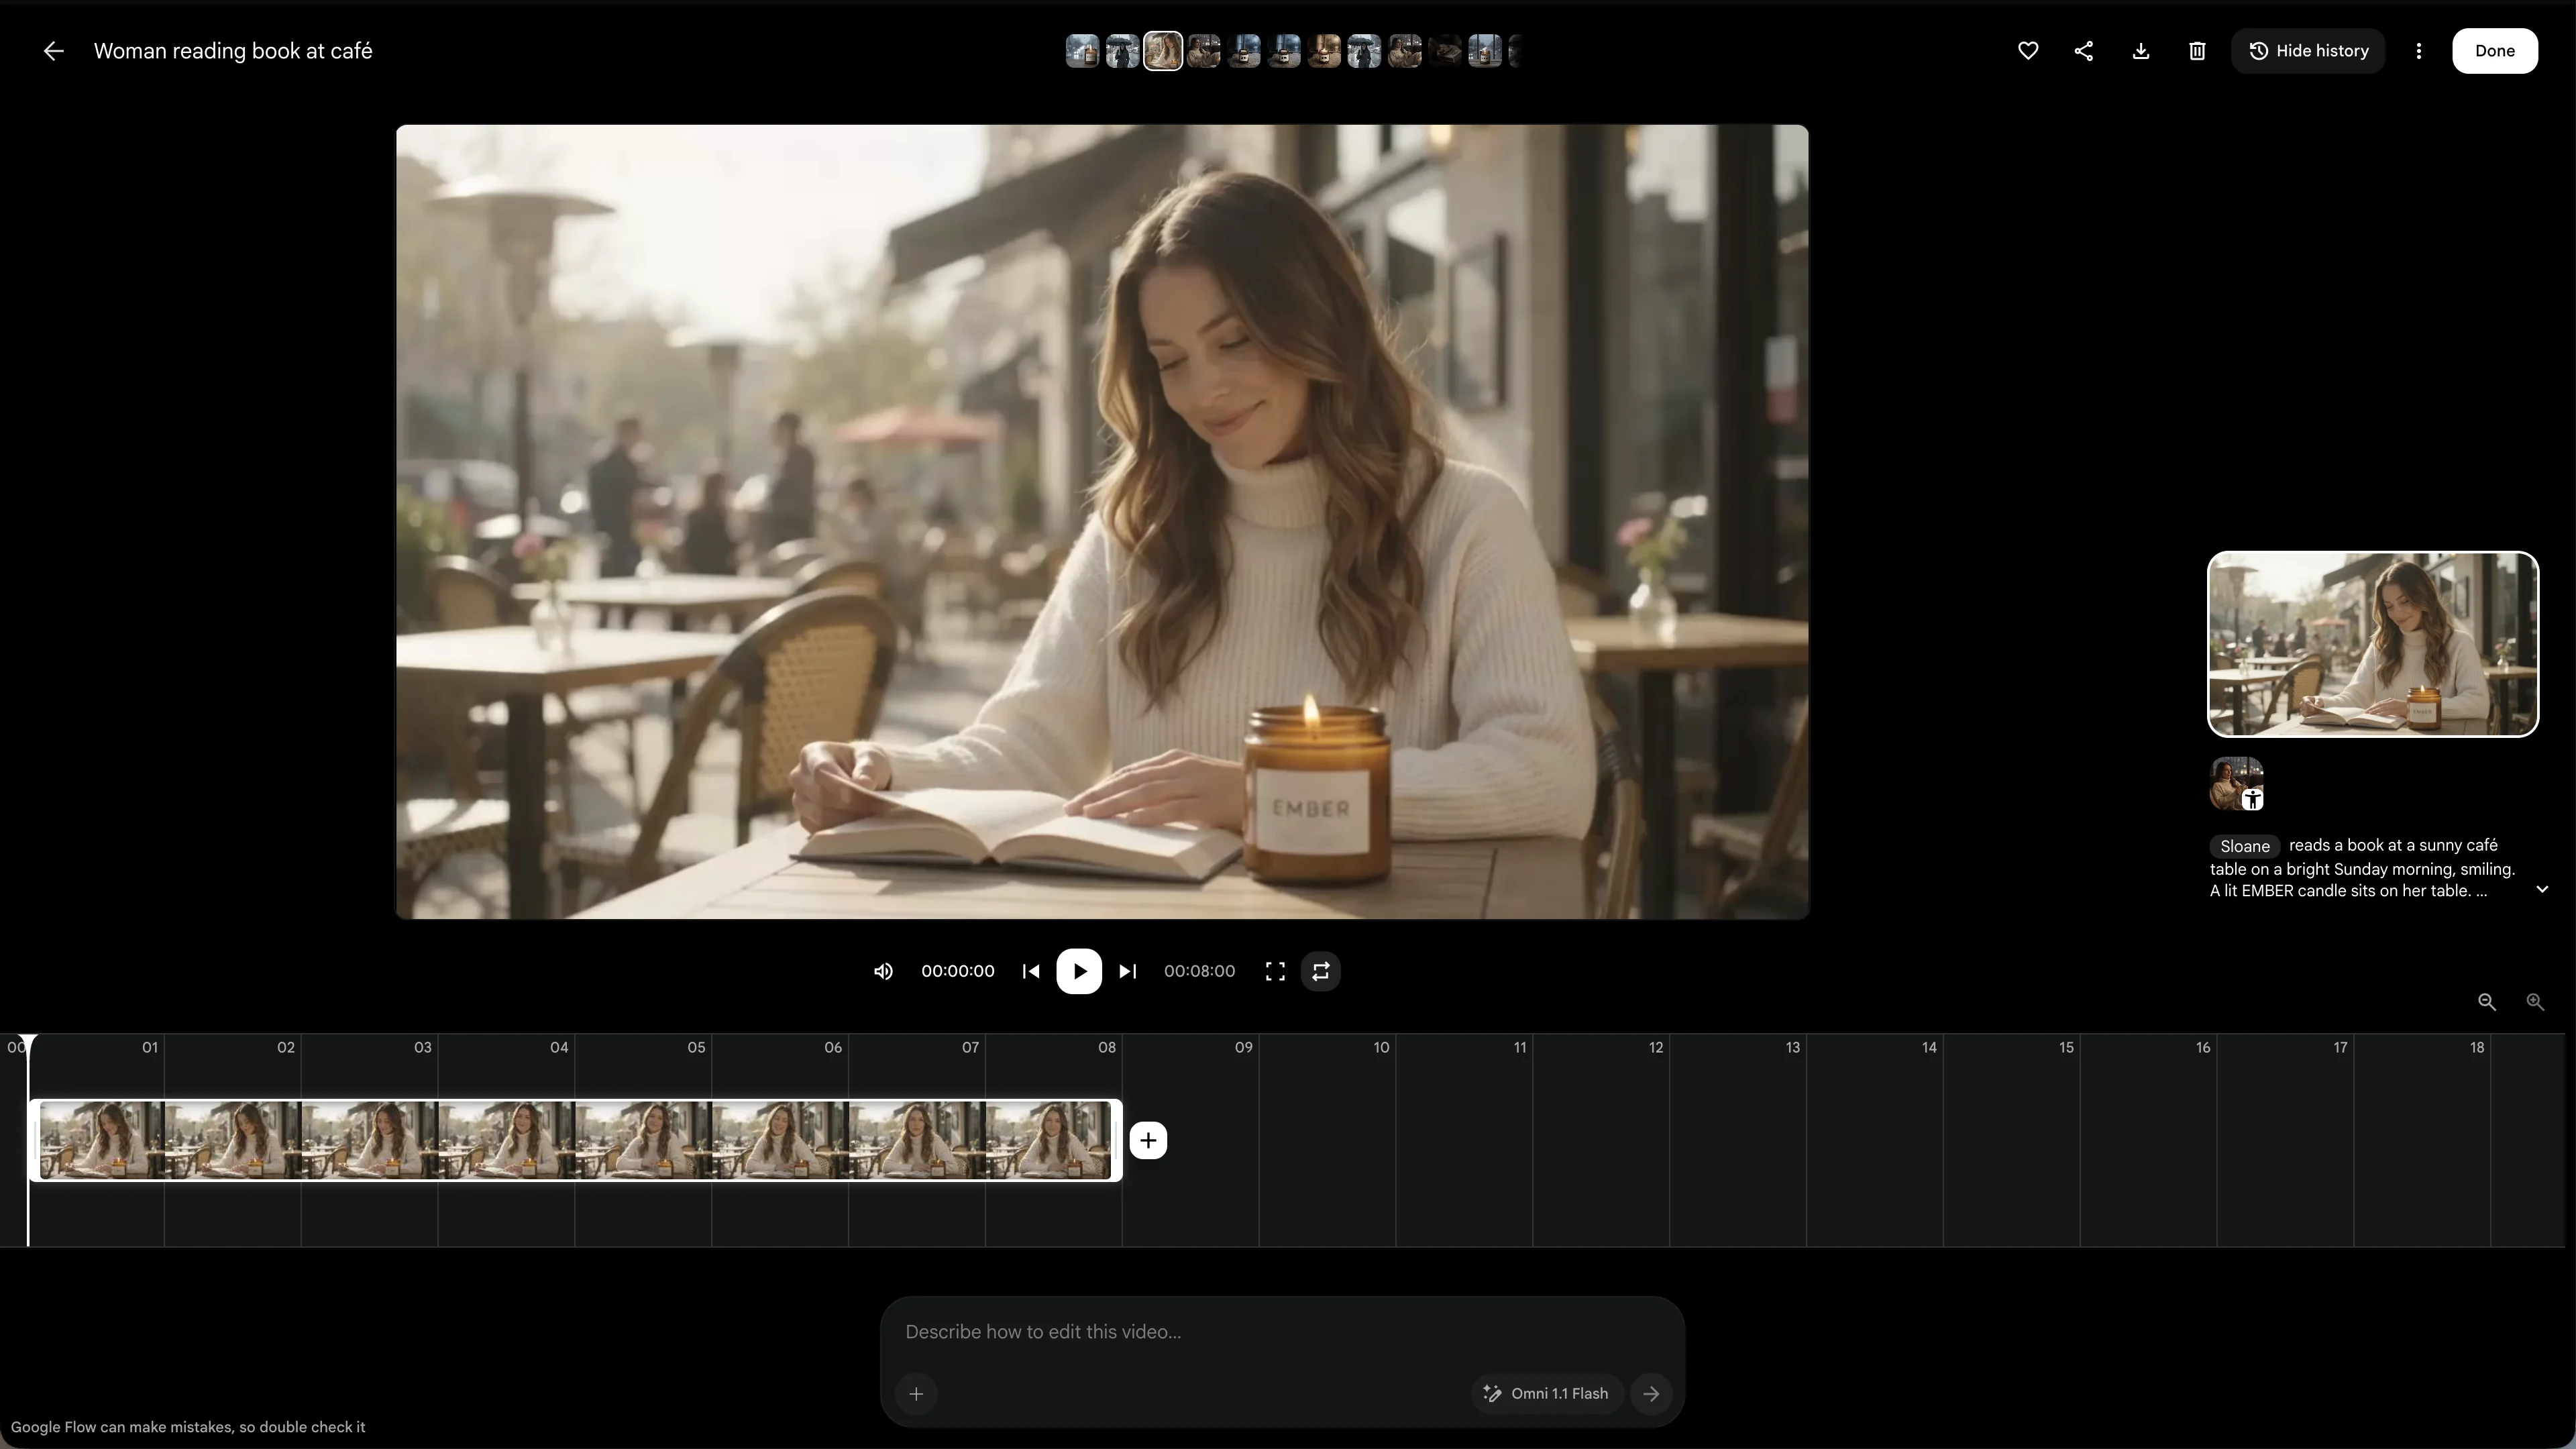
I put Sloane in a completely different scene: a sunny café on a Sunday morning, reading a book, with one spoken line. The 8-second clip cost 12 credits. Same face, same hair, same cream turtleneck, and she said the line clearly.
Step 8: Control a Shot With Start and End Frames
When you need a shot to start and end in an exact way, use Frames instead of Ingredients. You give Flow a start image and an end image, and it creates the motion in between.
I wanted a shot of a match lighting the candle in a dark room, with the room filling with warm light. First I made the start image in manual mode (agent off, Image, Nano Banana Pro).
The image looked great, but the label said "EMBER CANDLE CO." on brown paper. This is the catch from step 3: in manual mode, the agent instructions don't apply, so Flow didn't know the label rules.
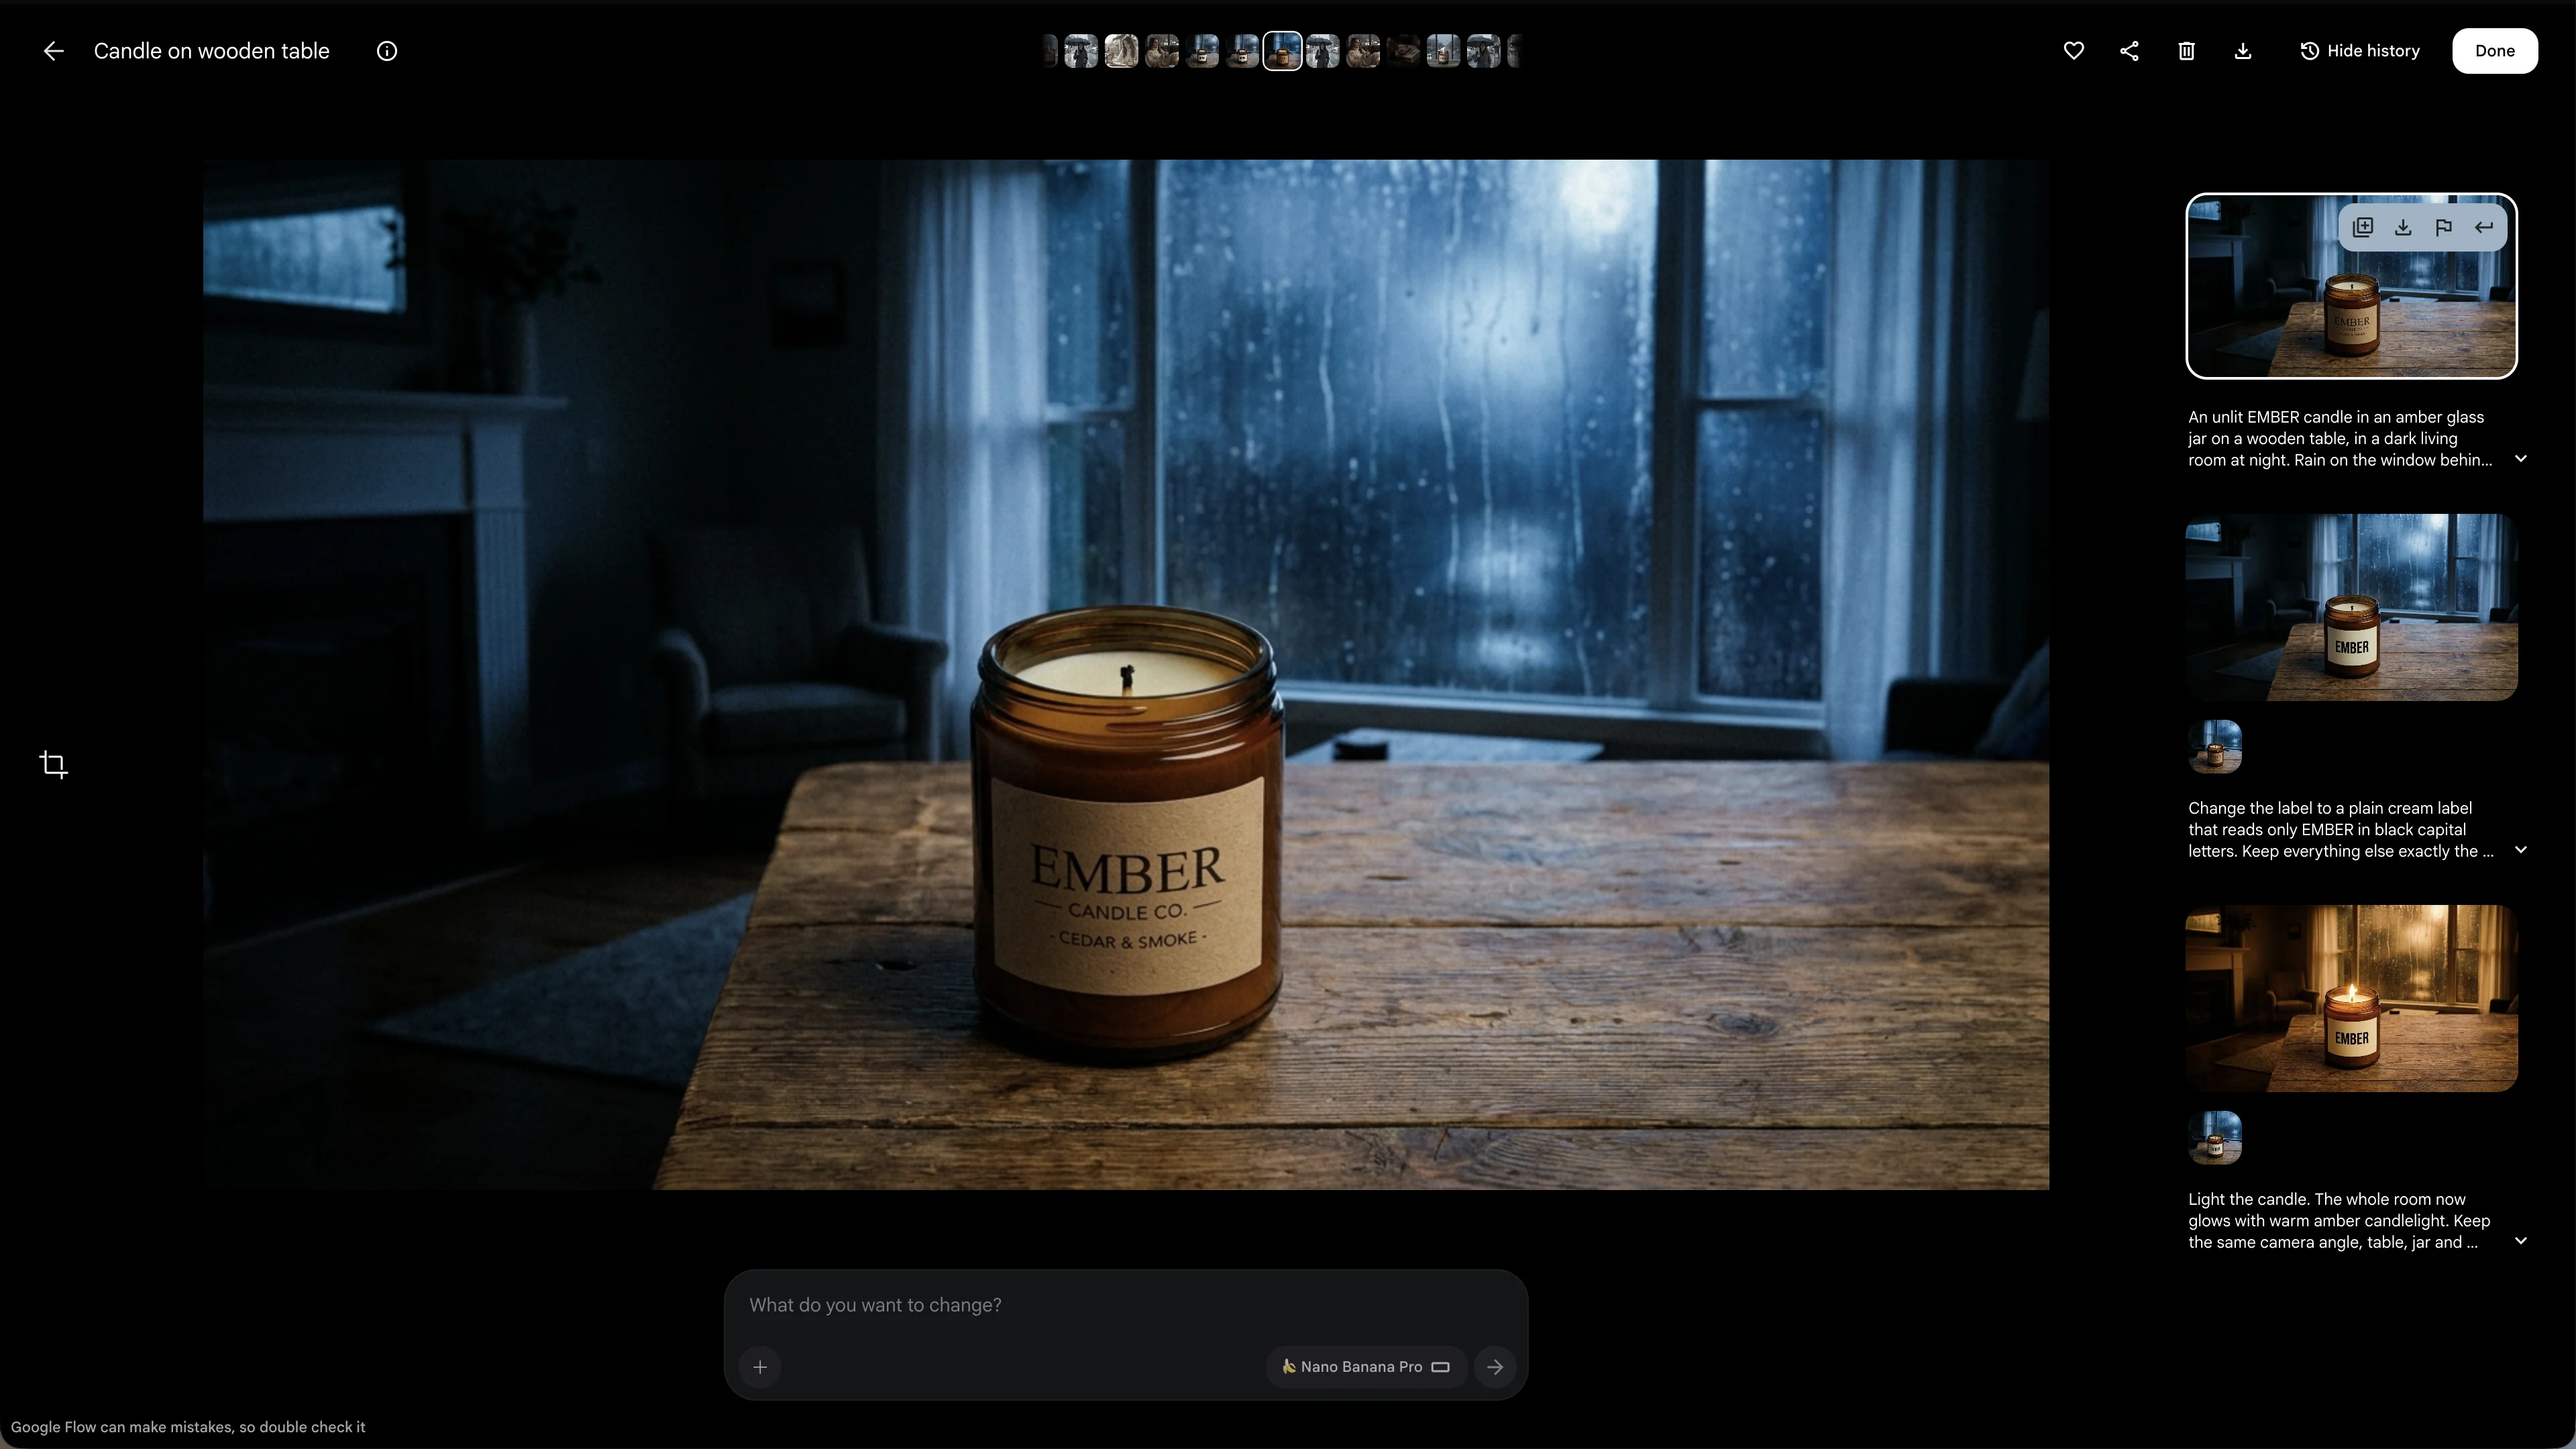
You can fix images the same way you fix clips. I asked Flow to change the label to a plain cream label that reads only EMBER and keep everything else the same. Then I made the end frame with a second edit: "Light the candle. The whole room now glows with warm amber candlelight. Keep the same camera angle, table, jar and label."
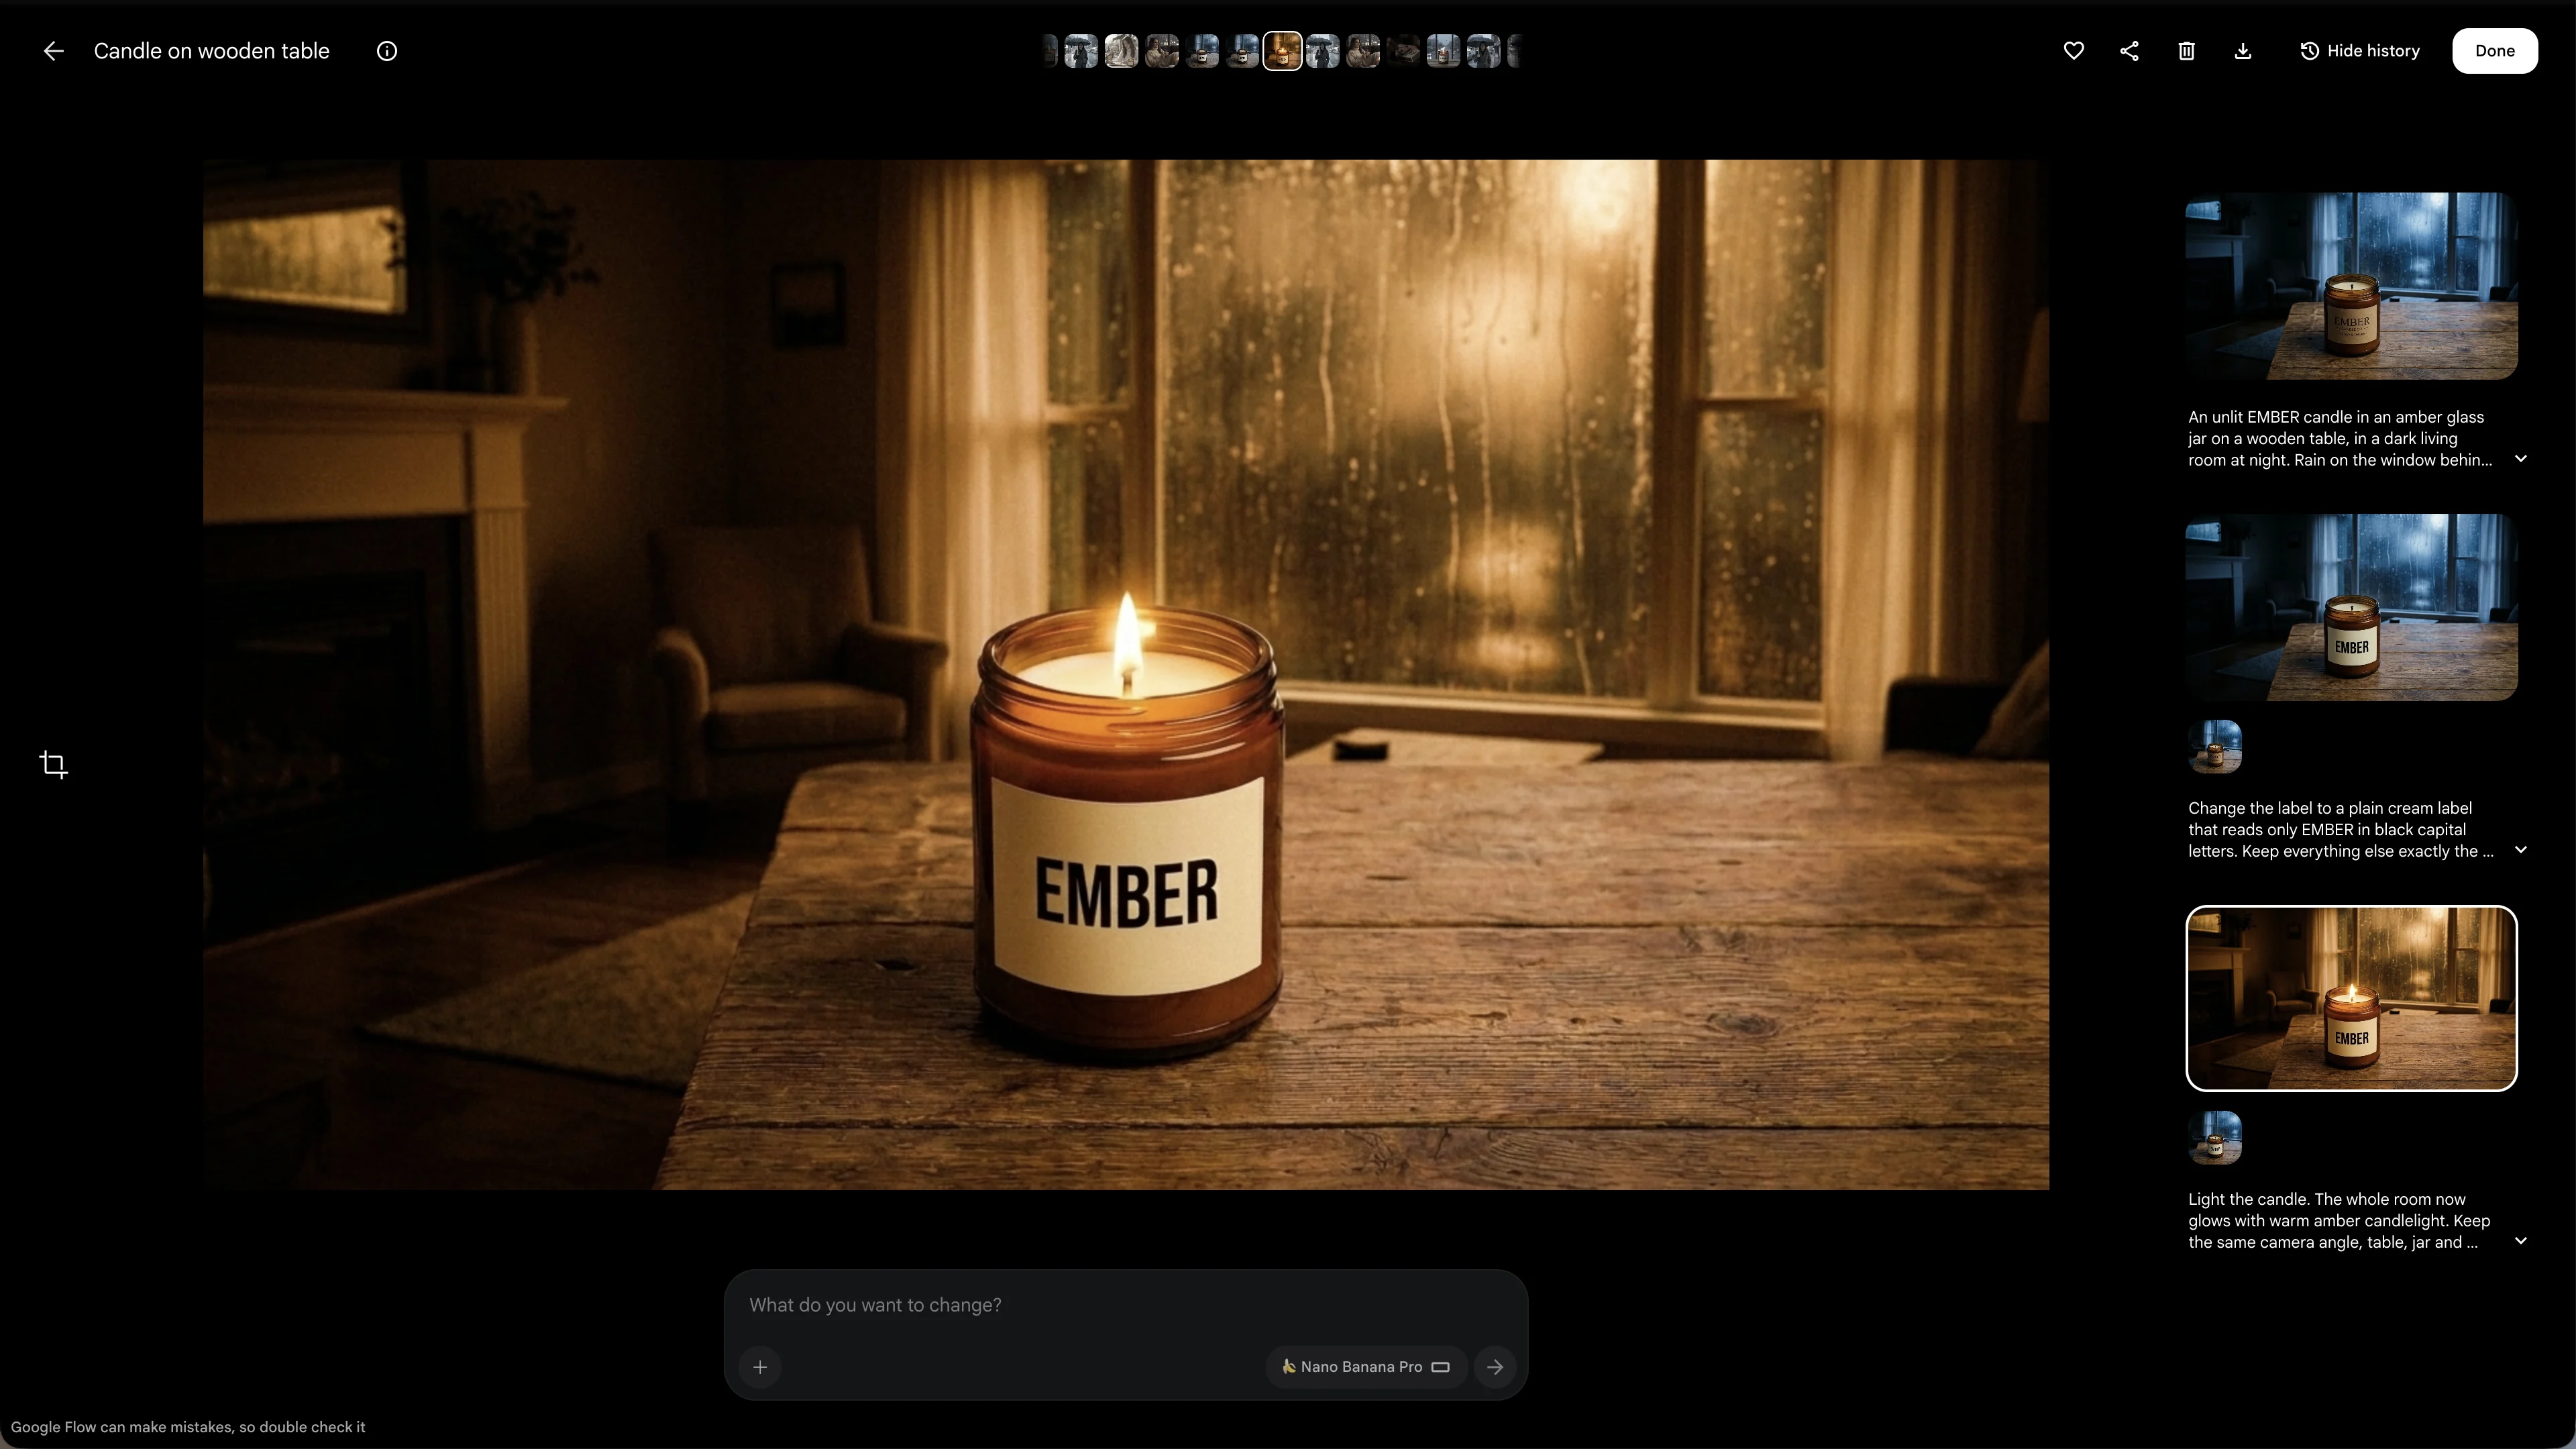
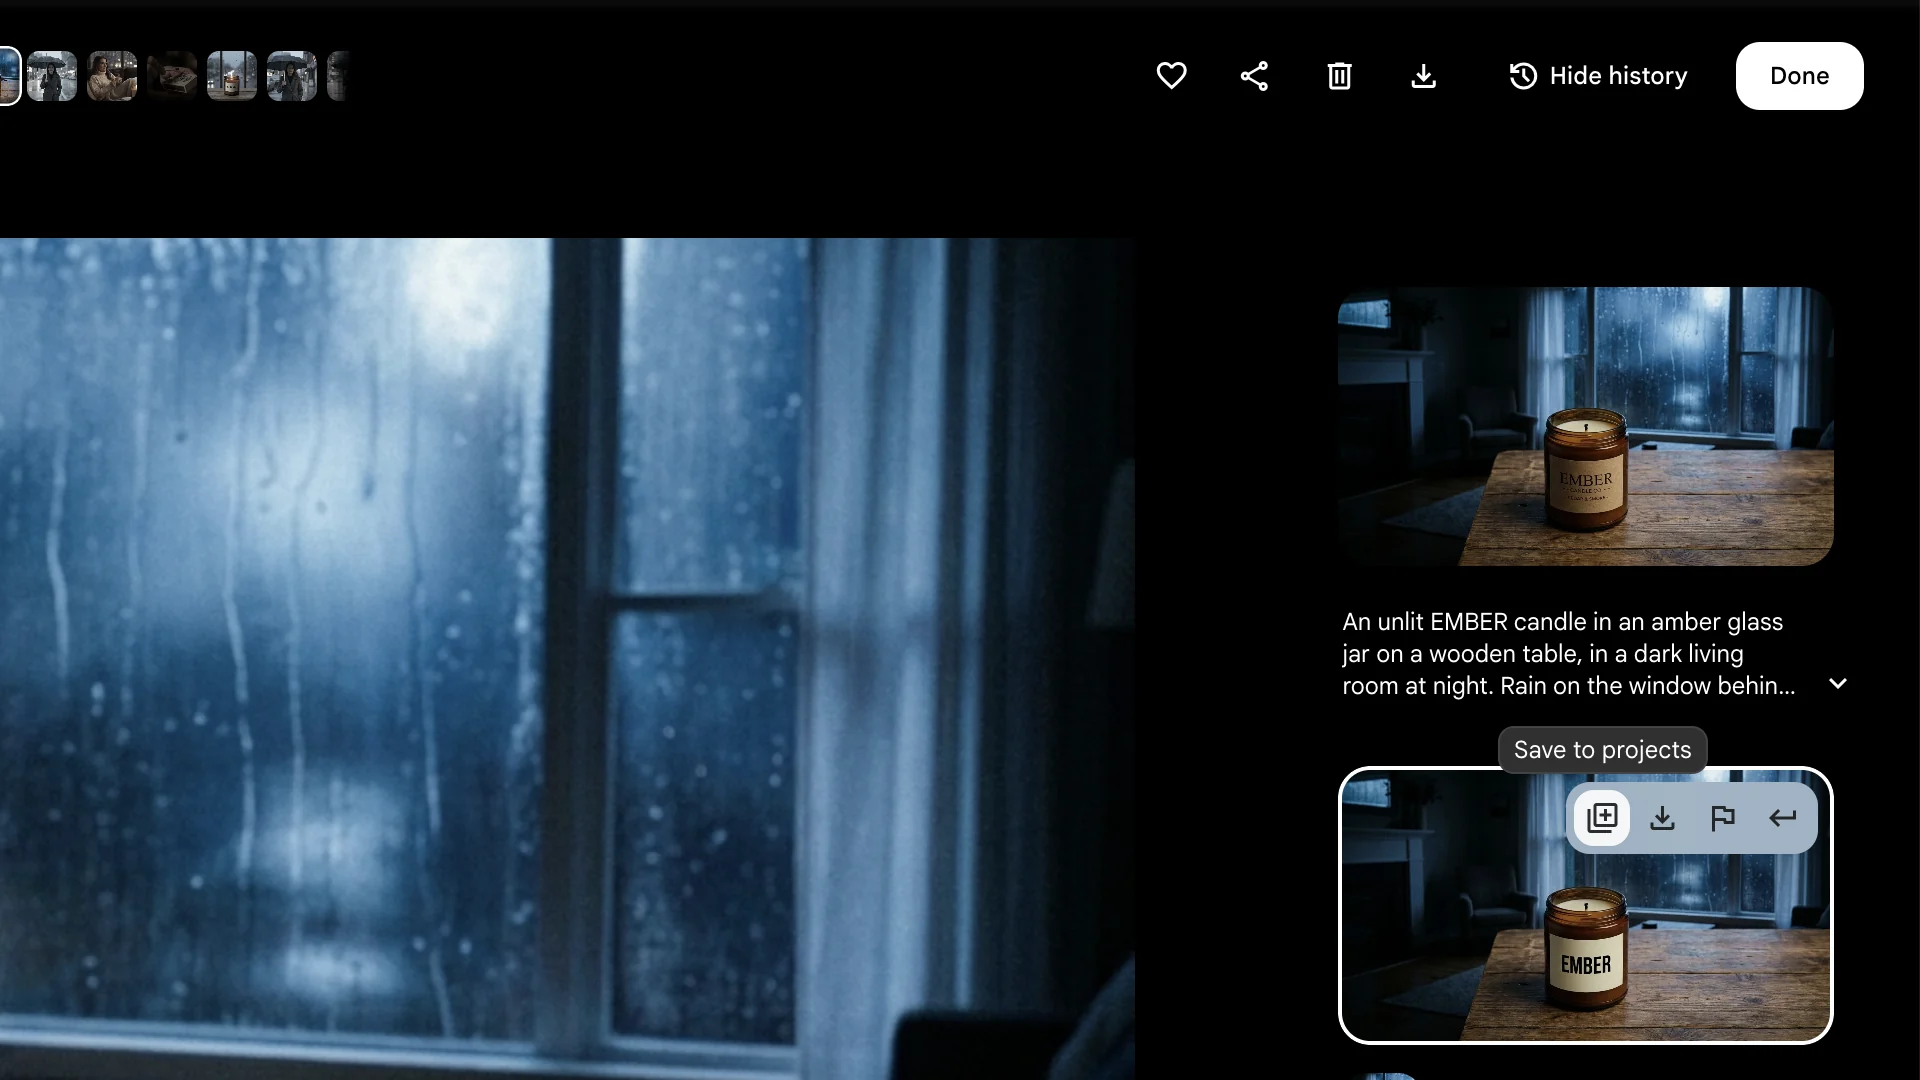
Each edit is saved as a new version of the same image. The frame picker only shows the latest version, so to use the unlit version as the start frame, hover over it in the history and click Save to projects. It becomes its own image.
Then switch the prompt box to Video and Frames. Two slots appear, Start and End. Add your images, write what happens between them, and choose the model.
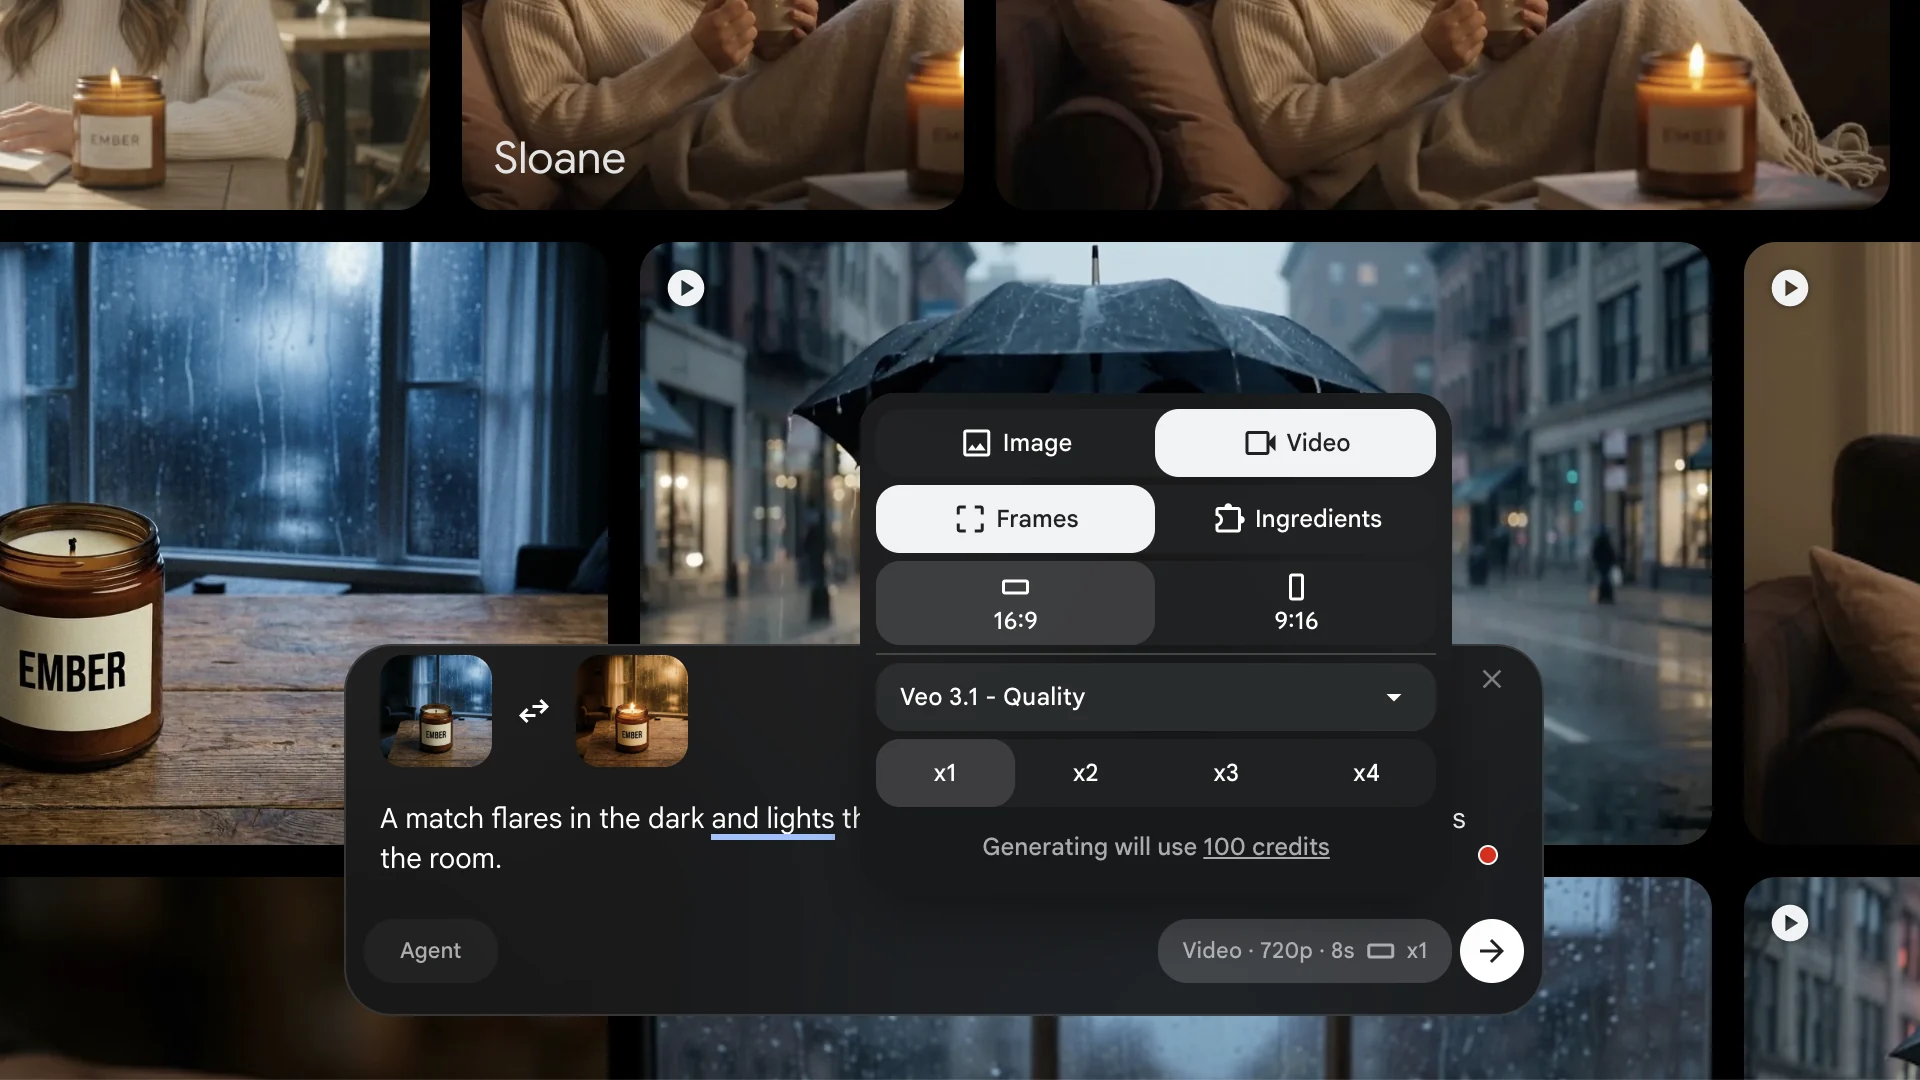
I used Veo 3.1 Quality, the best and most expensive model, at 100 credits for 8 seconds. The hand, match and flame looked real. But the room stayed blue until the last half second and then jumped to the warm end frame.
The lesson: if the start and end frames are very different, the change happens suddenly at the end. Make the end frame closer to the start frame, or describe the change in the prompt with a time, such as "the room slowly turns warm over 6 seconds".
Step 9: Put Your Clips Together in Scenes
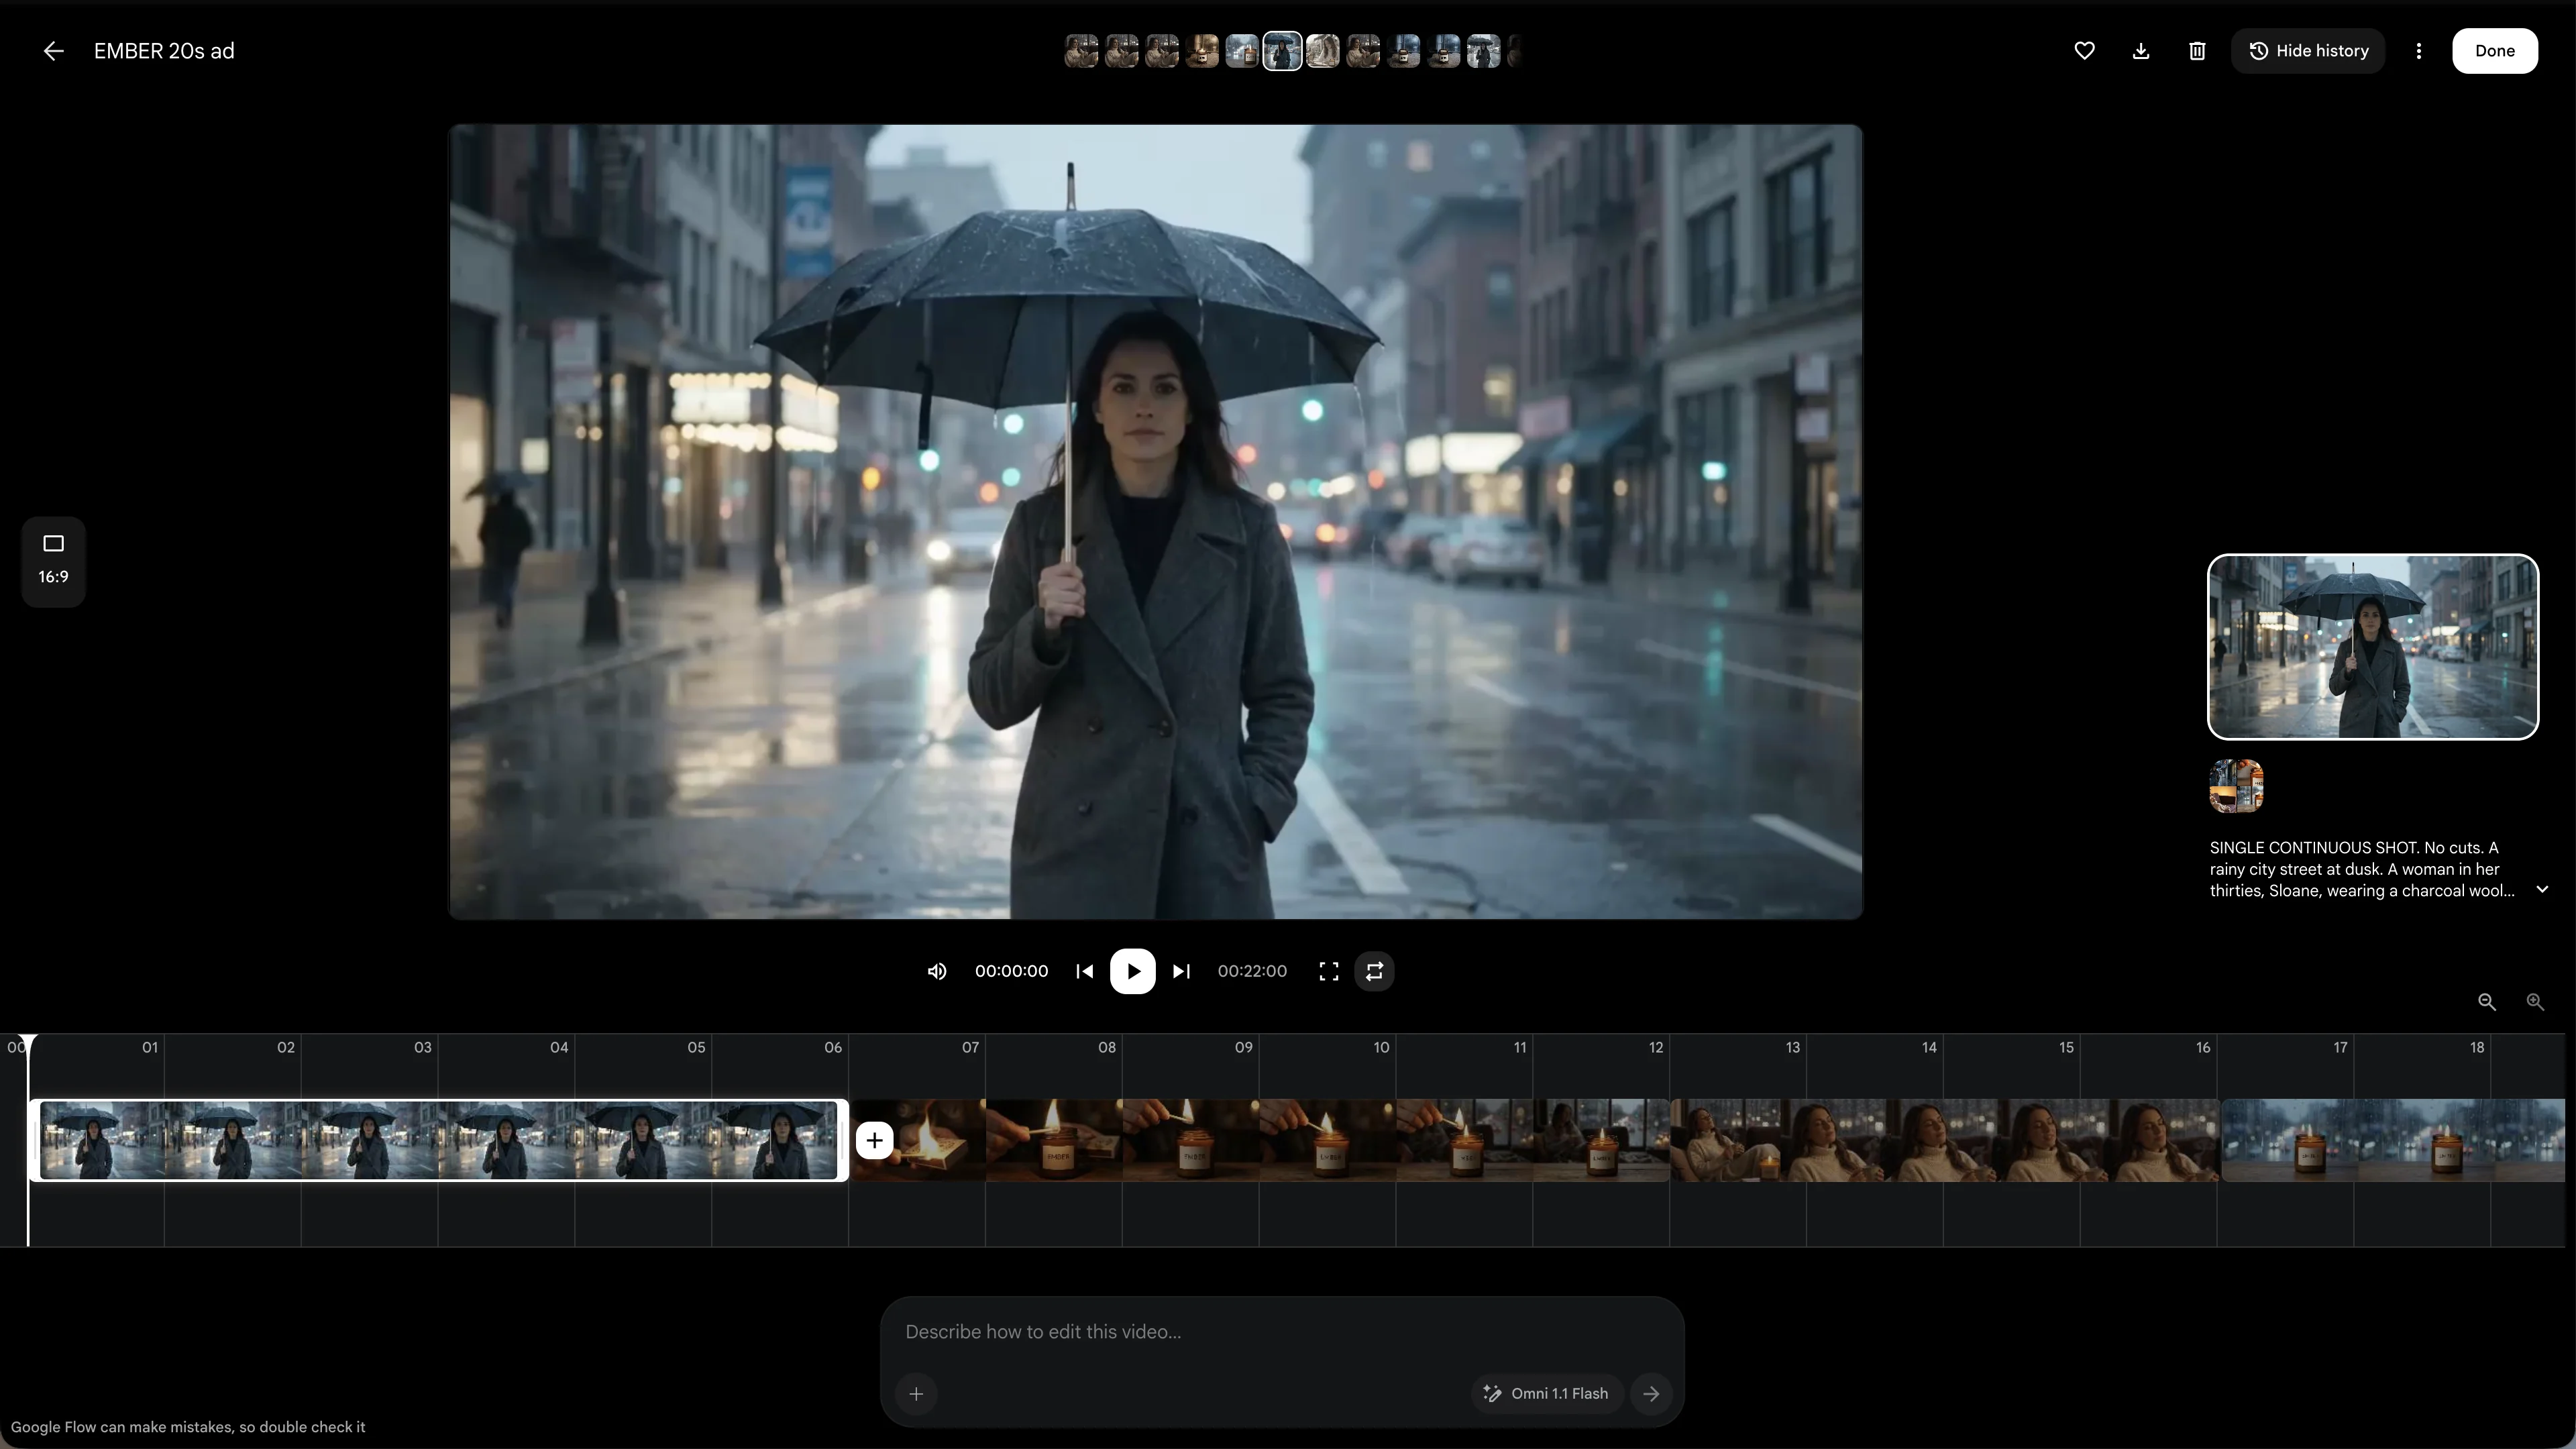
The Scenes section is Flow's video editor. Right-click the empty page and choose New scene, then give it a name.
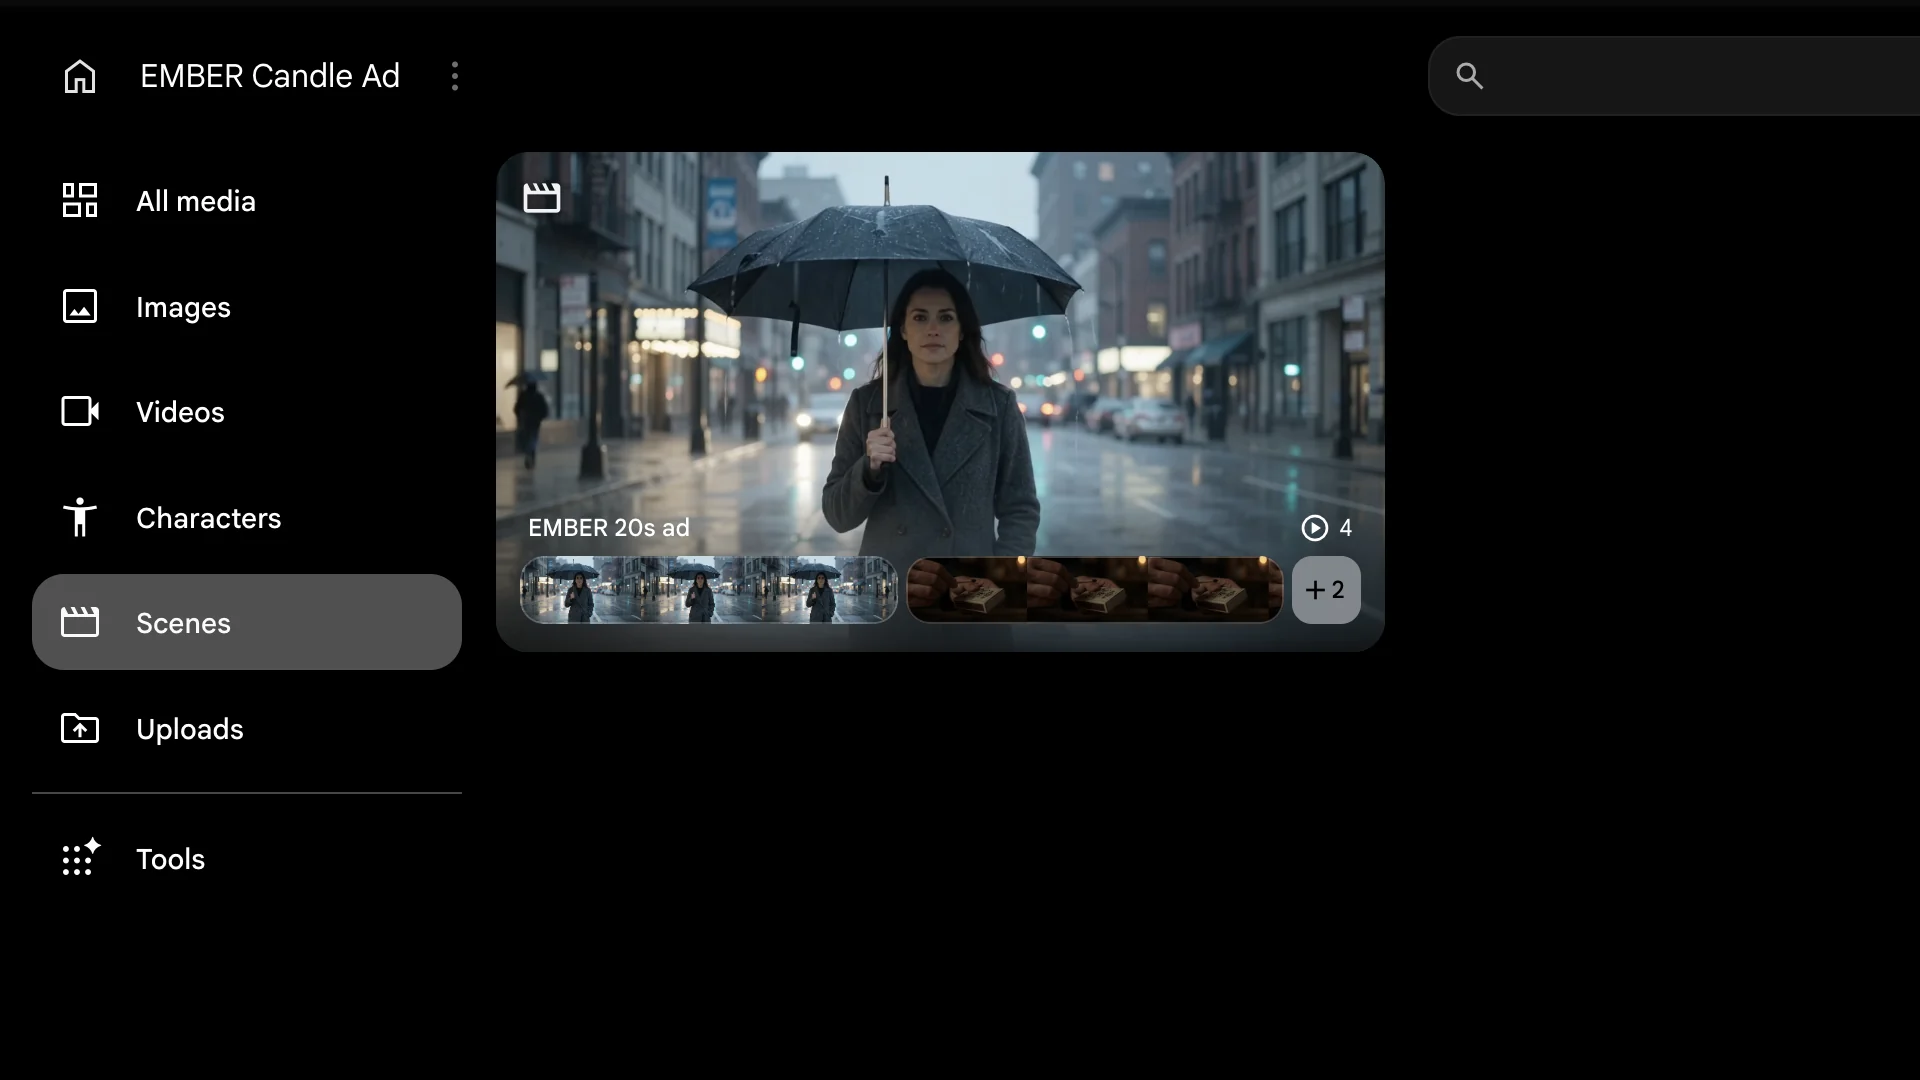
In the scene editor:
- Add clips with the + button on the timeline (it appears when a clip is selected), then choose from your videos or uploads.
- Reorder by dragging a clip along the timeline.
- Trim by dragging the start or end of a clip. I dragged the start of the sofa clip 2 seconds to the right, which removed the leftover cut from step 5.
- Extend a clip from the + menu. In our project this option used Veo 3.1 Lite and was greyed out for Gemini Omni Flash clips.
My final scene: the walk (6 seconds), the match (6), the sofa (4) and the product shot (6), 22 seconds in total.
Step 10: Download Your Video
There are two ways to download, and they don't give the same quality:
- A single clip: click the download icon on the clip and choose 270p (animated GIF), 720p (original size), 1080p (upscaled, free on paid plans) or 4K (upscaled, Ultra only). The 1080p upscale took about 45 seconds.
- A whole scene: the download icon in the scene editor exports the joined video. Ours came out at 720p, with sound, in about 15 seconds. There was no resolution choice.
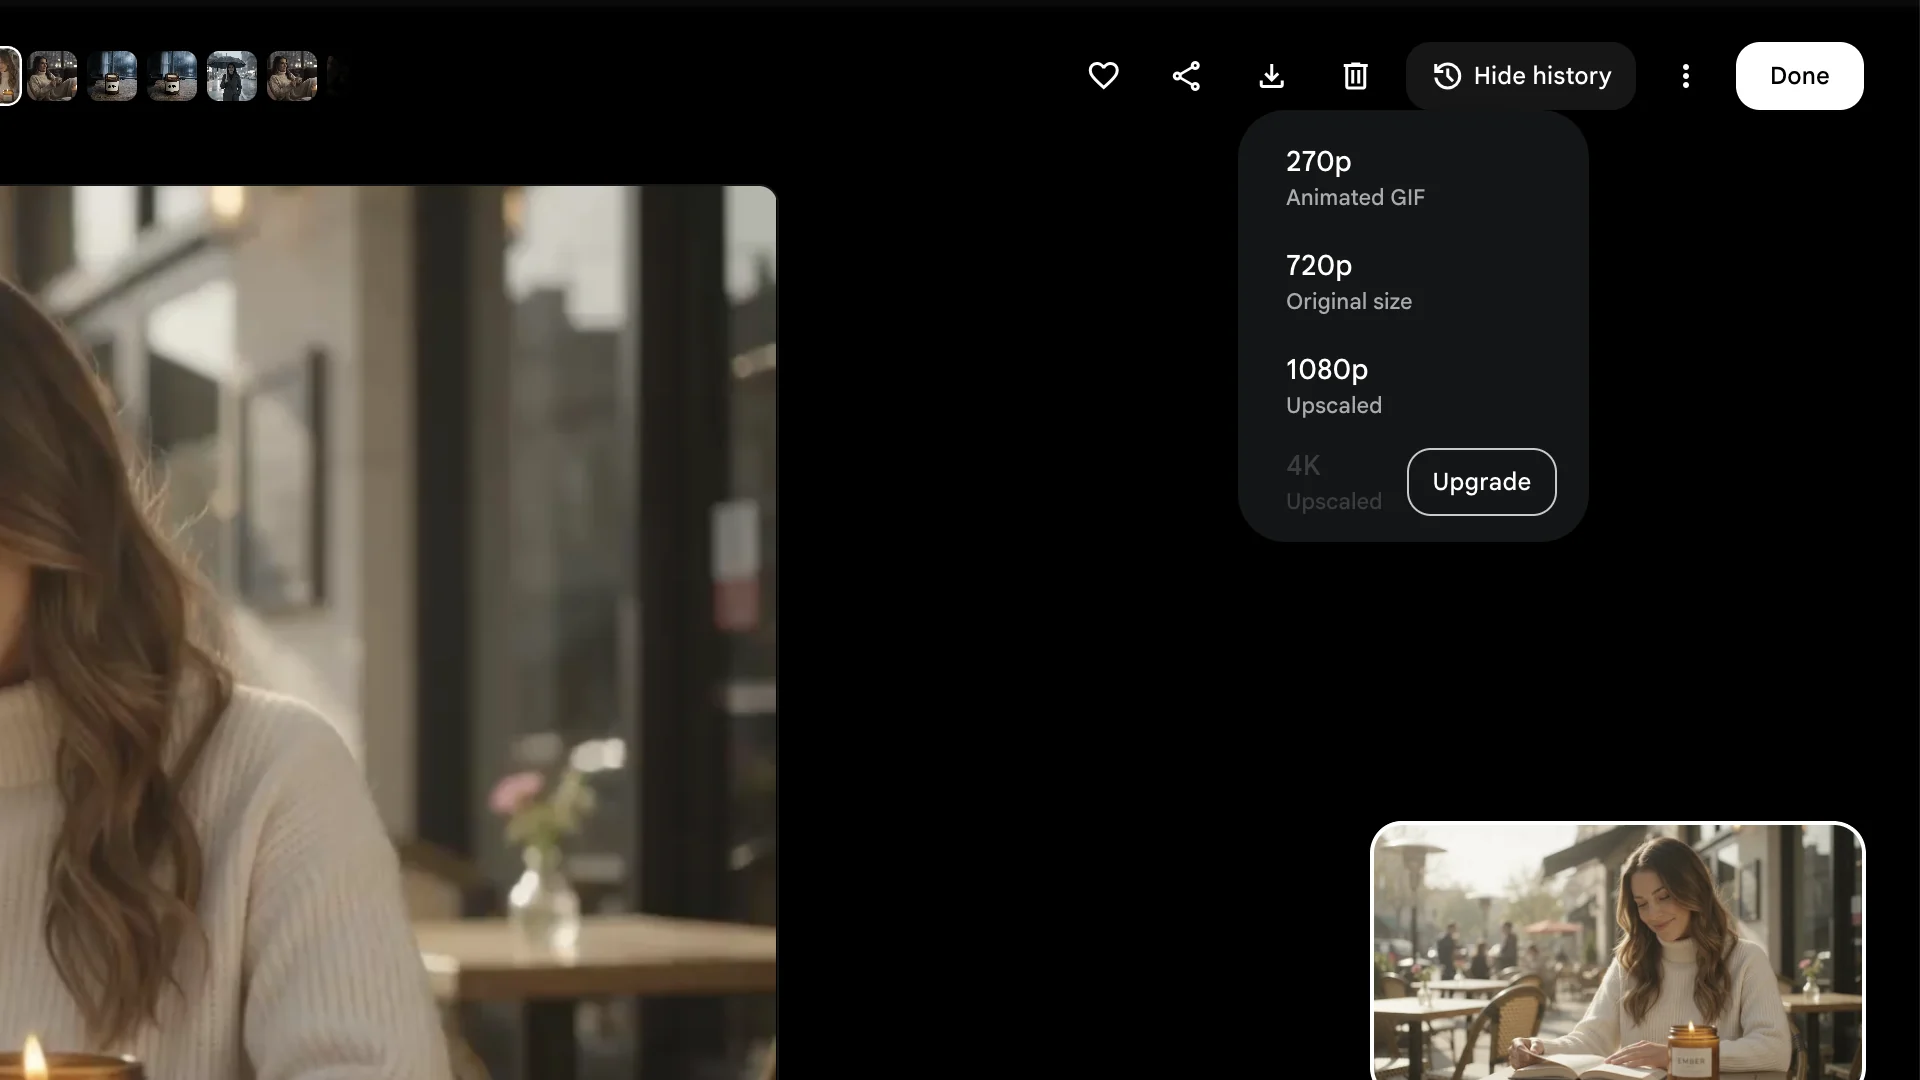
If you need the final video in 1080p, download each clip in 1080p and join them in a video editor. You can also publish a clip straight to YouTube from Flow. If YouTube is where your videos will go, my guide to YouTube marketing covers what to do next.
Here's what the whole project cost:
| What I did | Model | Credits |
|---|---|---|
| Brief, text storyboard, two storyboard grids | Agent, Nano Banana Pro | 0 |
| Four 10-second clips (first try, with cuts) | Gemini Omni Flash | 60 |
| Four 6-second clips (single shots, one failed and refunded) | Gemini Omni Flash | 40 |
| Edit of the product shot | Gemini Omni Flash | 20 |
| Character clip in the café | Gemini Omni Flash | 12 |
| Start and end frame images | Nano Banana Pro | 0 |
| Start and end frames clip | Veo 3.1 Quality | 100 |
| Scene editing, 1080p clip download, scene export | None | 0 |
| Total | 232 |
The first round of clips (60 credits) was the biggest waste. With "single continuous shot, no cuts" in the brief from the start, the ad would have cost about 170 credits.
Which Google Flow Model Should You Use?
Flow has four video models. This is how they compare, based on Google's help pages and what I saw in the app:
| Model | Clip lengths | Credits per clip | Best for |
|---|---|---|---|
| Gemini Omni Flash | 4, 6, 8 or 10 seconds | 7 to 15 (720p), 4 to 7 (360p draft) | Most clips, characters, dialogue, editing clips and uploaded videos |
| Veo 3.1 Lite | 4, 6 or 8 seconds | 10 | Cheap tests and extending clips |
| Veo 3.1 Fast | 4, 6 or 8 seconds | 20 | Better quality at a middle price |
| Veo 3.1 Quality | 8 seconds | 100 | The one hero shot that has to look perfect |
My advice for beginners: use Gemini Omni Flash for almost everything. It's the default for the agent, it makes the longest clips, and it's the model for editing. Try a 360p draft when you're testing an idea. Save Veo 3.1 Quality for a shot that really matters, once the prompt is right.
On Ultra plans, Veo 3.1 Lite and Fast cost half as much.
More Things You Can Do in Google Flow
Edit Your Own Videos
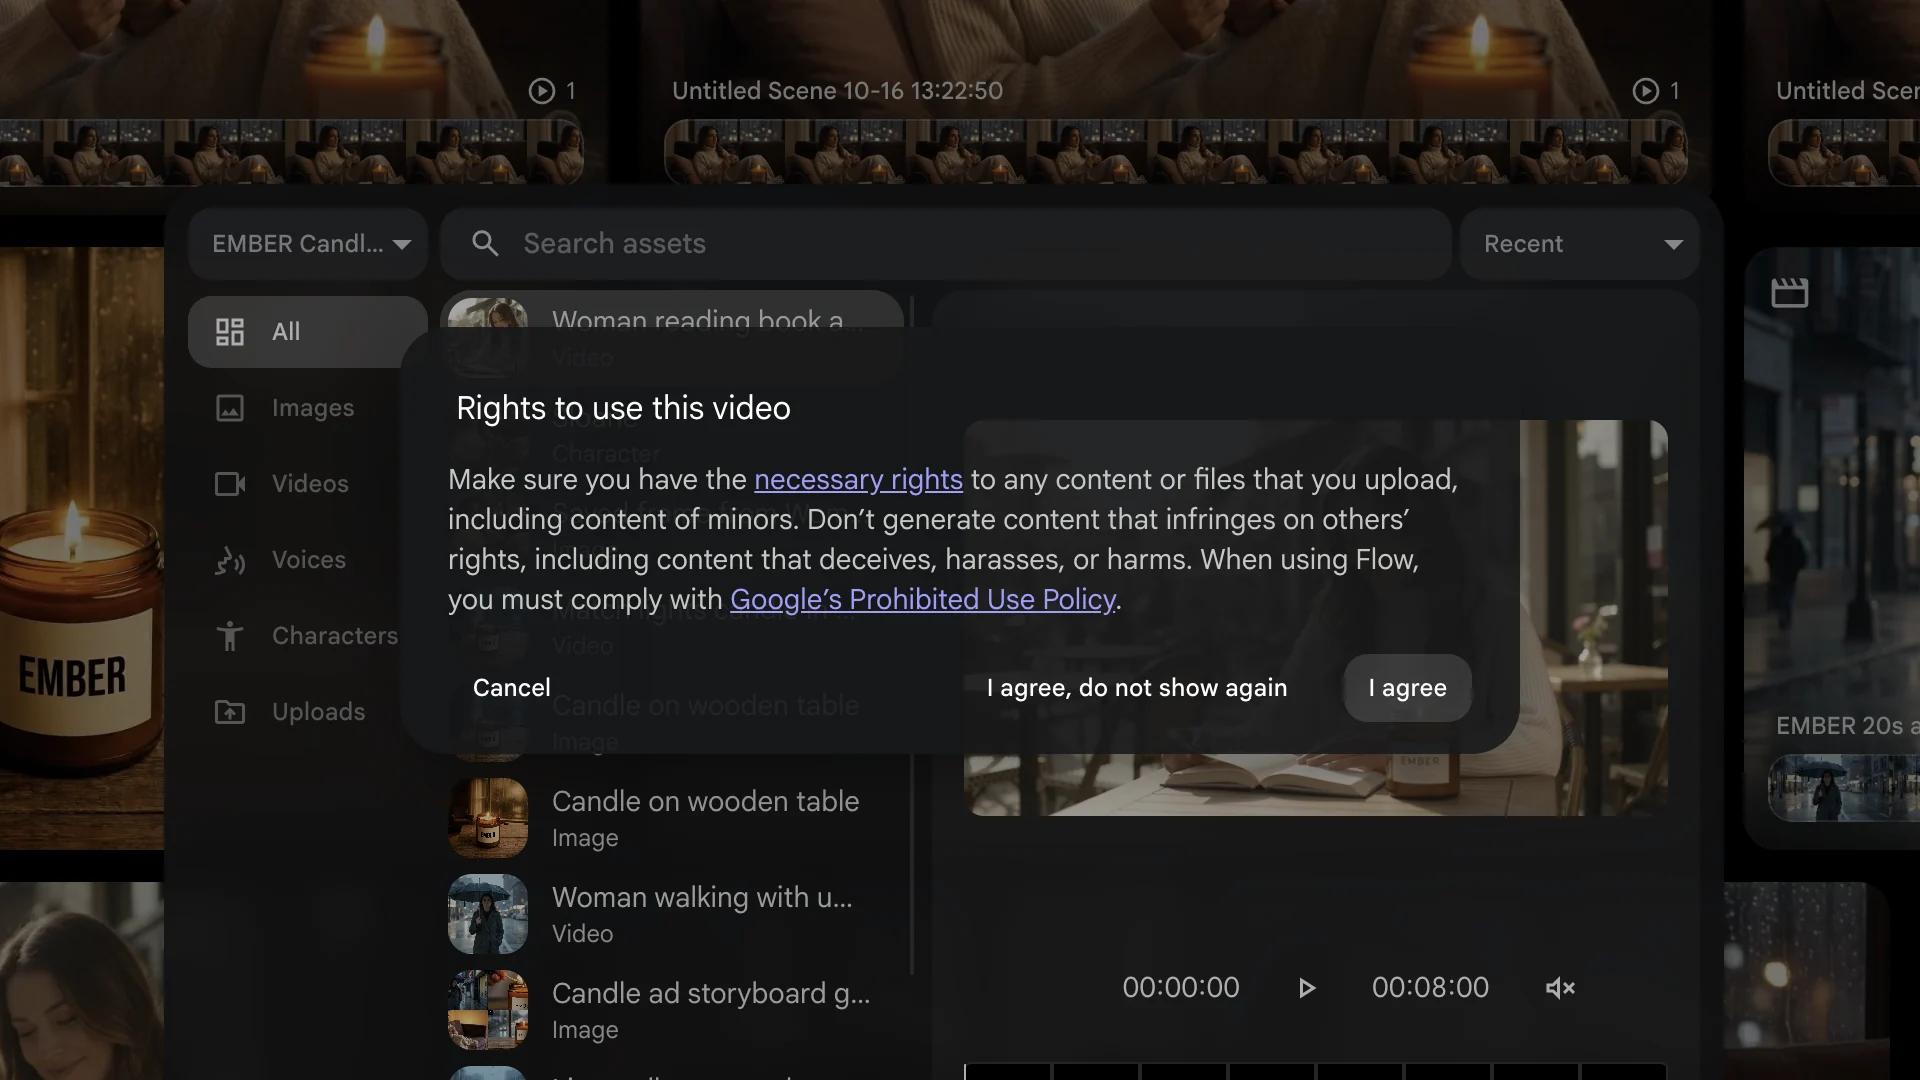
You can upload your own footage and change it with a prompt. In the prompt box, click + and then Upload media. Flow accepts the common image and video formats. The first time, you'll be asked to confirm you have the rights to use the video.
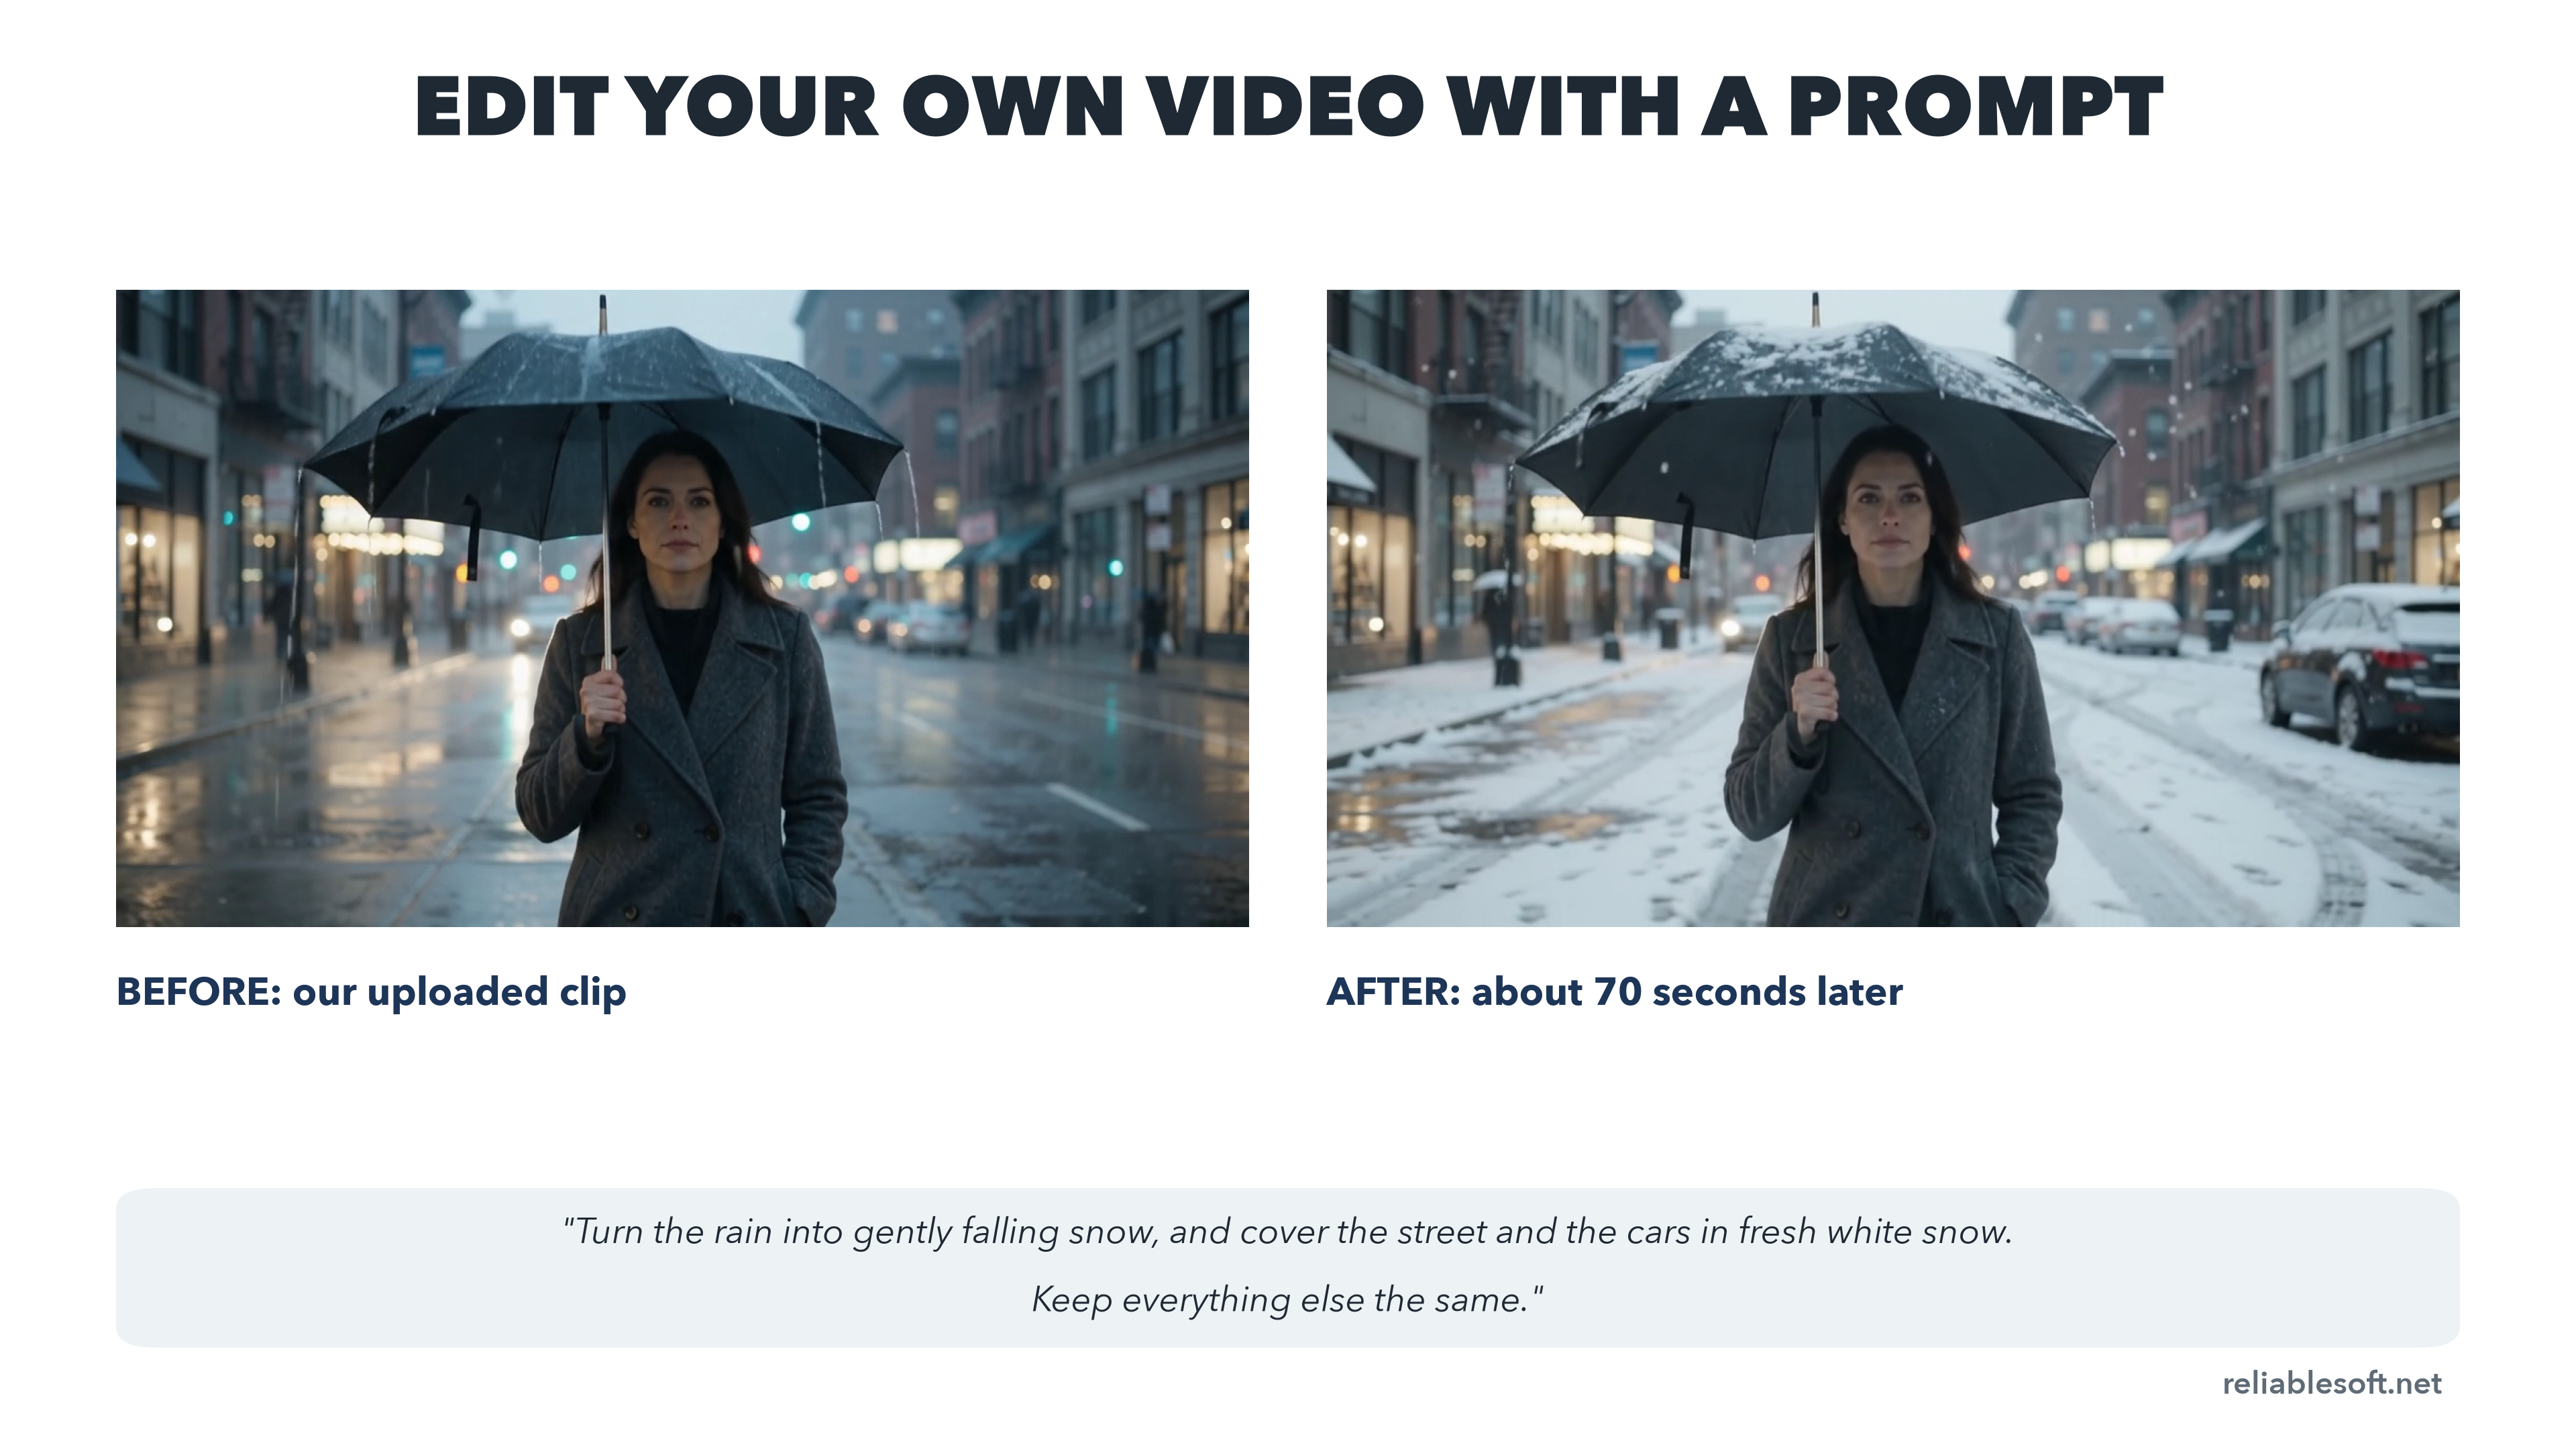
I uploaded our 6-second rainy street clip and asked Flow to turn the rain into snow and keep everything else the same. About 70 seconds later, the street, the cars and her umbrella were covered in fresh snow, and the woman, her coat and the framing hadn't changed.
Editing uploaded videos isn't available in the European Economic Area, Switzerland or the UK.
Create an Avatar of Yourself
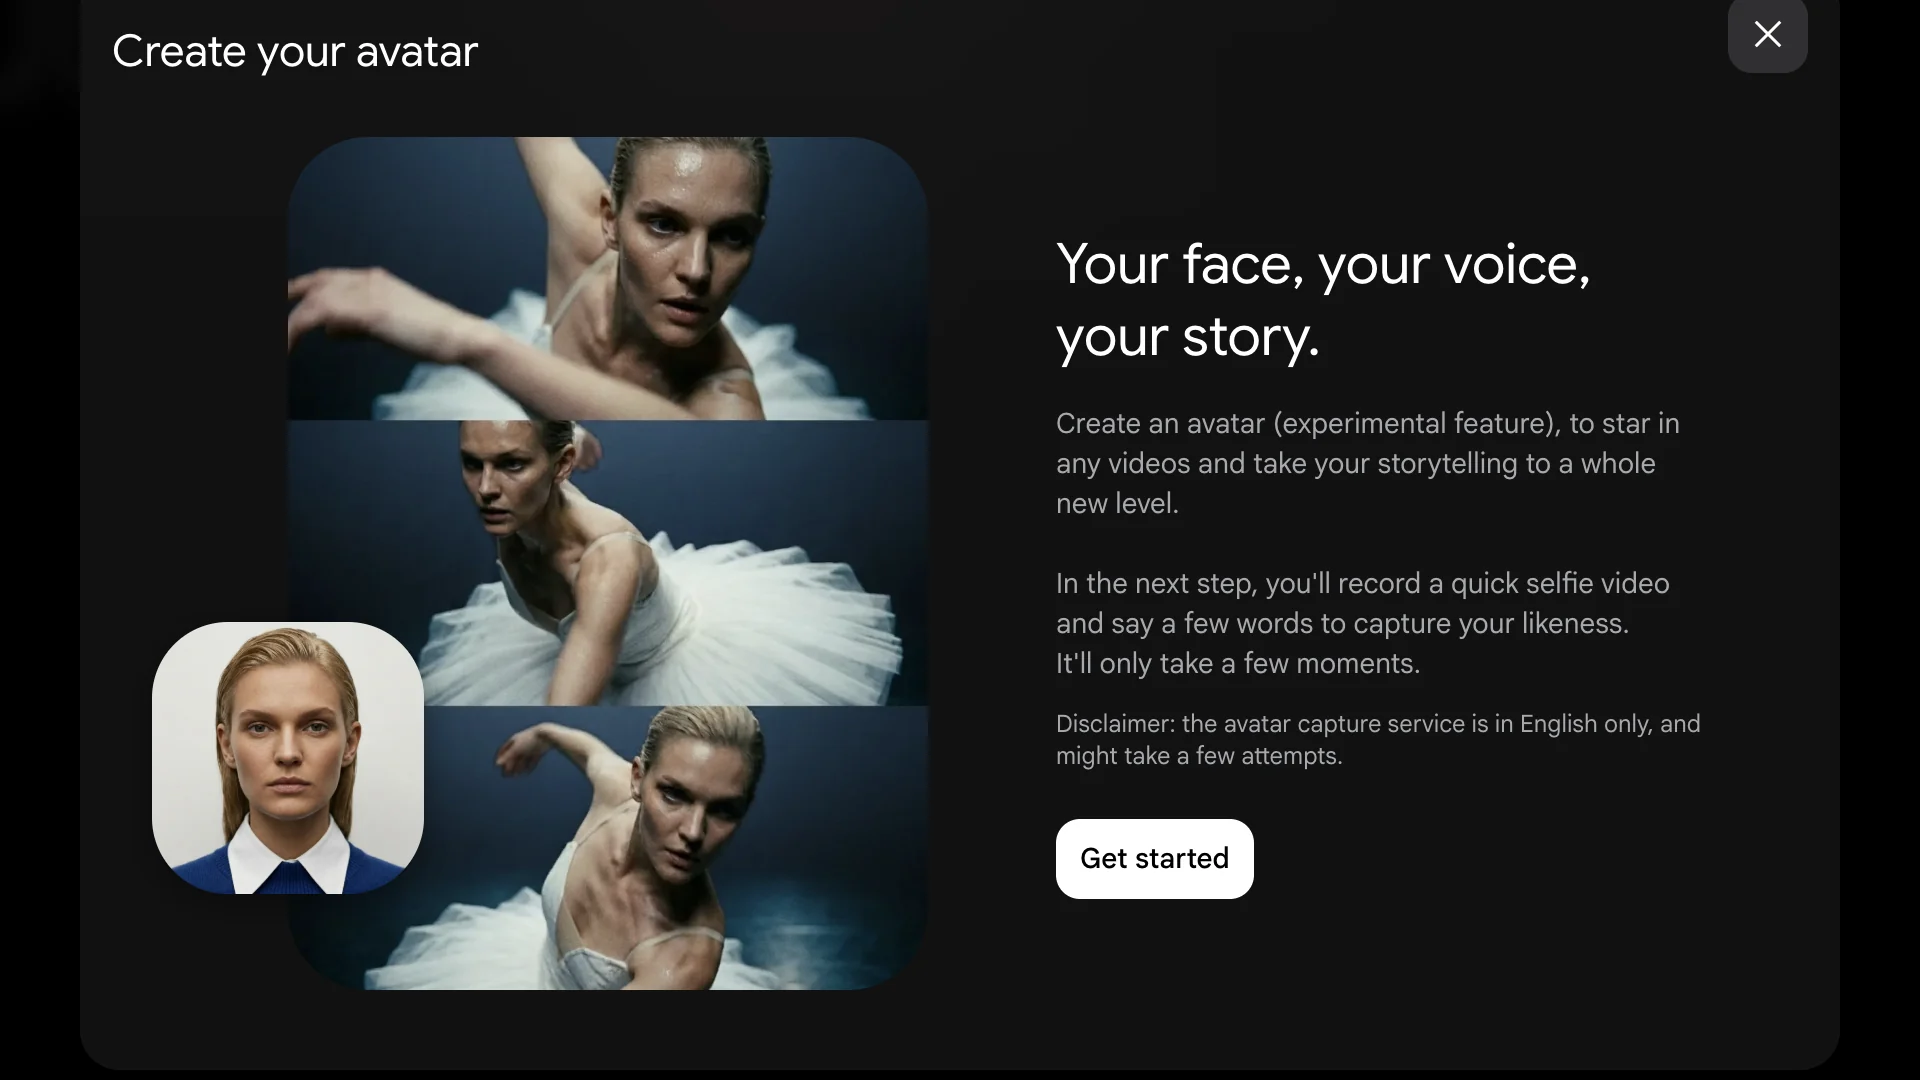
On the Characters page, Create my avatar lets you make a digital version of yourself. You record a short selfie video and say a few words, and Flow captures your likeness and voice so you can star in your own videos. Avatars aren't available in the EEA, Switzerland or the UK either.
Tools, Flow TV and the Mobile App
- Tools: ready-made mini apps built on Flow, by Google and the community. You can also create your own.
- Flow TV: a channel of videos made by other creators, with the prompts they used. It's a good way to learn what prompts produce.
- Mobile app: Flow is also available on Android and iPhone. Some features differ between web and mobile.
Google Flow Prompt Tips
Whether you brief the agent or write prompts yourself, a good video prompt has the same parts:
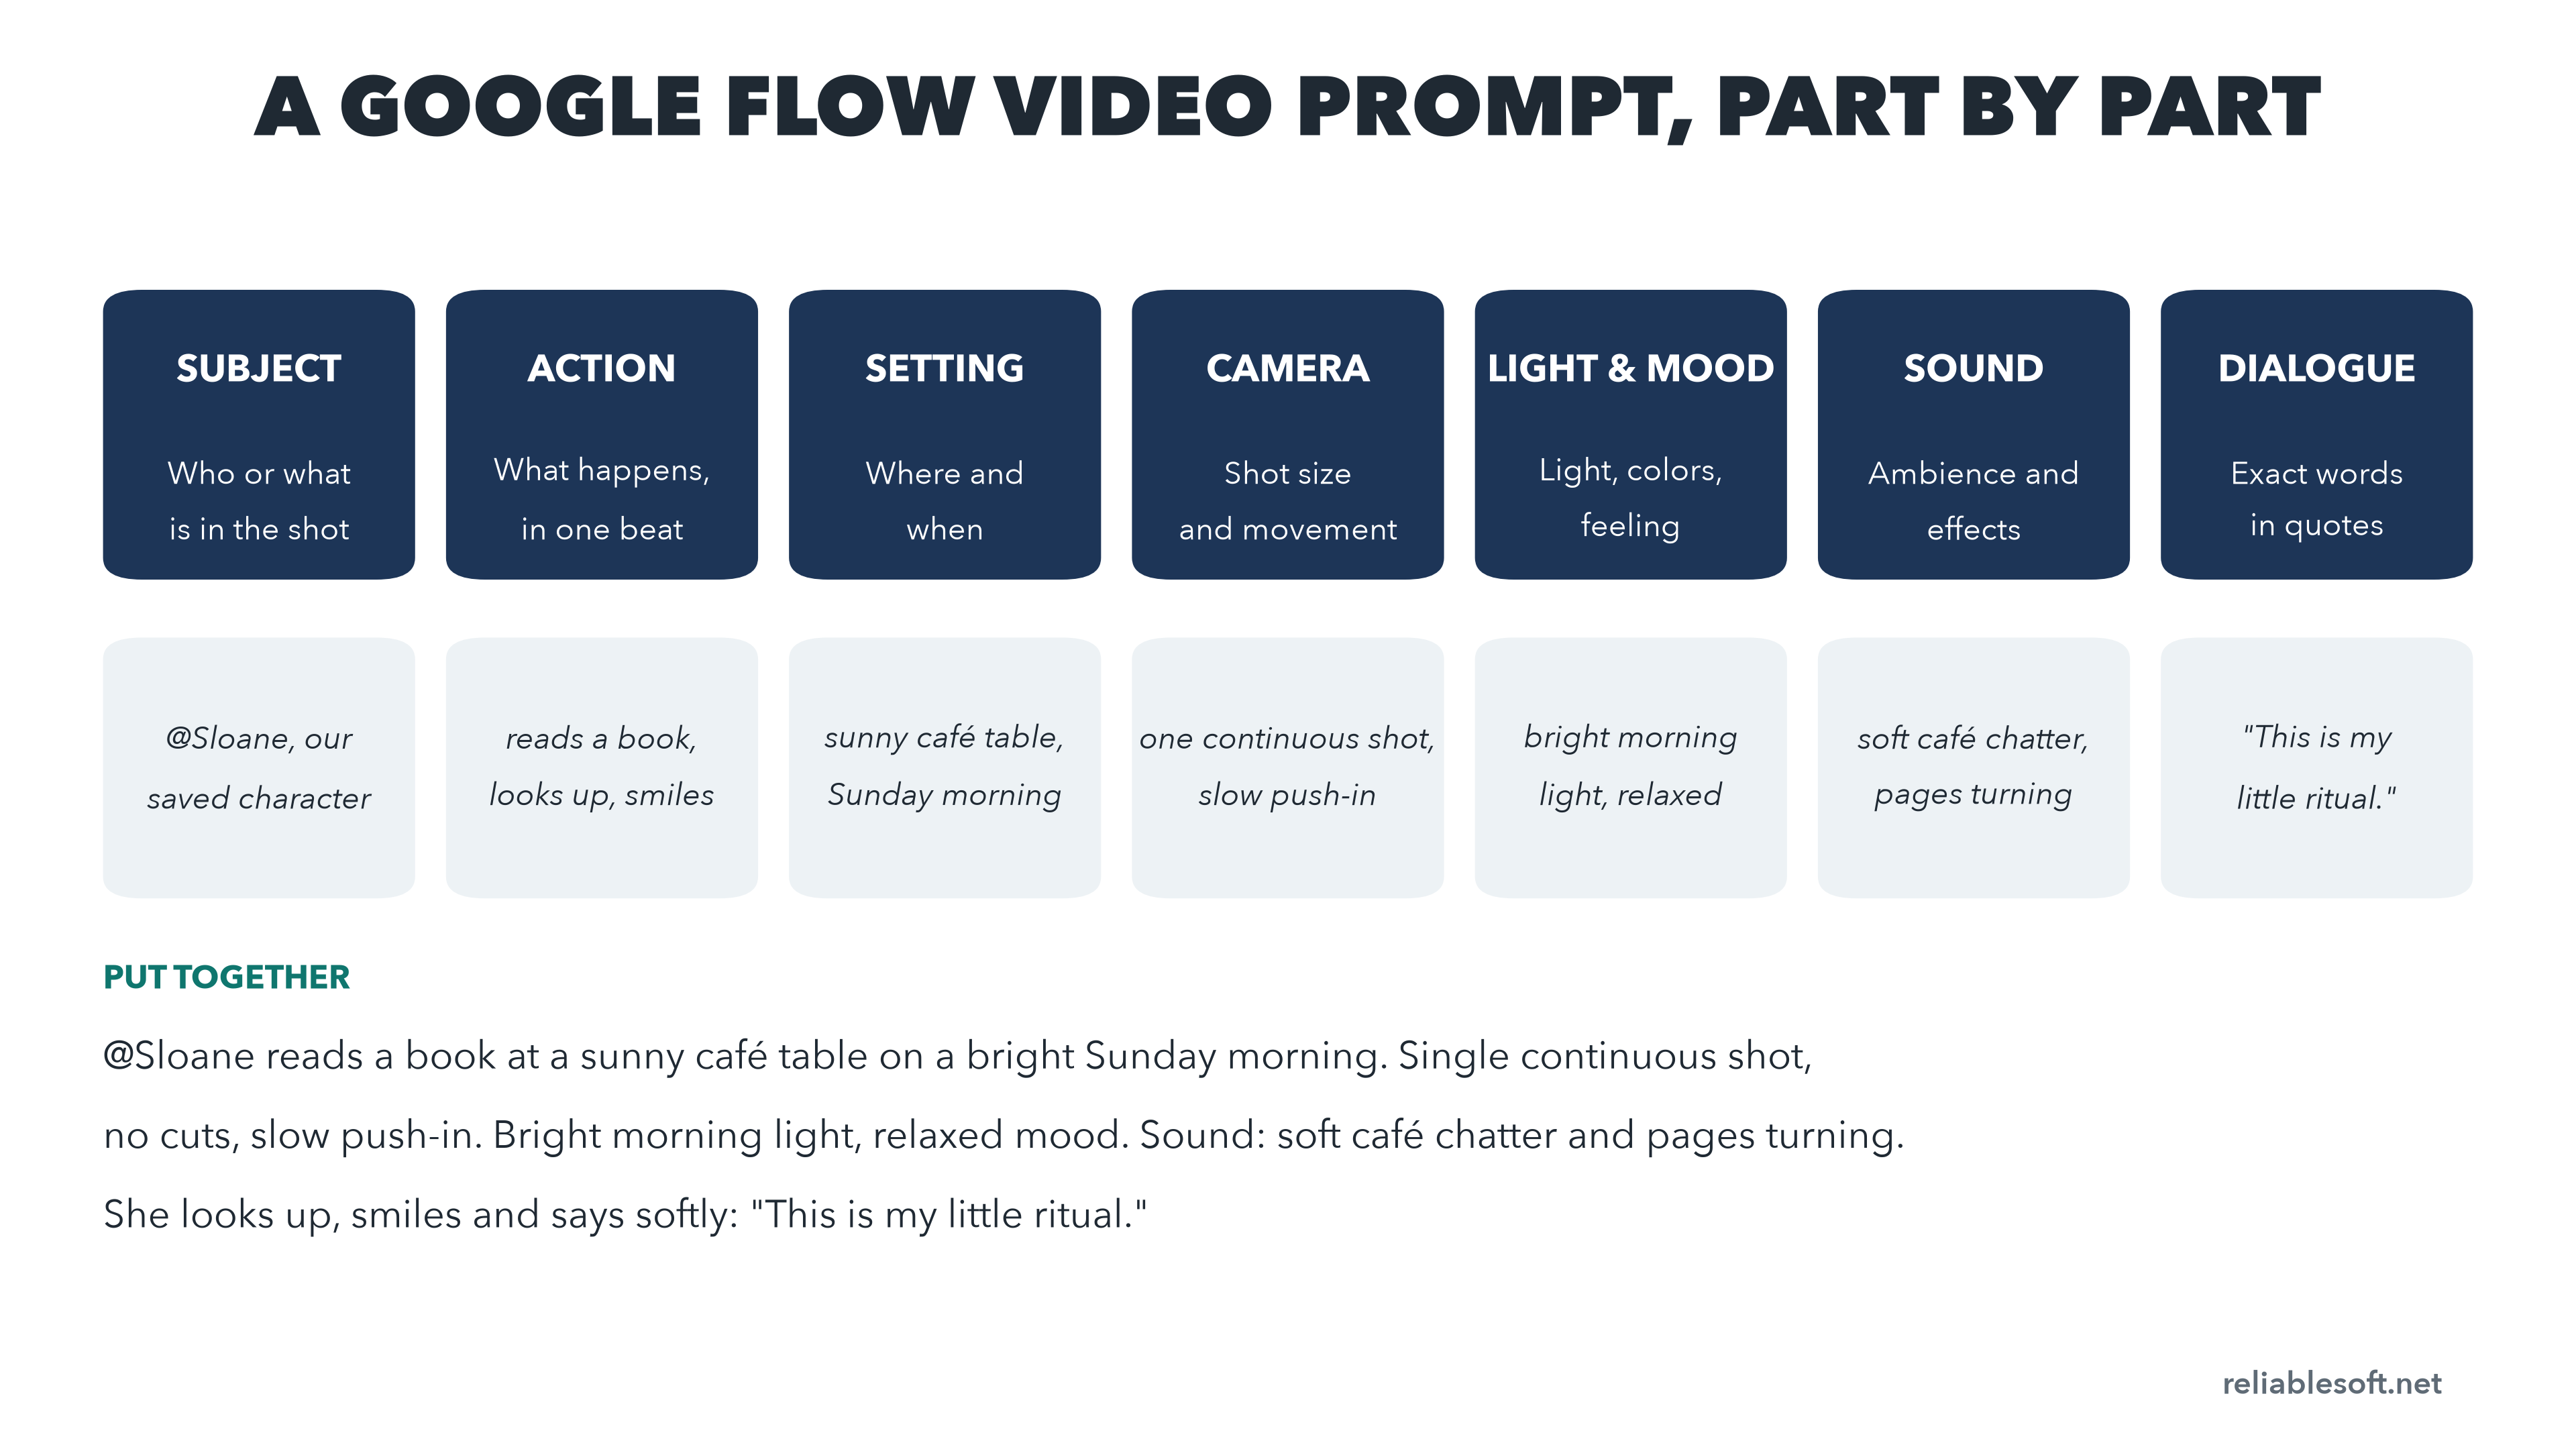
And these tips saved me credits:
- Add "single continuous shot, no cuts" to every clip prompt. Without it, Flow may put several shots in one clip.
- Describe one moment per clip. A clip is 4 to 10 seconds. If you need more, plan more clips and join them in Scenes.
- Put dialogue in quotes and keep it short. One line per clip works best.
- Spell out any text you want on screen, such as a product label, and check it in every image. Text is where AI makes the most mistakes.
- Say what should stay the same when you edit an image or clip ("keep everything else exactly the same").
- Use a 360p draft or Veo 3.1 Lite to test a new prompt, then make the final version.
- Don't name real people or famous brands. Flow blocks videos of prominent people.
If you want to get better at writing prompts for any AI tool, read my guide to prompt engineering.
Common Beginner Mistakes (and How to Fix Them)
| Problem | Why it happens | How to fix it |
|---|---|---|
| Several shots inside one clip | The model tries to tell the whole story in one clip | Ask for "a single continuous shot, no cuts", or trim the extra shot in Scenes |
| Wrong or garbled text on a product | AI models still struggle with text | Spell out the exact text and fix the image before you turn it into video |
| Your brand rules are ignored | Agent instructions only apply when the agent is on | Turn the agent on, or paste the rules into your manual prompt |
| A sudden jump at the end of a Frames clip | The start and end frames are too different | Make the frames closer, or describe the change over time |
| Credits gone before the video is right | Generating clips before the storyboard is final, or using x4 outputs | Fix the text storyboard first (it's free) and generate one output per clip |
| A "Failed" clip | A safety filter or a busy server | Click retry. Failed generations are refunded. If it fails again, reword the prompt. |
| Your screen looks different from a tutorial | Features depend on your plan, your country and whether you use the web or the app | Check your plan in the profile menu and use Chrome on a computer |
| Can't generate video in the afternoon | Peak-hour limits for free accounts (about 2 PM to 5 PM UTC) | Make images and storyboards then, and generate video outside those hours |
Key Learnings
Google Flow lets anyone make short videos with AI, and the free 50 daily credits are enough to learn how it works. The secret to good results without wasted credits is the order you work in.
Set your rules, brief the agent like a film crew and fix everything in the free text storyboard. Then generate one clip per shot, as single continuous shots, and use Characters to keep people consistent. Finally, trim and join your clips in Scenes.
Expect a few clips to need a fix. In my project, the first round of clips had cuts inside them, a label came out wrong and the start and end frames clip jumped at the end. Each one was easy to fix once I knew why it happened.
To plan where your videos will go and how they fit your marketing, start with my guide to video marketing.
FAQ
Are Google Gemini and Flow the Same?
No. Gemini is Google's AI assistant, and it can make short videos inside a chat. Flow is a separate app built for making videos: it has projects, an agent that plans shots, characters, a timeline and downloads in higher quality. Both use the same Google AI subscription.
What's the Difference Between Google Flow and Veo?
Veo is one of Google's video models. Flow is the app where you use it, together with Gemini Omni Flash for video and Nano Banana for images.
How Do I Get Access to Google Flow?
Go to flow.google.com and sign in with a Google account, or download the Flow app. You need to be 18 or older and live in a country where Flow is available. You don't need a subscription to start.
How Long Can a Google Flow Video Be?
A single clip is up to 10 seconds with Gemini Omni Flash and up to 8 seconds with Veo 3.1. For a longer video, make several clips and join them in Scenes, or extend a clip with Veo 3.1 Lite.
Does Google Flow Add a Watermark?
Flow has a Visible watermarking switch in the profile menu. In some countries, a visible watermark is always added. Every video and image also carries SynthID, an invisible watermark that marks it as AI-generated.
Can I Use Google Flow Videos for Commercial Purposes?
Google's terms of service say it won't claim ownership of content you generate. You're responsible for how you use it: follow Google's Prohibited Use Policy and the rules of the platforms where you publish, including any AI disclosure rules for ads and YouTube.
Is Google Flow Worth It?
For short ads, social videos and product clips, yes. You can make in an hour what used to need a shoot, and the free credits let you try it at no cost. It's not built for long videos yet: clips are short, the scene export is 720p, and you'll spend credits on clips that don't work.
Is Google Flow Better Than Other AI Video Generators?
Flow's strengths are the agent, which plans and storyboards for you, characters with their own voice, and sound and dialogue in every clip. The best tool depends on your project, so test a few with the same prompt before you pay for a plan.
Resources to Learn More About AI Video
- Free Google Flow Prompts - every prompt from this tutorial, ready to copy into your own project.
- AI Builders Lab - practical AI workflows and a prompt library for marketers and creators.
- AI Video Production - if you'd rather have us make your training, onboarding or YouTube videos for you.