


Facebook retargeting lets you show ads to people who already know your business: visitors who left your website without buying, customers on your email list, and people who engaged with your Facebook Page or Instagram account.
In this guide, you’ll learn how Facebook retargeting works, which audiences to create for your type of business, and how to set up a retargeting campaign in Meta Ads Manager step by step.
What are Facebook Retargeting Ads?
Facebook retargeting ads are shown to a specific group of people who are already familiar with your brand. By creating custom audiences in Meta Ads Manager, you can retarget people who visited your website (even specific pages), used your app, or interacted with your Facebook Page or Instagram account.
Retargeting ads work because you can show different ads to people based on what they did. For example, you can show a discount code to people who reached your checkout page but did not complete their purchase.
With retargeting, you can bring more people back to your online store, generate more leads, and sell new products to existing customers.
The main benefits of using Facebook for retargeting are:
- You can reach audiences who have already engaged with your brand.
- You can personalize ads for each audience, or for each customer using Advantage+ catalog ads (previously known as dynamic ads).
- You can retarget people who have already become customers with new product offerings.
- You can reach the same audience across Facebook, Instagram, Messenger, and the Audience Network from one campaign.
Your retargeting ads can appear in placements such as the Facebook and Instagram feeds, Stories, Reels, Facebook Marketplace, and Messenger.
How Does Facebook Retargeting Work?
Facebook retargeting works by telling Meta which people you want to reach again. Depending on your business, you can do this in four ways:
Uploading your customer list: This can be a list from your CRM, email software, or eCommerce platform. Meta matches the list against its users using identifiers such as email addresses, phone numbers, and names. There is no single required field, but the more identifiers you include, the more people Meta can match. The list is hashed before it is uploaded.
Using the Meta Pixel on your website: If you want to retarget your website visitors, you need to install the Meta Pixel. The pixel records the pages people visit and the actions they take, such as adding a product to their cart. Meta also recommends using the Conversions API alongside the pixel, which sends the same events from your server and makes tracking more reliable.
The additional advantage of using the pixel is that you can create different audiences based on what people did on your website. With the pixel properly configured, you can also track the results of your retargeting ads.
Using the Meta SDK in your app: If you want to retarget people based on their app activity, the Meta SDK tells Meta which actions people took in your app, such as adding an item to their cart without buying.
Using engagement on Facebook and Instagram: You can also create audiences from people who watched your videos, opened your lead forms, or engaged with your Facebook Page or Instagram account. These audiences don’t need a pixel, which makes them useful if you don’t have a website or your website traffic is small.
Which Retargeting Audiences Should You Create?
The right audiences depend on your type of business and what you consider a conversion. Here are good starting points:
| Business type | Audiences to create | What to show them |
|---|---|---|
| eCommerce store | People who added to cart but didn’t buy; people who viewed products; past buyers | The products they viewed, a discount or free shipping offer for cart abandoners, and new or related products for past buyers |
| Lead generation (services, B2B, courses) | Visitors to your pricing, service, or contact pages who didn’t submit a form; people who opened your lead form but didn’t submit it | A case study, testimonial, free consultation, or free trial |
| Local business | People who engaged with your Facebook Page or Instagram account; people who watched your videos; website visitors | Offers, reviews, and reminders about your location and opening hours |
| App | People who installed your app but didn’t complete an action, such as a purchase or sign-up | The feature or offer that gets them to take that action |
In all cases, exclude people who already converted. There is no reason to keep showing a purchase offer to someone who just bought.
The 7 Steps To Create a Facebook Retargeting Campaign
- Create a Facebook Business page
- Add the Meta Pixel to your website
- Set up pixel events (conversion tracking)
- Create custom audiences
- Create a retargeting campaign
- Create your retargeting ads
- Monitor the performance of your ads
1. Create a Facebook Business page
The first step before starting a retargeting campaign is to create a Facebook Business page.
You need a Facebook Page to advertise on Facebook. Your ads show your Page’s name and profile picture, so they appear to come from your business and not from a personal profile. Add your logo as the profile picture so people recognize your brand in their feed.
If you don’t already have a Facebook Page, create one. The process takes a few minutes and it’s free.
2. Add the Meta Pixel to your website
The next step is to add the Meta Pixel to your website. The pixel is a piece of code that lets Meta measure the actions people take on your website and add them to your retargeting audiences.
To create a pixel, go to Meta Events Manager, click Connect data, select Web, and give your pixel a name. Meta then checks your website URL for a partner integration. If you use a platform like WordPress or Shopify, a partner integration lets you install the pixel without editing code. Otherwise, you can add the code manually or with a tag manager. Meta’s guide to setting up the Meta Pixel walks you through each option.
Meta also recommends setting up the Conversions API. It works together with the pixel and sends events from your server, so fewer conversions are lost to ad blockers and browser restrictions.
Even if you only plan to retarget an uploaded customer list, install the pixel so you can measure the results of your campaigns.
3. Set up pixel events (conversion tracking)
After adding the pixel to your site, the next step is to set up events. Events are actions people take on your website that you want Meta to know about.
For example, adding a product to the shopping cart, signing up for your newsletter, submitting a contact form, or completing a purchase.
By default, the pixel tracks which pages people visit (PageView). To track other actions, open Events Manager and set up standard events. You can do this in three ways:
- A partner integration, if your website platform supports one. This is the easiest option for most stores.
- The event setup tool, which lets you add events to buttons or page URLs on your website without writing code.
- Adding the event code manually, usually with a developer’s help.
What kind of events do you need?
This depends on your retargeting strategy and what you consider a conversion. If you have an eCommerce store, you need events for “Add to Cart”, “Initiate Checkout”, and “Purchase.” If your goal is to get leads through a contact form, set up a “Lead” event that fires when the form is submitted.
A useful tip from Meta: set up the purchase event on your thank-you page, not on the “Buy now” button. A button click fires even when the payment fails, while the thank-you page only loads after a successful order.
For more information on how to set up events, go through the following resources:
It’s important not to skip this step. Meta’s delivery system uses event data to optimize your campaigns, and you need events to build audiences such as “added to cart but didn’t buy.”
4. Create custom audiences
The next step is to create custom audiences. In simple terms, custom audiences are groups of people you want to show your ads to. As explained above, you can build them from your website visitors, customer lists, app activity, or engagement on Facebook and Instagram.
Follow these steps to create a website retargeting audience:
Open Audiences in Meta Ads Manager.
Click Create audience and select Custom audience.
Meta will ask you to choose a source. Under your sources, you’ll find Website, Customer list, App activity, and Catalog. Under Meta sources, you’ll find options such as Video, Instagram account, Lead form, Facebook Page, and Events.
For this tutorial, we’ll use Website as the audience source. You can create an audience from a different source depending on your business type.
You can use more than one custom audience in a retargeting campaign. For example, you can combine a customer list and website visitors in the same ad set.
Select Website and click Next. On the next screen, you define the rules for your audience.
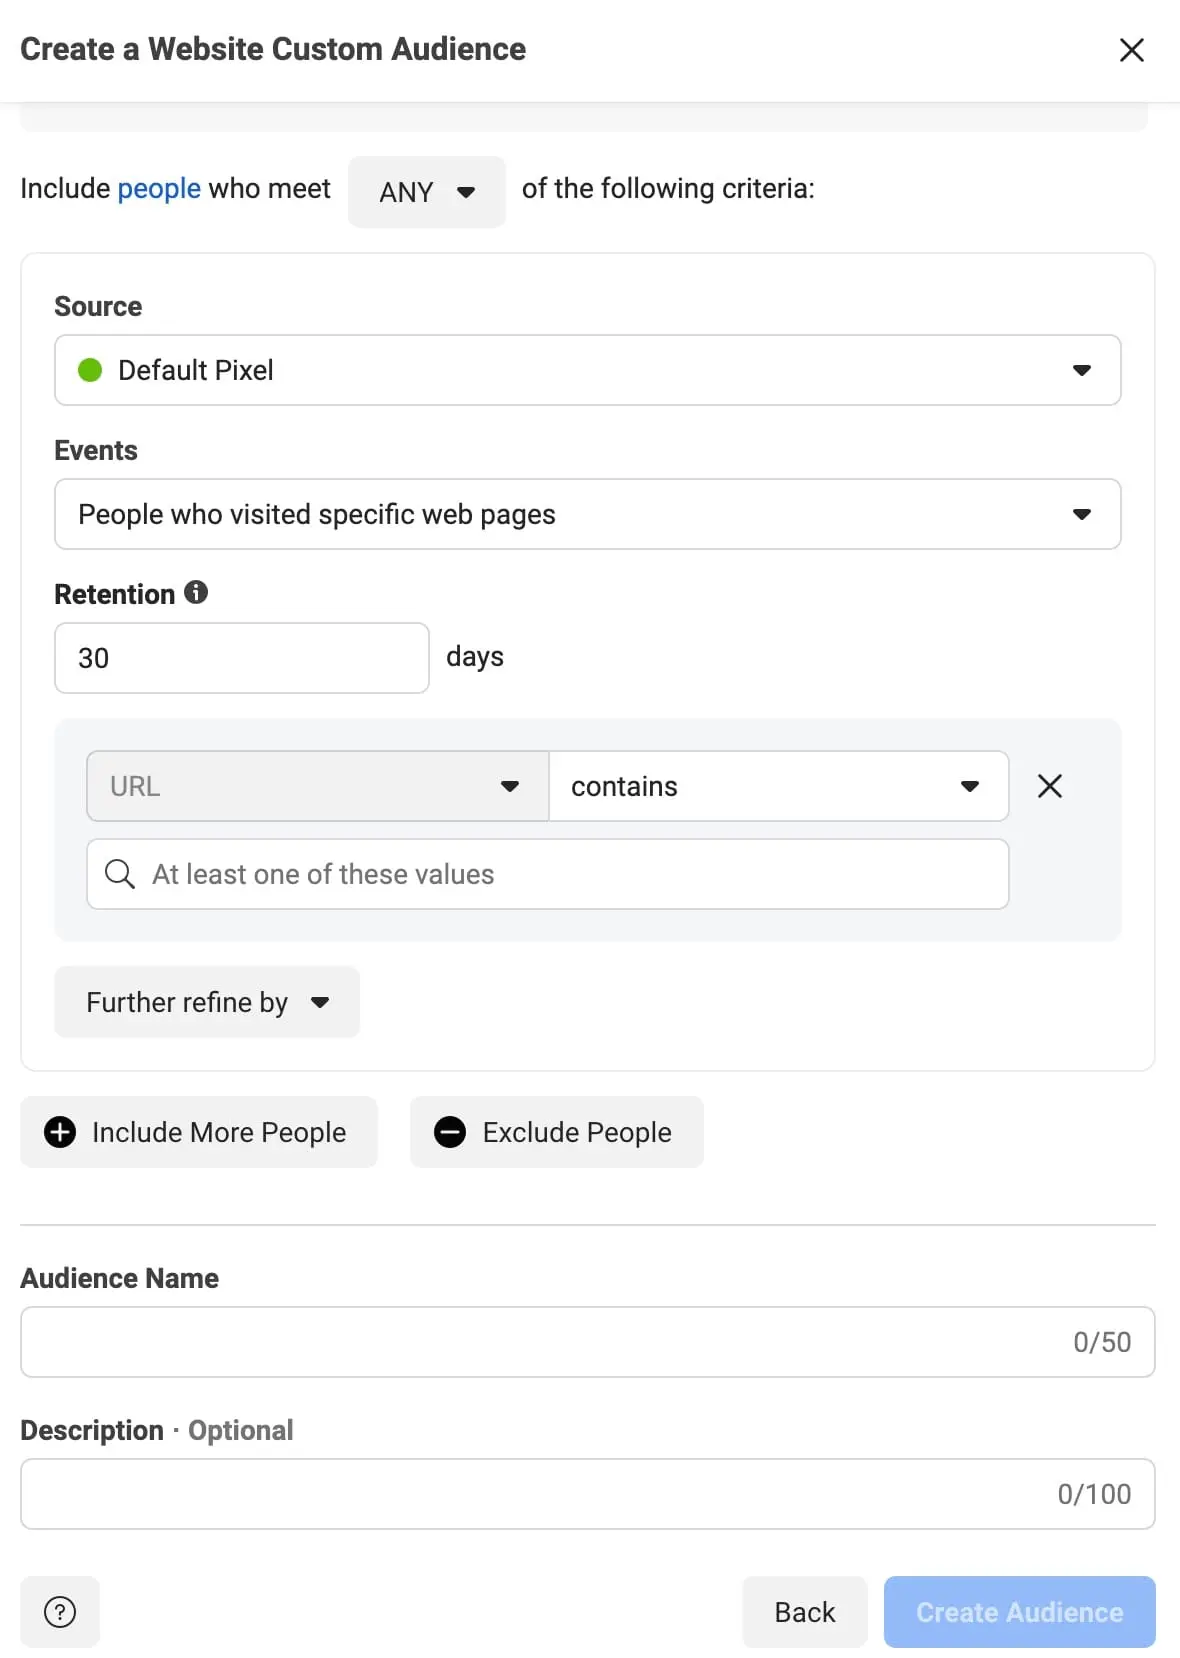
Source: Select the Meta Pixel to use for this audience.
Events: Choose which visitors to include. The main options are:
- All website visitors
- People who visited specific web pages
- Visitors by time spent
- People who triggered one of your events
Retention: Enter how many days people stay in the audience after their last visit, up to 180 days. The audience starts filling from the day you create it and does not include earlier visits.
All website visitors: This rule includes everyone who visits the website where your pixel is installed.
People who visited specific web pages: This rule includes people who visited pages that match a URL condition. The available URL conditions are:
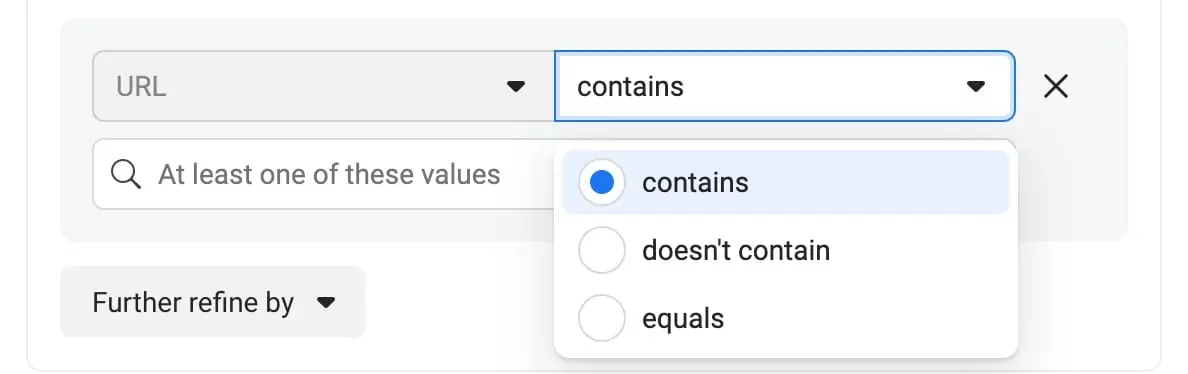
Contains: If you sell clothes and want an audience of people who looked at summer clothes, include people who visited URLs that contain “summer.”
Doesn’t contain: If you sell tables, chairs, and drawers and want to reach people who viewed tables and chairs, include people who visited URLs that don’t contain “drawers.”
Equals: If you want to reach people who visited one specific page, such as the page of your most expensive product, include people who visited that exact URL.
Visitors by time spent: You can create an audience of your most engaged visitors, the top 5%, 10%, or 25% by time spent on your website. You can combine this rule with specific pages and a retention period.
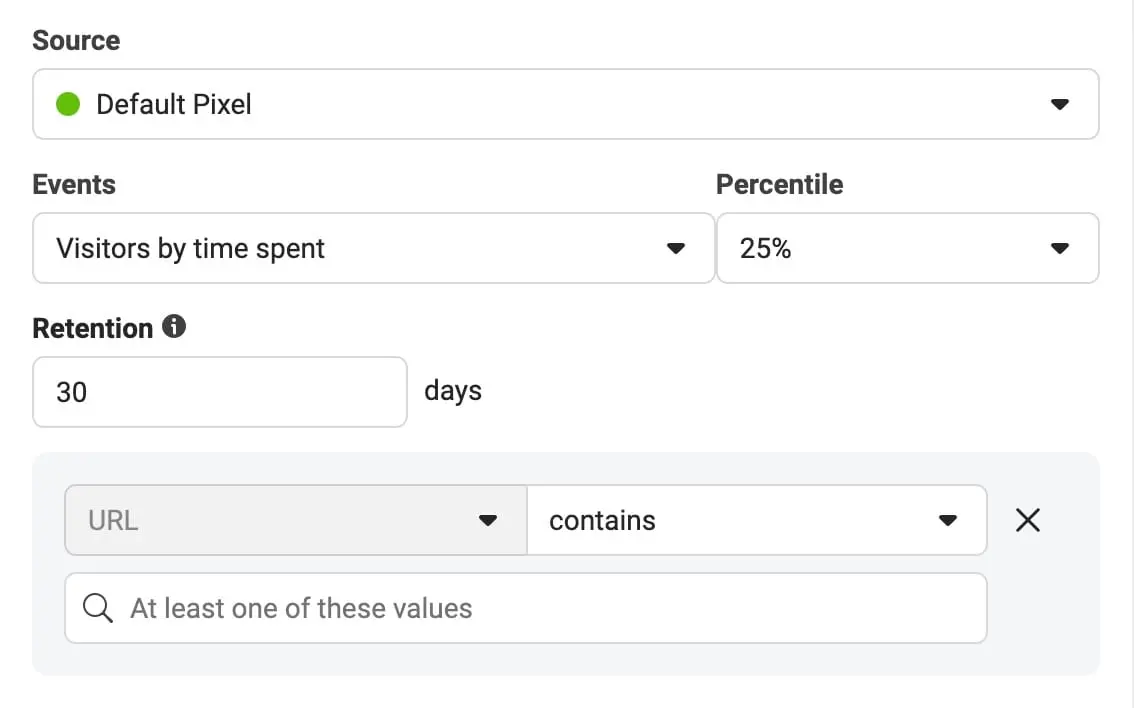
For example, you can create an audience of the top 25% of visitors who viewed your sales page in the last 30 days.
Events: You can use one of the events you set up in Step 3 as the source for your audience, such as AddToCart or Purchase.
You can also click Include more people or Exclude people to combine rules. Meta allows up to five rules per audience.
What custom audiences do you need to create?
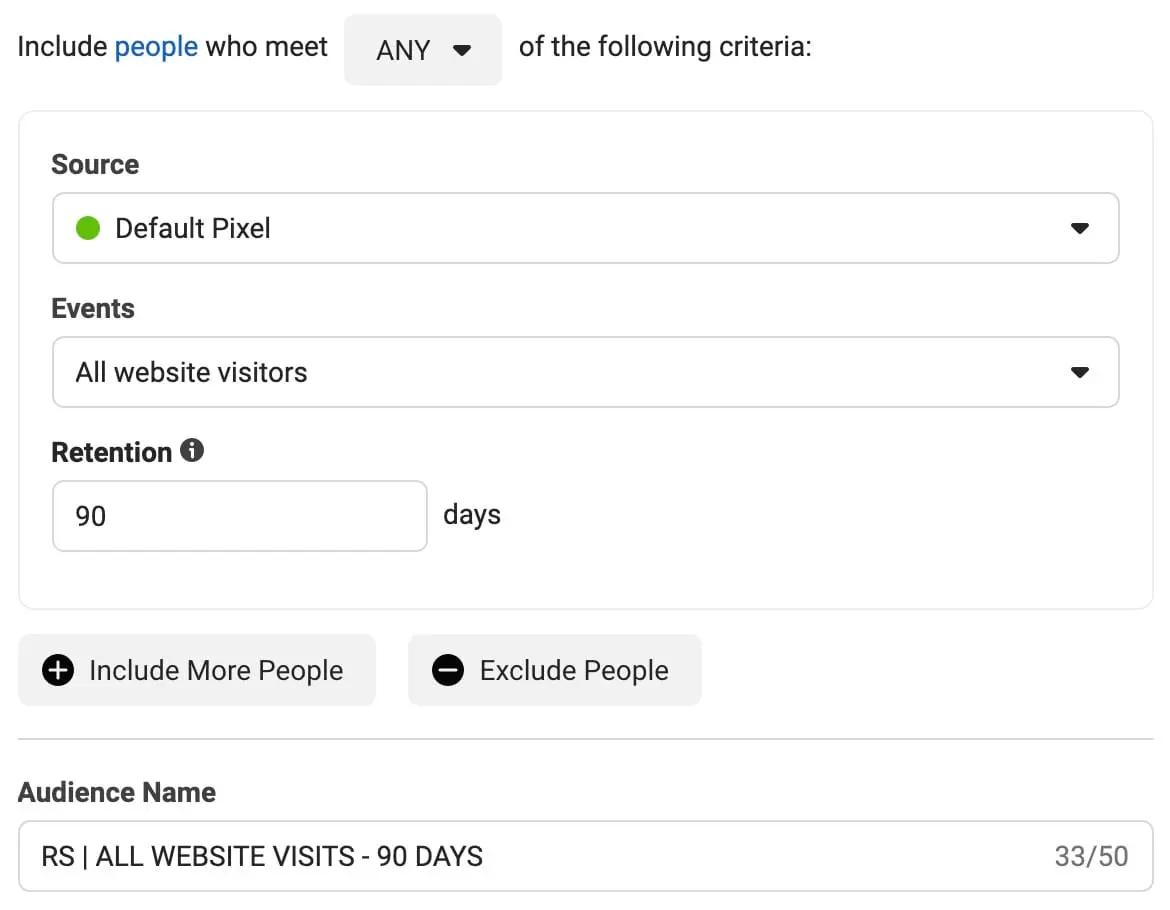
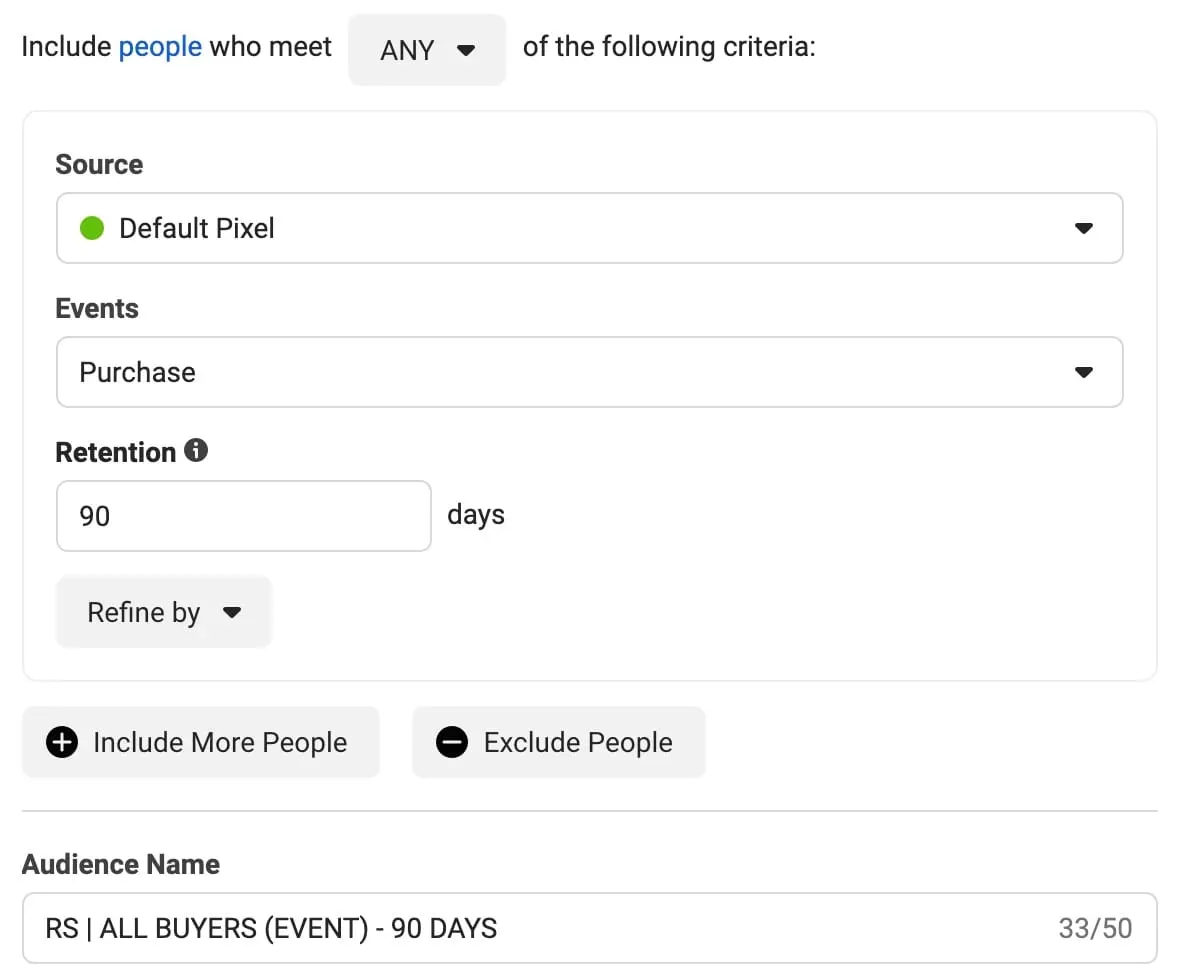
In this tutorial, our goal is to show ads to people who visited our website in the past 90 days but did not make a purchase. To do this, we need two audiences:
1. “All Website Visits - 90 Days” includes people who visited any page on our website in the last 90 days. This is how the rules for this audience look:
2. “All Buyers (Event) - 90 Days” includes everyone who purchased a product from our website in the last 90 days. This is how the rules for this audience look:
After you create an audience, it needs time to fill up. You can check its status in Audiences before using it in a campaign.
5. Create a retargeting campaign
After creating your custom audiences, the next step is to set up your retargeting campaign.
Follow these steps:
Go to Meta Ads Manager and click + Create.
Select Sales as the campaign objective. If your goal is leads instead of purchases, select Leads. Give your campaign a name and set your budget.
At the ad set level, configure the following settings:
Conversion location and event: Choose your website as the conversion location and select the Purchase event (or the Lead event for lead generation).
Audience: This is the most important setting in a retargeting campaign. Ads Manager applies Advantage+ audience by default when it’s available. With Advantage+ audience, the custom audiences you add are only suggestions, and Meta can show your ads to other people if it expects better results. That works well for finding new customers, but Meta itself recommends Advantage+ audience for almost all campaign types except retargeting campaigns.
To keep your ads limited to your retargeting audience:
- Select Further limit your audience (or Further limit the reach of your ads) and add the “All Website Visits - 90 Days” audience under custom audiences.
- Uncheck Use as a suggestion if the box appears, so the audience becomes a hard limit.
- Under Show more controls, use Exclude these custom audiences to exclude the “All Buyers (Event) - 90 Days” audience.
We exclude buyers because there is no reason to show a purchase offer to people who have already converted.
Locations: Only set a specific location if you sell in a particular country or region.
Leave the rest of the options at their default values and continue to the ad level to create your ads.
6. Create your retargeting ads
The final step before starting your campaign is to create your ads.
Ad creation matters because people in your retargeting audience have already seen your business once and decided not to act. Your ads need to give them a reason to come back.
While I can’t tell you exactly what to show in your ads (this depends on your products or services), these tips will make your ads more effective.
Provide multiple options for primary text: The primary text appears above your image or video. Add several text options, and Meta will show the combination that performs best. Use the preview to make sure the important part of your text is visible without clicking “See more.”
Keep your headlines short: Use headlines to highlight the main benefit of your offer, and add a couple of headline options as well.
Add a description: This is optional but recommended. The description appears below the headline in some placements. Keep it to one line.
Remind people about the benefits of your product or service: Focus on what people get from buying, such as a money-back guarantee, free updates, lifetime access, or personal support.
Give cart abandoners a reason to finish: People who added a product to their cart were close to buying. A discount code, free shipping, or a reminder that stock is limited can bring them back.
Use Advantage+ catalog ads if you have a product catalog: Advantage+ catalog ads (previously known as dynamic ads) automatically show each person the products they viewed or added to their cart on your website. They need a product catalog and pixel events that include product IDs.
Create a few ads per ad set: Have at least three active ads in each ad set, so Meta can deliver the ones that perform better and people don’t see the same ad every time. Mix image and video ads, because people respond to different formats.
Keep your videos short: People in your retargeting audience already know you, so get to the point in the first few seconds.
Preview your ads in every placement: Before publishing, check how your ad looks in each placement using the preview. Different placements crop images and videos and show text differently, so fix any issues before you publish. Meta’s Ads Guide lists the specs for each placement.
Use the Meta Ad Library to get ideas: The Meta Ad Library lets you search all ads currently running on Facebook and Instagram. You can use it to see what your competitors are running and get ideas for your own ads.
- Visit the Meta Ad Library
- Search for a company name or keyword
- Click on an ad to view more details.
Once you reach this point, you’re ready to start your first Facebook retargeting campaign. Click Publish to send your campaign for review.
7. Monitor the performance of your ads
There are two ways to monitor the performance of your campaigns. The first is to use the data in Meta Ads Manager, and the second is to use Ads Reporting.
With Ads Reporting, you can create detailed reports on your campaigns’ performance, export the data, and share the reports with your team.
For this tutorial, we will focus on monitoring your campaigns in Ads Manager, the most commonly used tool. Once you know what to monitor, you can easily create a report with Ads Reporting.
Important campaign metrics to track
Our retargeting campaign aims to increase purchases. So, when monitoring the ads’ performance, we should concentrate on metrics related to conversions (such as Add to Cart, Checkout, and Purchase).
In addition to conversions, you should monitor other key metrics like cost per click and click-through rate, which give you a more accurate picture of how your campaigns are performing.
To add these metrics in Ads Manager, click the Columns dropdown and select Customize columns. Search for each metric and select it, then drag the selected columns into the order you want.
Add the following columns to your report:
Delivery shows the current status of your campaign (active, learning, inactive, and so on).
Results is the total number of conversions generated, based on your conversion event. If your conversion event is Purchase, the Results column shows the number of purchases generated by the campaign.
Cost per Result is the average cost per result: the amount spent divided by the number of results.
Amount Spent is the total amount spent in the selected time period.
Reach is the number of people who saw your ads at least once.
Impressions is the number of times your ads were on screen.
Frequency is the average number of times each person saw your ads. Retargeting audiences are small, so watch this metric closely.
Link Clicks is the number of clicks on links within the ad that led to your website or another destination.
CPC (Cost per Link Click) is the average cost for each link click: the amount spent divided by link clicks.
CTR (All) is the percentage of times people saw your ad and clicked on it.
Adds to Cart is the number of add-to-cart events attributed to your ads.
Checkouts Initiated is the number of initiated checkout events attributed to your ads.
Cost per Add to Cart is the average cost of each add to cart: the amount spent divided by add-to-cart events.
Purchases is the number of purchase events attributed to your ads.
Purchases Conversion Value is the total value of the purchases attributed to your ads.
Cost per Purchase is the average cost of each purchase: the amount spent divided by purchases.
When you’re done, and before closing the window, check Save as preset and give your column set a name. Click Apply to save it. You can then choose your preset from the Columns dropdown every time you open Ads Manager.
Facebook Retargeting Best Practices
Now that you have the most important metrics, let’s examine how to use this data to improve your campaigns’ performance.
1. Let campaigns finish the learning phase before making changes
Don’t rush to conclusions. Every new ad set goes through a learning phase, while Meta’s delivery system works out how to deliver it. According to Meta, ad sets usually exit the learning phase after about 50 results in the week after the last significant edit.
Results during the learning phase are less stable and usually more expensive, so wait until it ends before you judge a campaign. Avoid unnecessary edits too, because a significant edit sends the ad set back into learning.
2. Analyze each ad separately
Go deeper into each campaign and analyze it in detail. Don’t just look at the general picture. Click the campaign name to see the performance of your ad sets and individual ads.
Before you do this, make sure you clearly understand what each metric means, as explained in the previous step.
3. Start with reach, impressions, and frequency
If reach and impressions are low or not increasing as the campaign runs, your audience is too small. For retargeting campaigns to work, you need a decent audience size. If needed, extend the retention period of your audience (up to 180 days) or add more sources, such as Facebook Page and Instagram engagement.
If frequency keeps rising, the same people are seeing your ads over and over. Refresh your ads or widen your audience before people start ignoring them.
4. Look at link clicks, CPC, and CTR
If your ads are being delivered, the next metrics to check are link clicks, cost per link click, and click-through rate. Together, they show what share of the people who saw your ads clicked on them and how much you paid for each click.
Click the campaign and then an ad set to get to the ads view, and compare these metrics across your ads. If some ads get a much lower CTR than others, replace them with new ads that use a different angle.
Examine which ads perform better than others and create new ads with the same concepts. For example, if an image ad performs well, create a video ad with the same theme and message. Keep both running and compare the results.
5. Examine the cost per purchase
The cost per purchase shows how much you pay Meta for each purchase generated by your retargeting campaign, and it’s perhaps the most important metric to follow.
Your cost per purchase should be low enough that you make a profit on each sale after other costs, such as product and delivery costs.
If you sell products at different prices, use the purchase conversion value together with the cost per purchase to understand what it costs you to make a sale.
At the end of the day, your goal is to lower the cost per purchase so that you generate more sales from the same budget.
Does Facebook Retargeting Still Work?
Yes, but it works differently than it did a few years ago.
Website audiences are smaller. Since Apple’s iOS 14 update, iPhone users can opt out of tracking, and Meta notes that website custom audiences may not include events from some iOS 14 users. Browser privacy features and ad blockers remove more visitors. This is why the Conversions API, longer retention windows, and engagement audiences from Facebook and Instagram have become more important.
Meta’s AI now finds audiences on its own. With Advantage+ audience, Meta uses signals such as your pixel data and past ad interactions to decide who sees your ads, even in campaigns that don’t target a retargeting audience. That’s why many advertisers now run broad campaigns to find new customers and keep a smaller retargeting campaign for their warmest audiences, such as cart abandoners and past buyers.
Retargeting still needs its own setup. If you want your ads shown only to people who already know you, you have to turn Advantage+ audience off at the ad set level, as shown in Step 5. Meta itself recommends Advantage+ audience for almost everything except retargeting.
Facebook Retargeting FAQ
How much does Facebook retargeting cost?
There is no fixed price. You set a daily or lifetime budget, and your costs depend on your audience, your industry, the placements, and how well your ads perform. Because retargeting audiences are small, retargeting campaigns usually need smaller budgets than campaigns aimed at new customers.
How long should people stay in a retargeting audience?
Website custom audiences can keep people for up to 180 days. Use short windows (7 to 30 days) for cart abandoners and other high-intent actions, and longer windows (90 to 180 days) for general website visitors, especially if your traffic is small.
Do I need the Meta Pixel to retarget on Facebook?
You need the pixel (or the Conversions API) to retarget your website visitors. You don’t need it to retarget an uploaded customer list or people who engaged with your Facebook Page, Instagram account, videos, or lead forms.
Can I retarget Instagram users with Facebook ads?
Yes. Meta Ads Manager runs ads on both Facebook and Instagram. You can create a custom audience from people who engaged with your Instagram account and show them ads on either platform.
What is the difference between retargeting and remarketing?
The terms are often used interchangeably. Retargeting usually refers to paid ads shown to people who visited your website or engaged with your brand, while remarketing usually means reaching people whose contact details you already have, for example by email. Read our guide to remarketing vs retargeting for the full comparison.
Conclusion
Retargeting is one of the best ways to increase conversions, and Facebook retargeting ads are one of the most effective tools for it.
The process is straightforward: install the Meta Pixel, set up your events, create audiences of people who didn’t convert, and run a campaign that is limited to those audiences. Then let the campaign finish its learning phase and improve it based on your cost per result.
If you want to go further, our Retargeting Course shows you how to plan a retargeting strategy and set up retargeting campaigns on both Facebook and Google Ads. For the full picture of Meta advertising, see our Facebook Ads Course, our guide on how to become a Facebook ads specialist, and our list of the best Facebook ads courses.